Policy App Dokumentation

Alles, was Sie zum Konfigurieren, Erstellen, Prüfen, Übersetzen, Veröffentlichen und Unterzeichnen von Richtlinien in der AXSOS Policy App benötigen, übersichtlich nach Rollen gegliedert.

Benutzer-
handbuch zur Policy App

1

Einführung

Die AXSOS Policy App ist eine Lösung auf Basis von Microsoft Power Apps, mit der Organisationen ihre internen Richtlinien zentral verwalten, strukturieren und überwachen können. Sie vereinfacht jede Phase des Richtlinien-Lebenszyklus: Erstellung, Prüfung, Übersetzung, Veröffentlichung und Bestätigung durch die Mitarbeitenden. 


So wird sichergestellt, dass Richtlinien einheitlich geprüft werden, leicht auffindbar sind und von den betroffenen Personen formell unterzeichnet werden. Dieses Handbuch ist danach gegliedert, welche Aufgaben die einzelnen Benutzertypen haben. Über das Inhaltsverzeichnis gelangen Sie direkt zu Ihrer Rolle. Alternativ können Sie das gesamte Handbuch lesen, um einen vollständigen Überblick über die Funktionsweise der App zu erhalten.

1.1

Der Richtlinien-Lebenszyklus

Jede Richtlinie durchläuft dieselben Phasen, unabhängig davon, wer sie erstellt. Das folgende Diagramm zeigt den vollständigen Lebenszyklus, einschließlich der optionalen Zweige für die rechtliche Prüfung, die inhaltliche Prüfung, die Übersetzung und die regelmäßige Validierung, die später in diesem Handbuch beschrieben werden.

Interactive Policy Life Cycle map
70%
Phase
User type
Follow a path

Jede Richtlinie durchläuft dieselben Phasen, unabhängig davon, wer sie erstellt. Das folgende Diagramm zeigt den vollständigen Lebenszyklus, einschließlich der optionalen Zweige für die rechtliche Prüfung, die inhaltliche Prüfung, die Übersetzung und die regelmäßige Validierung, die später in diesem Handbuch beschrieben werden.

Interactive Policy Life Cycle map
70%
Phase
User type
Follow a path

Die App unterscheidet vier Benutzertypen. Jedem davon ist später in diesem Handbuch ein eigener Abschnitt gewidmet.

03

Administrator

Konfiguriert die App für die Organisation und kann die Aufgaben aller anderen Benutzertypen übernehmen.

04

Creator

Erstellt Richtlinien, reicht sie zur Prüfung ein, veröffentlicht und übersetzt sie und hält sie dauerhaft auf dem neuesten Stand.

05

Reviewer

Genehmigt Richtlinien oder lehnt sie ab. Es gibt drei spezialisierte Prüfertypen sowie einen Lebenszyklus-Prüfer, der veröffentlichte Richtlinien regelmäßig erneut validiert:

06

End-user (Mitarbeitende von AXSOS)

Sieht die zugewiesenen Richtlinien ein und bestätigt sie per Unterschrift.

2

Aufbau dieses Handbuchs

Die Abschnitte 3 bis 9 sind eigenständige Leitfäden für die einzelnen Benutzertypen: Administrator, Creator, Reviewer, Rechtsprüfer, Sprachprüfer, Lebenszyklus-Prüfer und End-user. Jeder Abschnitt führt Sie von Anfang bis Ende durch die Aufgaben der jeweiligen Rolle, und zwar in der Reihenfolge, in der Sie diese voraussichtlich ausführen. So können Sie nur den Abschnitt lesen, der für Sie relevant ist, ohne an andere Stellen im Handbuch springen zu müssen.

Hinweis

Einige der in diesem Handbuch beschriebenen Felder und Schritte sind optional und hängen davon ab, wie Ihr Administrator die App konfiguriert hat (siehe Abschnitt 3.2). Wenn ein unten beschriebener Schritt in Ihrer Version der App nicht angezeigt wird, wurde er für Ihre Organisation vermutlich nicht aktiviert.

Inhaltsverzeichnis

3

Leitfaden für Administratoren

Als Administrator können Sie alle Aufgaben ausführen, die den anderen Benutzertypen zur Verfügung stehen. Zusätzlich sind Sie dafür verantwortlich, die App für Ihre Organisation zu konfigurieren und den Language Reviewern Sprachen zuzuweisen.

Wenn die Lösung zum ersten Mal zu einer Umgebung hinzugefügt wird, führen Sie den folgenden Flow aus, bevor Sie die Seite App Configuration“ öffnen: (Create First Record in Configuration Table and Languages Table) Dieser Flow legt den ersten Konfigurationsdatensatz an und befüllt die Sprachtabelle, damit der Rest der App korrekt funktioniert.

Auf der Seite App Configuration können Sie als Administrator den Richtlinien-Lebenszyklus an die Anforderungen Ihrer Organisation anpassen. Diese Einstellungen legen fest, welche Abschnitte im Formular zur Erstellung von Richtlinien angezeigt werden und welche Genehmigungsphasen eine Richtlinie durchlaufen muss. Es stehen vier Parameter zur Verfügung, die jeweils auf Required, Not Needed oder Optional gesetzt werden können.

2.2.1 Customization Parameters:

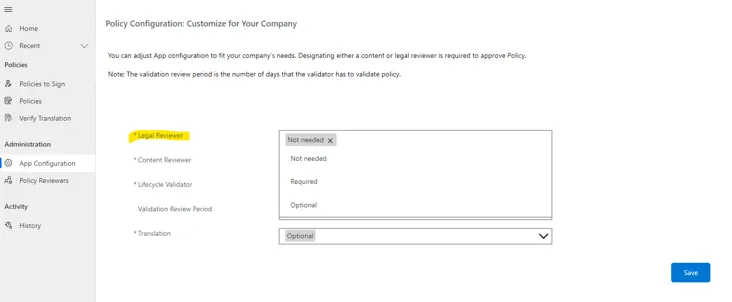
  1. Legal Reviewer: Admins must configure weather a legal review is required for the policies or not, some organizations need their policies to be legally reviewed before sending them to their employees to sign them, this parameter must be set to one of the following options:
  1. Required: will result in the addition of a mandatory section in the policy creation form, where the creator must assign a legal reviewer for the policy. Additionally, it will introduce a new stage in the policy life cycle, requiring legal approval before the policy can be published to users.
  1. Not Needed: will result in the removing the legal reviewer section in the policy creation form. Additionally, it will remove the legal approval stage in the policy life cycle, where legal approval is not required for the policy to be published to users.
  1. Optional: will result in the addition of an optional section in the policy creation form. Here, the creator has the flexibility to decide whether or not to assign a legal reviewer for the policy, if a legal reviewer is assigned to the policy, a new stage will be introduced in the policy life cycle, requiring legal approval before the policy can be published to users, in the other hand, if the creator didn’t assign a legal reviewer to the policy, the legal approval stage will be removed in the policy life cycle, where legal approval is not required for the policy to be published to users.
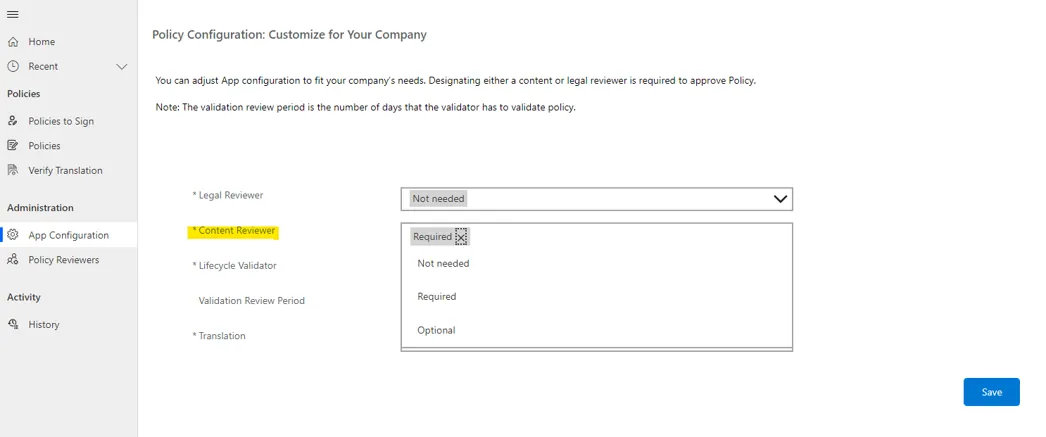
  1. Content Reviewer: Admins must configure weather a content review is required for the policies or not, some organizations need their policies to be reviewed before sending them to their employees to sign them, this parameter must be set to one of the following options:
  1. Required: will result in the addition of a mandatory section in the policy creation form, where the creator must assign one or more content reviewers for the policy. Additionally, it will introduce a new stage in the policy life cycle, requiring reviewer approval before the policy can be published to users.
  1. Not Needed: will result in the removing the content reviewer section in the policy creation form. Additionally, it will remove the reviewer approval stage in the policy life cycle, where reviewer approval is not required for the policy to be published to users.
  1. Optional: will result in the addition of an optional section in the policy creation form. Here, the creator has the flexibility to decide whether or not to assign a content reviewer for the policy, if a content reviewer is assigned to the policy, a new stage will be introduced in the policy life cycle, requiring approval before the policy can be published to users, in the other hand, if the creator didn’t assign a content reviewer to the policy, the approval stage will be removed in the policy life cycle, where approval is not required for the policy to be published to users.
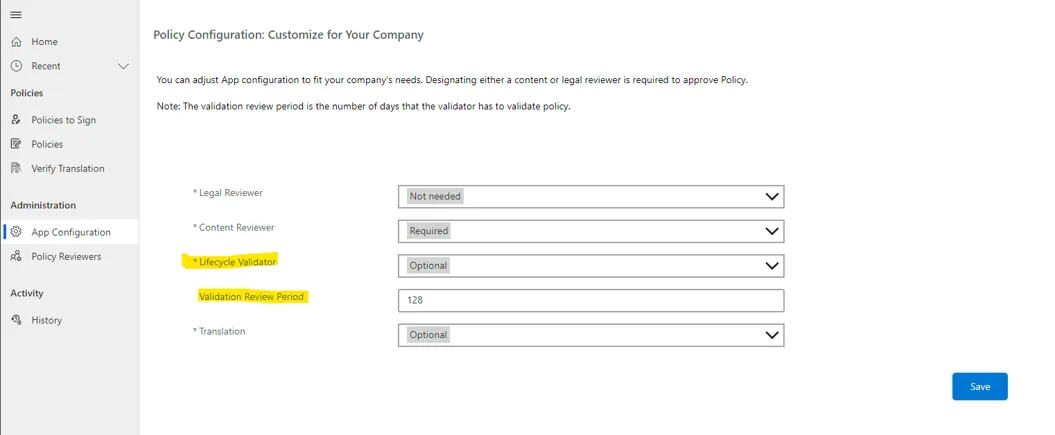
  1. Lifecycle Validator: Admins must configure whether a lifecycle validation is required for the policies or not. Some organizations may require their policies to undergo validation every 6 months or annually while the policy is still published, without necessitating an update., this parameter must be set to one of the following options:
  1. Required: will result in the addition of a mandatory section in the policy creation form. In this section, the creator must assign a lifecycle validator and specify the validation duration (6, 12, 18, 24, 30, 36, 42, 48, 54, 60 months) for the policy. Additionally, a new requirement is introduced in the policy app configurations, termed „Validation Review Period.“ This is the duration specified by the admin for the lifecycle validator to take action. For example, if a policy necessitates annual validation and the „Validation Review Period“ is set to 15 days, the next year’s validation will be shifted by 15 days. The lifecycle validator will then have 15 days to validate the policy; otherwise, the validation review period would be extended to another 15 days and so on. This validation process occurs only after a policy is published and once the specified validation duration has passed.
  1. Not Needed: will result in the removing the lifecycle validator section from the policy creation form. Moreover, it will eliminate the policy validation requirement, making policy validation unnecessary for policies with this configuration.
  1. Optional: will result in the addition of an optional section in the policy creation form. Here, the creator has the flexibility to decide whether or not to assign a lifecycle validator for the policy.
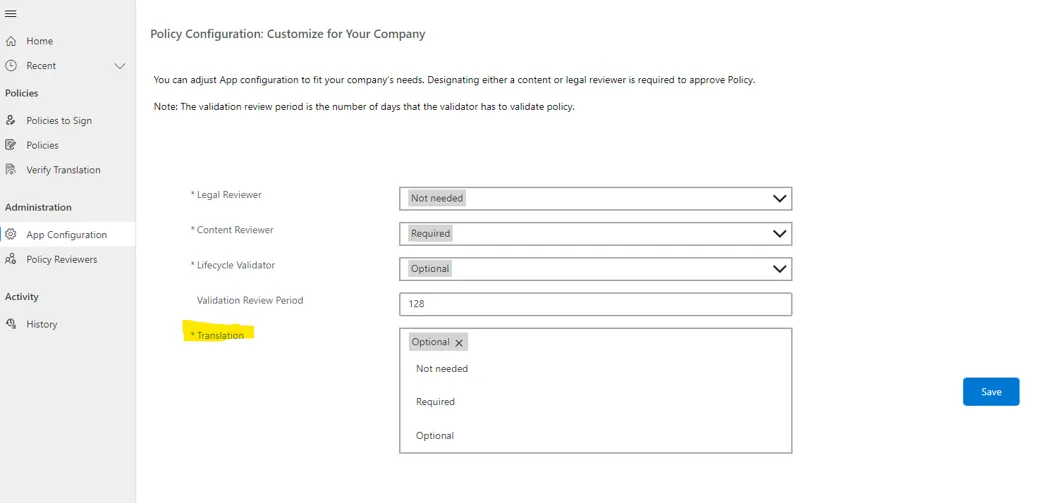
  1. Translation: Admins must configure whether a translation is required for the policies or not. Some organizations may require their policies to be translated to other languages than the base language, this parameter must be set to one of the following options:
  1. Required: will result in the addition of a mandatory section in the policy creation form. In this section, the creator must assign a language reviewer to the policy, resulting in the addition of a language translation corresponding to the language assigned to this reviewer. Additionally, a new requirement is introduced in the policy where the language reviewer has to validate the automatic translation generated by the system.
  1. Not Needed: will result in the removing the language reviewer section from the policy creation form. Moreover, it will eliminate the translation validation requirement, making policy translation unnecessary for policies with this configuration.
  1. Optional: will result in the addition of an optional section in the policy creation form. Here, the creator has the flexibility to decide whether or not to assign a language reviewer for the policy.

Let's break app configurations down for you:

ParameterConfiguration OptionEffect
Legal ReviewerRequired

Adds a mandatory section in the policy creation form for assigning a legal reviewer.

Introduces a legal approval stage before publication.

Not Needed

Removes the legal reviewer section from in policy creation form.

Eliminates the legal approval stage.

Optional

Adds an optional section in the policy creation form for assigning a legal reviewer.

The creator decides on legal reviewer assignment, impacting the approval stage.

Content ReviewerRequired

Adds a mandatory section in the policy creation form for assigning content reviewers.

Introduces a reviewer approval stage before publication.

Not Needed

Removes the content reviewer section from the policy creation form.

Eliminates the reviewer approval stage.

Optional

Adds an optional section in the policy creation form for assigning content reviewers.

The creator decides on content reviewer assignment, impacting the approval stage.

Lifecycle ValidatorRequired

Adds a mandatory section in the policy creation form for assigning a lifecycle validator and choosing validation duration.

Adds a new configuration parameter „Validation Review Period“ which sets the designated time for lifecycle validator to validate a policy.

Not Needed

Removes the lifecycle validator section from the policy creation form.

Eliminates the policy validation requirement.

Optional

Adds an optional lifecycle validator section in the policy creation form.

Creator decides on lifecycle validator assignment impacting the valuation requirement.

TranslationRequired

Adds a mandatory section in the policy creation form for assigning language reviewers.

Introduces a requirement for the language reviewer to validate automatic translations.

Not Needed

Removes the language reviewer section from the policy creation form.

Eliminates the translation validation requirement.

Optional

Adds an optional section in the policy creation form for assigning language reviewers.

The creator decides on language reviewer assignment, impacting the Translation validation requirement.

Important

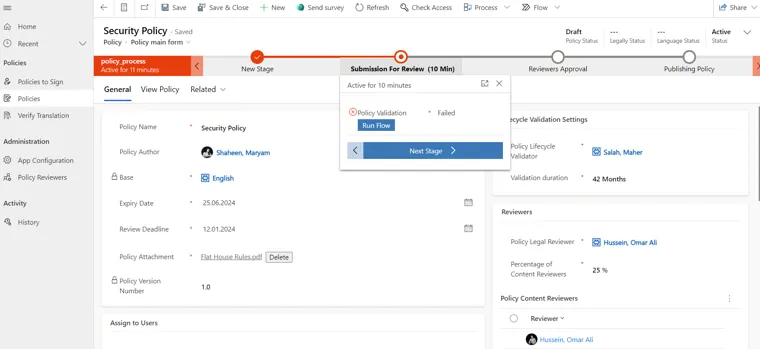
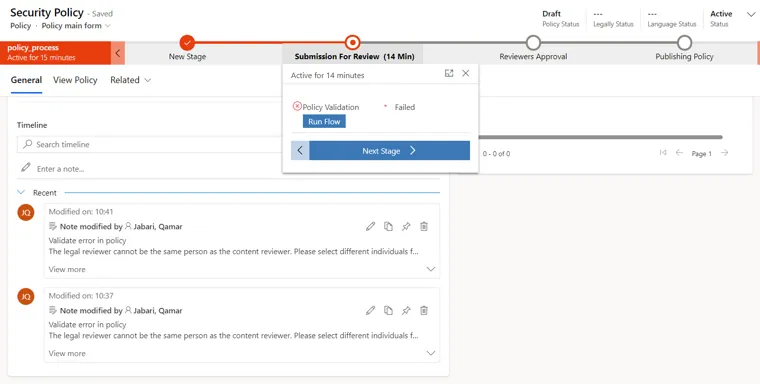
The Legal Reviewer and Content Reviewer assigned to the same policy can never be the same person. The Policy Validation flow will fail if they match, so make sure to assign different individuals.

Alle Reviewer anzeigen

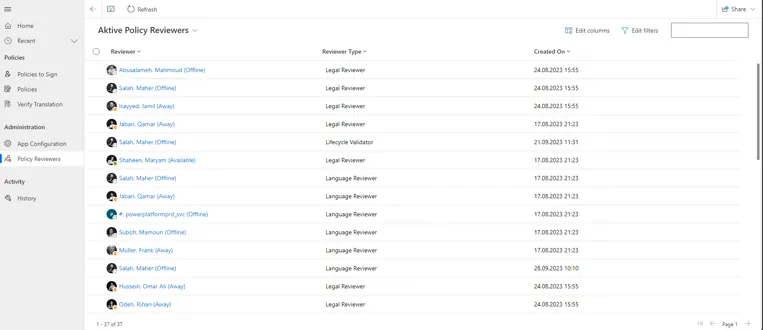
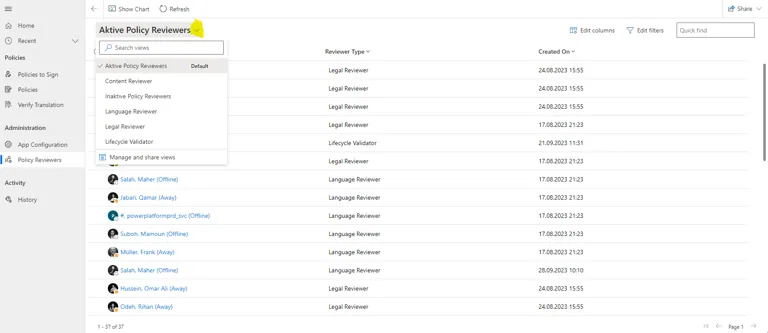
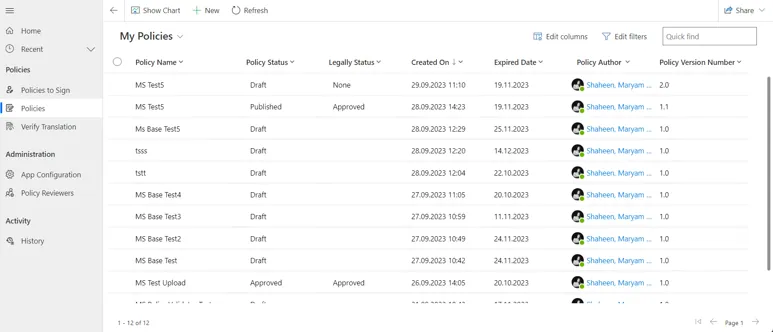
Auf der Seite Policy Reviewers werden alle Reviewer im System aufgelistet. Als Administrator können Sie die Ansicht anpassen oder nach Reviewer-Typ filtern.

Über verschiedene Ansichten können Sie zwischen den Reviewer-Typen wechseln (Inhaltsprüfer, Rechtsprüfer, Sprachprüfer, Lebenszyklus-Prüfer und weitere):

Hinweis

Damit Benutzer in der Liste Policy Reviewers erscheinen, muss ihnen eine der Reviewer-Rollen zugewiesen sein. Ein automatisierter Flow fügt Reviewer täglich anhand von Rollenänderungen hinzu oder entfernt sie.

Wenn eine Rollenänderung sofort sichtbar sein soll, führen Sie den Flow (Add / Remove Reviewers ) manuell aus oder wenden Sie sich an den Support.

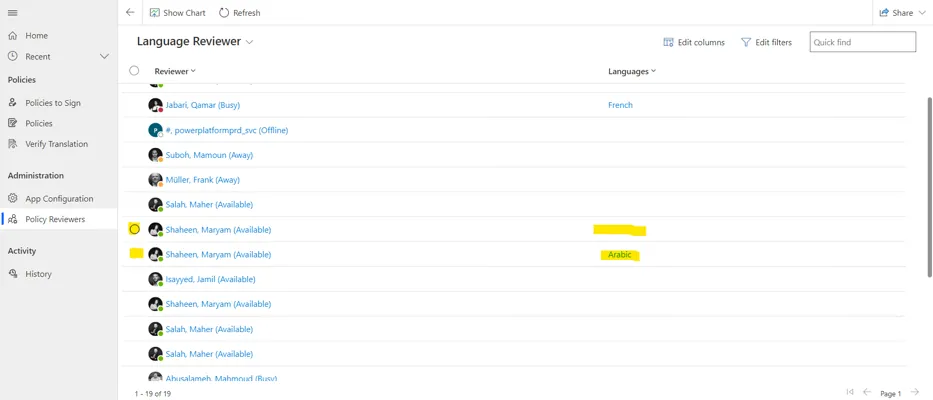
Sprachen den Sprachprüfern zuweisen

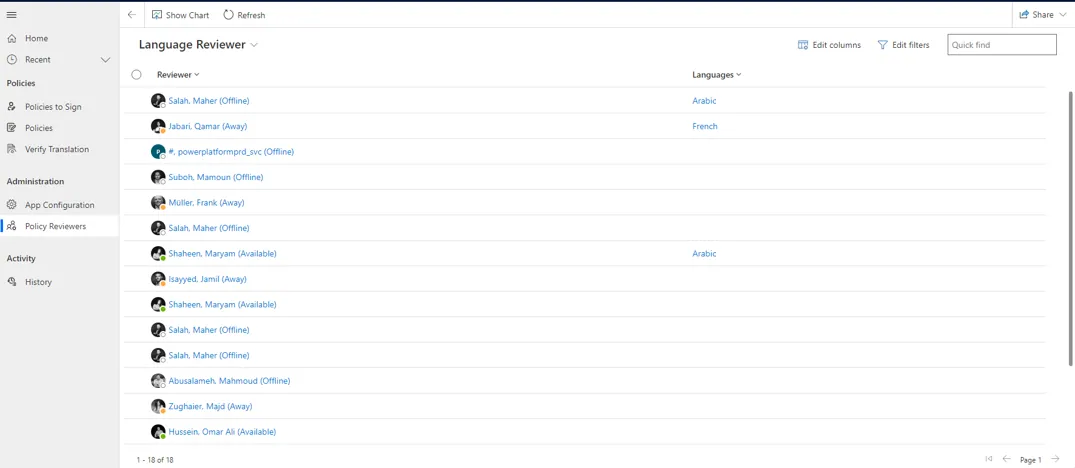
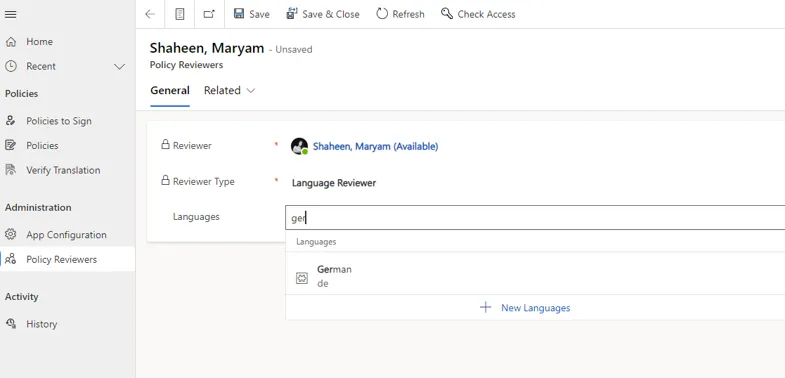
Als Administrator können Sie den Sprachprüfern Sprachen zuweisen. Gehen Sie dazu wie folgt vor:

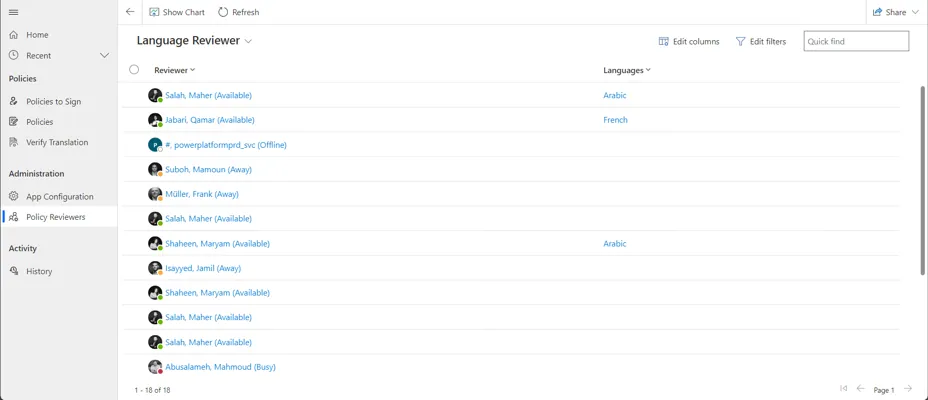
1. Öffnen Sie die Ansicht Sprachprüfer, um alle Sprachprüfer mit der jeweils zugewiesenen Sprache zu sehen:

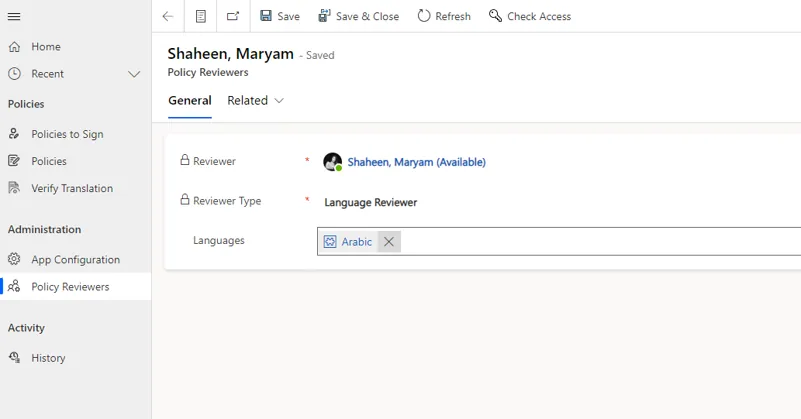
2. Wählen Sie einen Prüfer-Datensatz aus, um ihn zu bearbeiten:

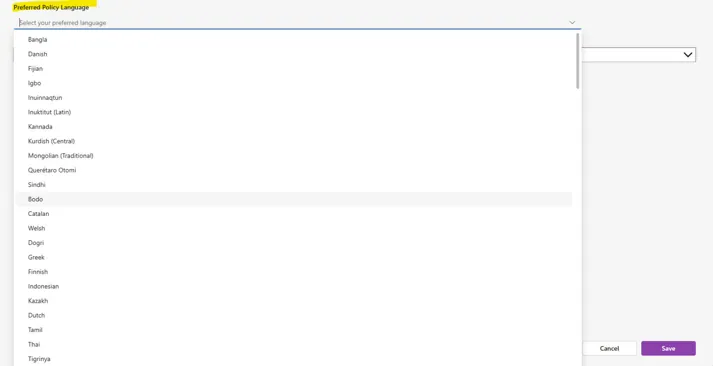
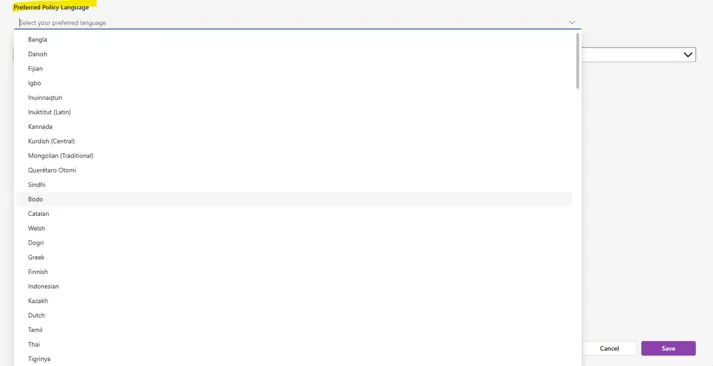
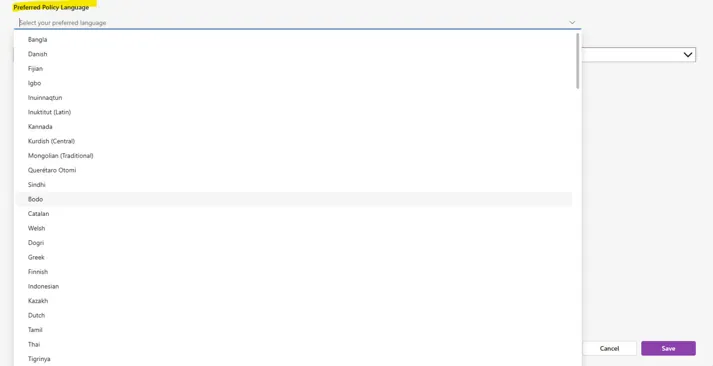
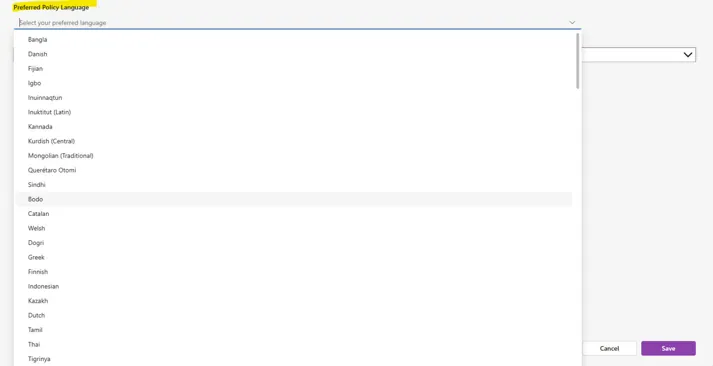
3. Suchen Sie nach der Sprache, die Sie dem Sprachprüfer zuweisen möchten:

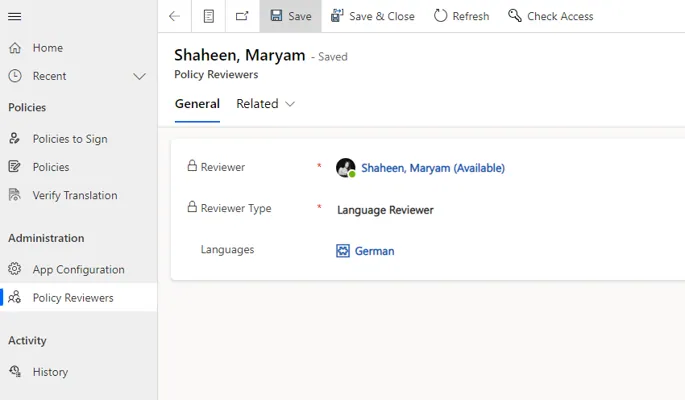
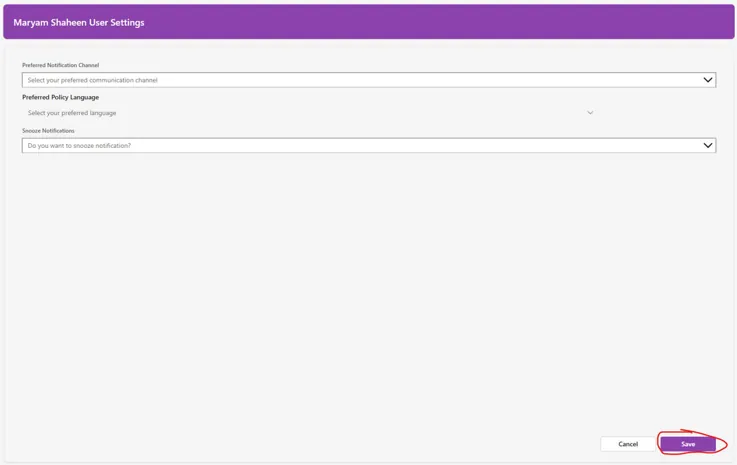
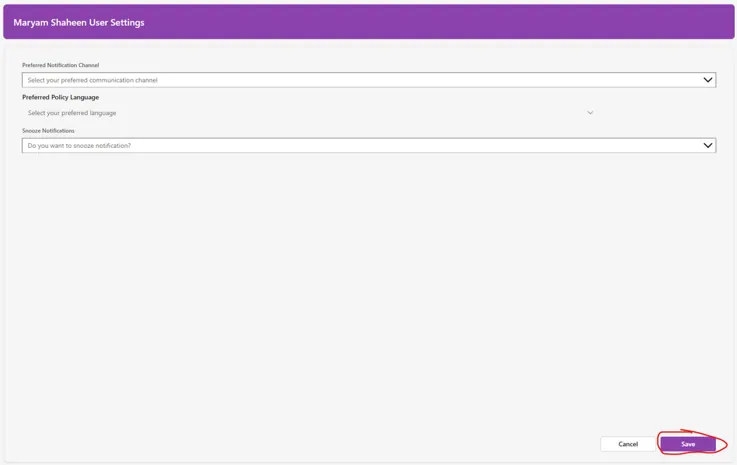
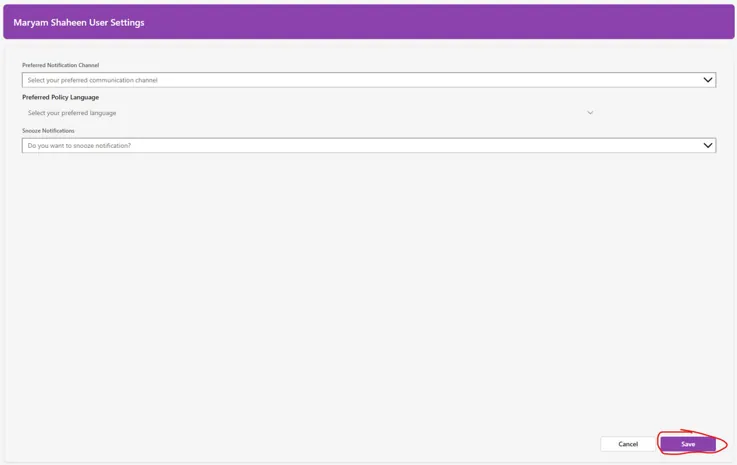
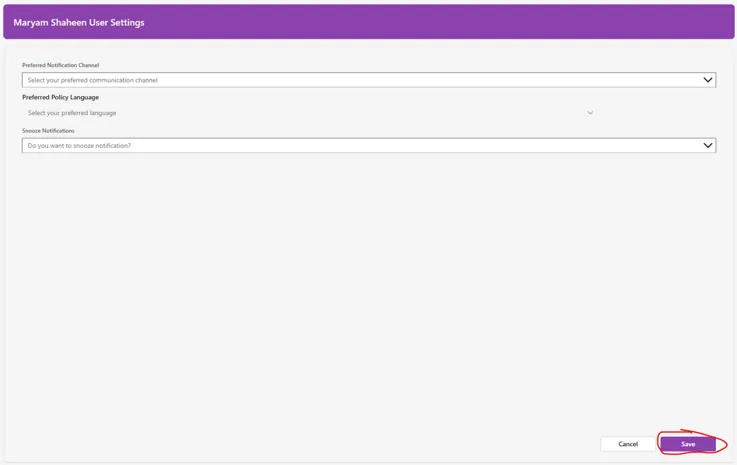
4. Klicken Sie auf „Save“, um die Zuweisung zu bestätigen:

Sprachprüfern mehrere Sprachen zuweisen

Als Administrator können Sie einem Sprachprüfer mehrere Sprachen zuweisen. Gehen Sie dazu wie folgt vor:

  1.  Öffnen Sie die Ansicht „Sprachprüfer“, um alle Sprachprüfer mit der jeweils zugewiesenen Sprache zu sehen:
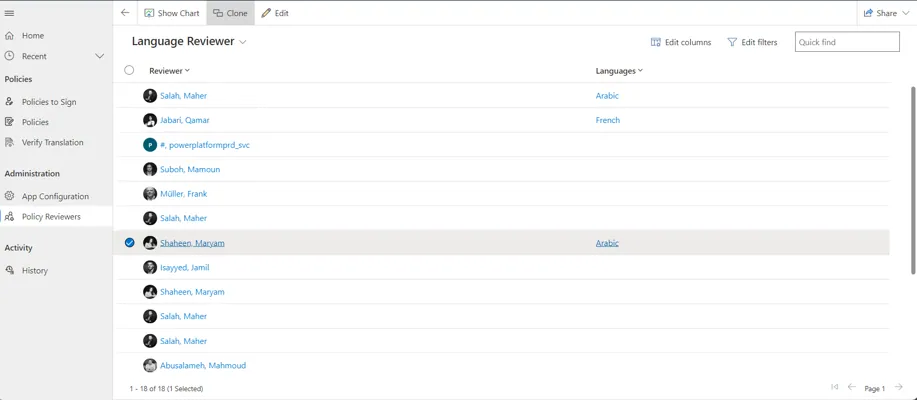
  1. Wählen Sie einen Prüfer-Datensatz aus und klicken Sie anschließend auf „Clone“:
  1. Weisen Sie dem neuen Klon eine Sprache zu. Gehen Sie dabei genauso vor wie im Abschnitt „Sprachprüfern Sprachen zuweisen“ beschrieben:

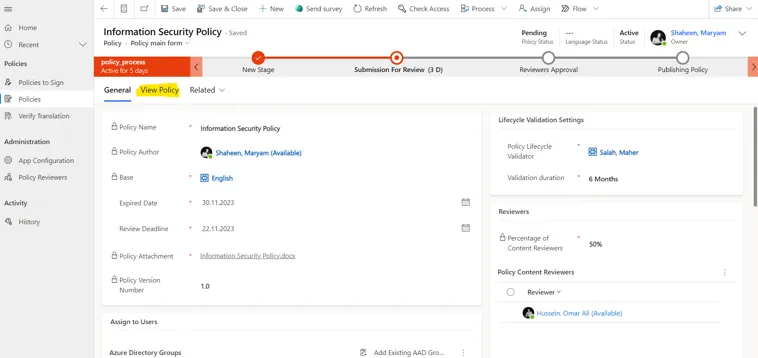
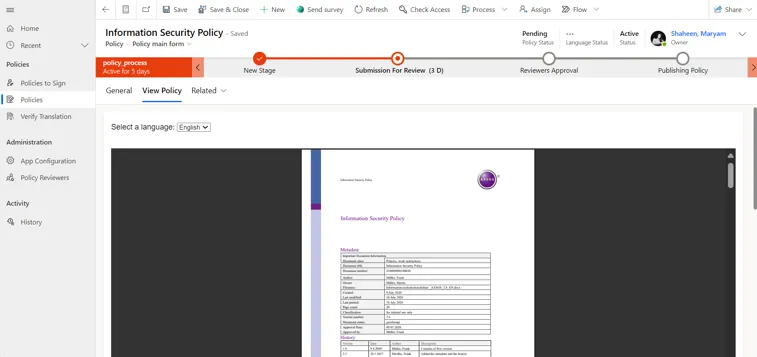
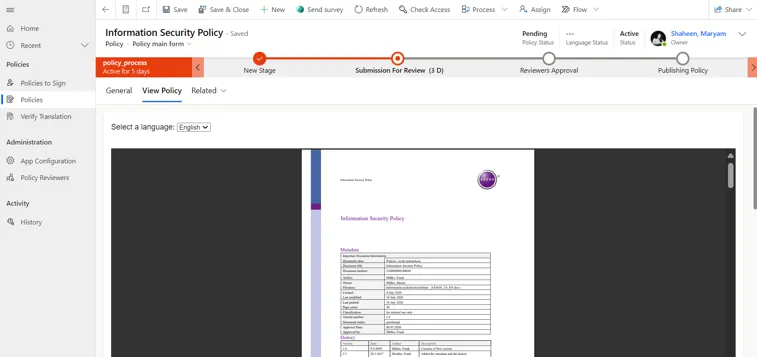
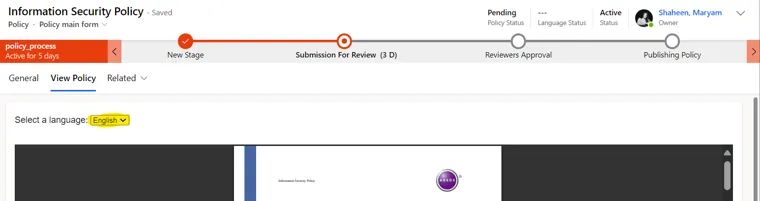
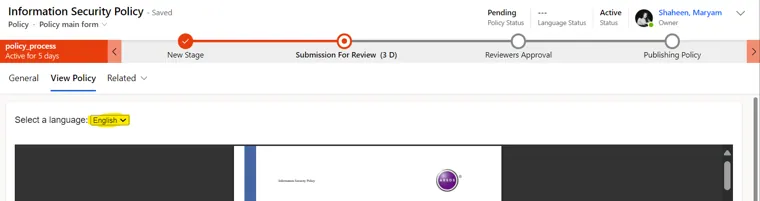
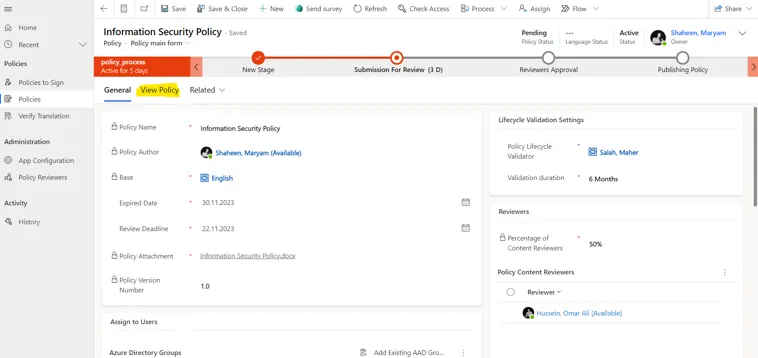
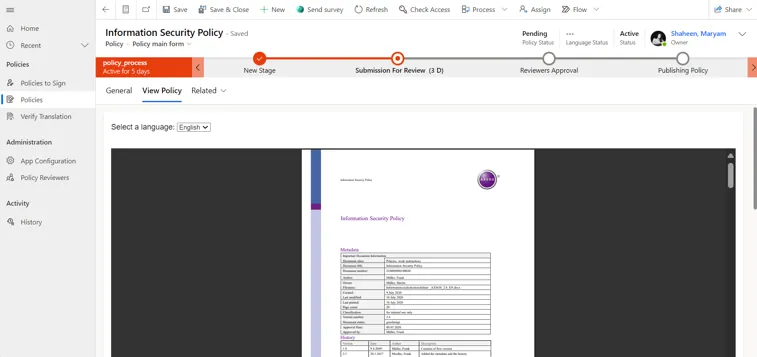
Als Administrator können Sie das Richtliniendokument über die Registerkarte „Richtlinie anzeigen“ öffnen. Dabei wird die Richtlinie aus dem Ordner ihrer Ausgangssprache geöffnet.

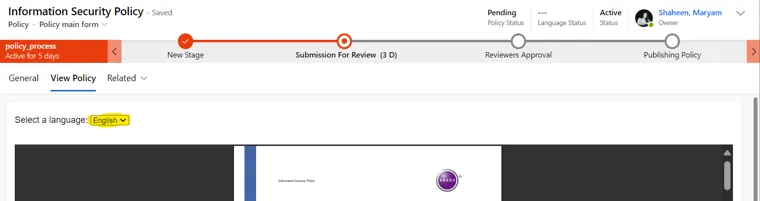
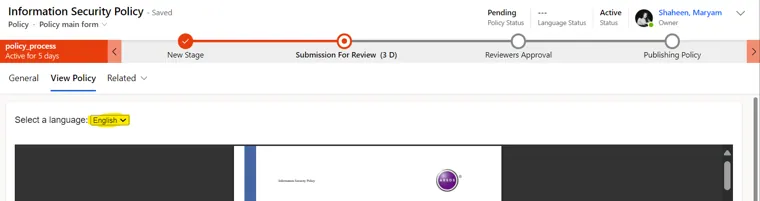
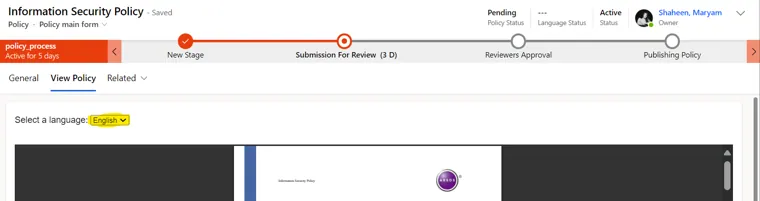
Nachdem eine Richtlinie veröffentlicht und übersetzt wurde, können Sie als Administrator über eine Dropdown-Liste die gewünschte Sprache auswählen und so auf die übersetzten Versionen zugreifen.

Dieser Zugriff ist möglich, sobald die Richtlinie den Sprachprüfern zur Validierung zugewiesen wurde, den Genehmigungsprozess durchlaufen hat, veröffentlicht wurde und ihre Übersetzung validiert ist.

Anzeigeoptionen für Richtliniendokumente

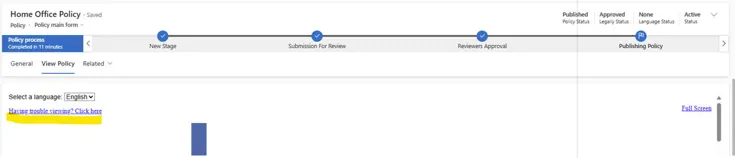
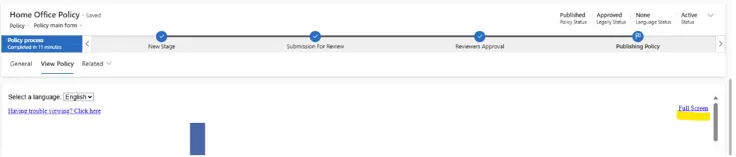
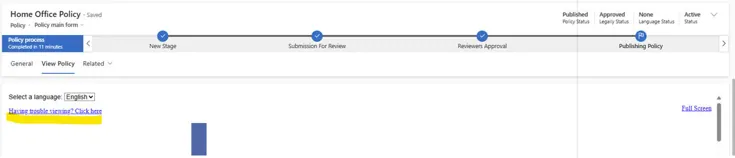
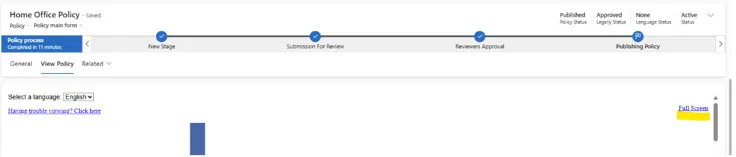
Die Policy App bietet zwei Möglichkeiten, Richtliniendokumente in der Vollansicht anzuzeigen. So können Sie Dokumente flexibler und komfortabler lesen.

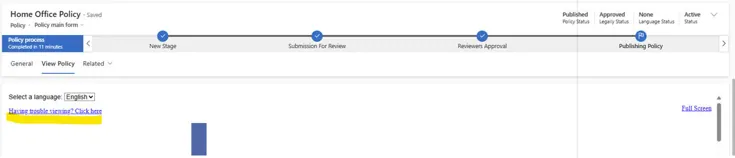
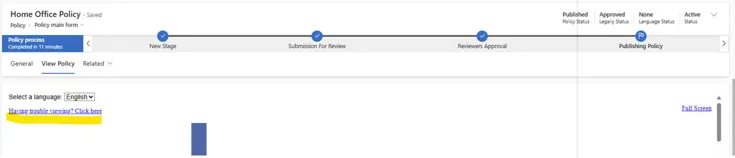
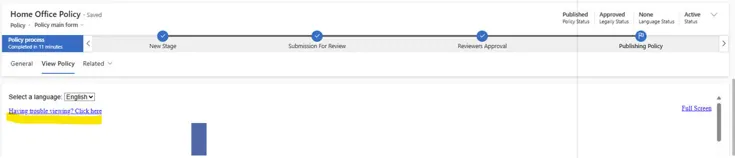
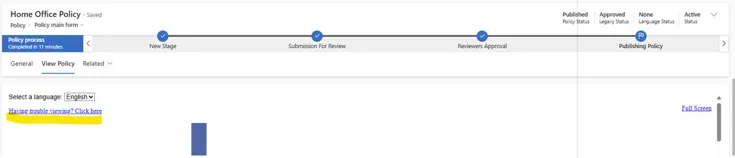
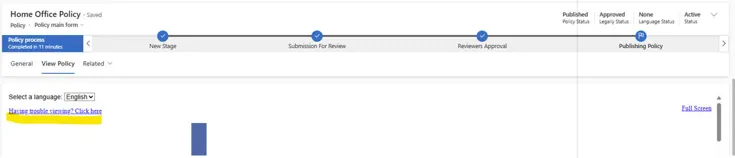
  1. In neuem Tab öffnen: Sie können das Richtliniendokument in einem neuen Browser-Tab öffnen. So navigieren Sie leichter und können das Dokument parallel zu anderen Funktionen der App nutzen. Klicken Sie dazu auf „Probleme bei der Anzeige? Hier klicken“, wie im folgenden Screenshot dargestellt.
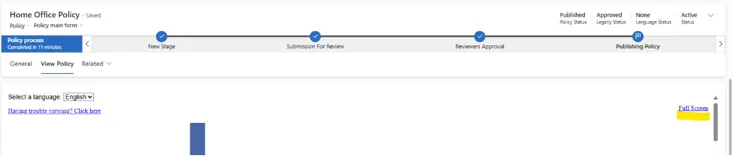
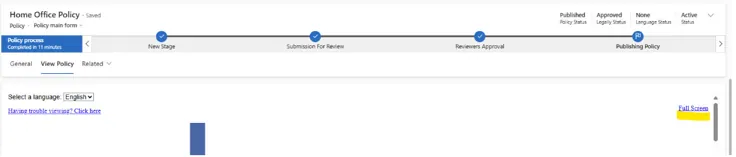
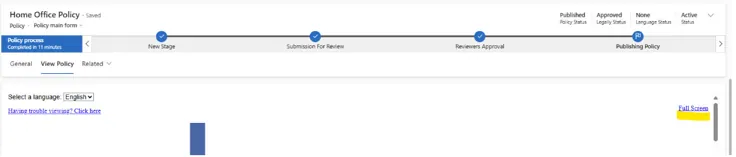
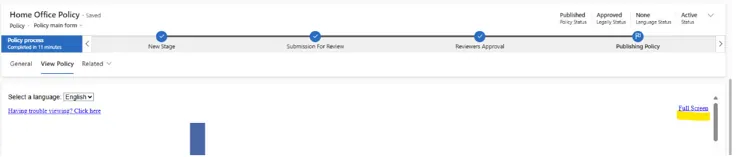
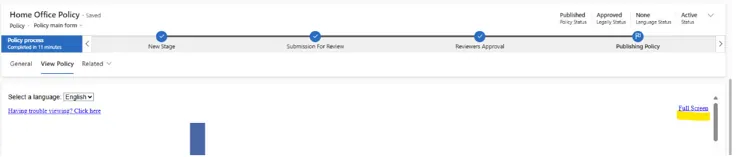
  1. In neuem Fenster öffnen: Alternativ können Sie das Richtliniendokument in einem separaten Fenster öffnen. Diese Option eignet sich besonders, wenn Sie sich ohne Ablenkung ganz auf das Dokument konzentrieren möchten. Klicken Sie dazu auf „Vollbild“, wie im folgenden Screenshot dargestellt.

Bei beiden Optionen stehen Ihnen die üblichen PDF-Funktionen wie Vergrößern und Verkleinern, Scrollen und Suchen zur Verfügung. So können Sie Richtlinien bequemer und nach Ihren eigenen Vorlieben lesen.

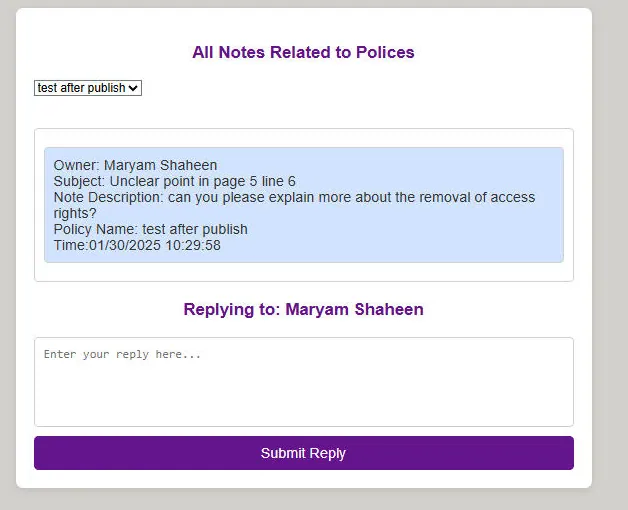
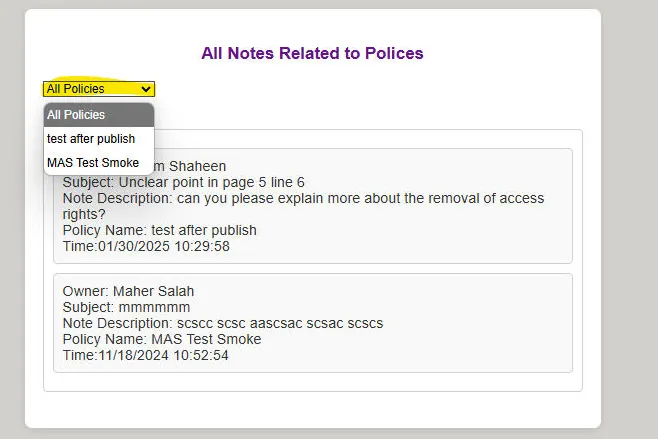
Als Administrator können Sie Benutzeranmerkungen direkt über eine benutzerfreundliche Oberfläche anzeigen, filtern und beantworten. Diese Funktion vereinfacht die Kommunikation und sorgt dafür, dass Fragen und Feedback der Benutzer zeitnah beantwortet werden.

Anmerkungen anzeigen und beantworten

  1. Öffnen Sie die Policy App.
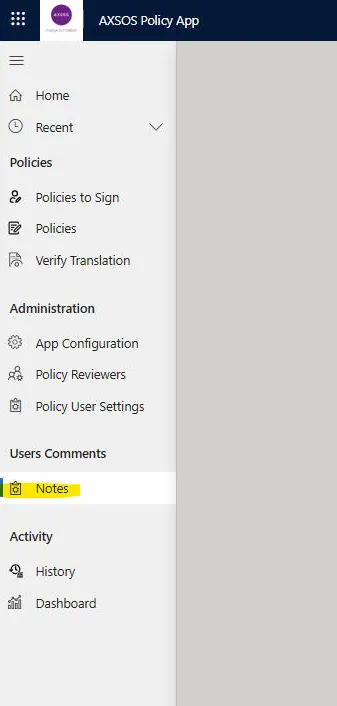
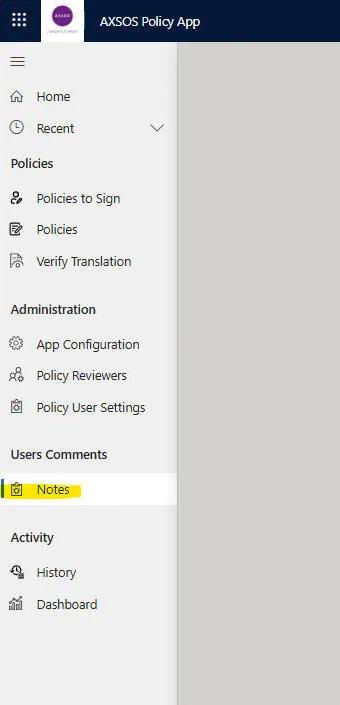
  1. Wechseln Sie im Menü zum Bereich „Anmerkungen“.
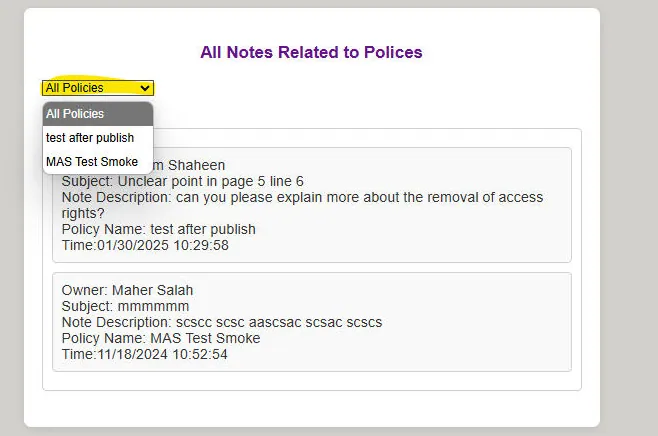
  1. Verwenden Sie die Option „Nach Richtlinienname filtern“, um die Anmerkungen zu einer bestimmten Richtlinie zu finden.
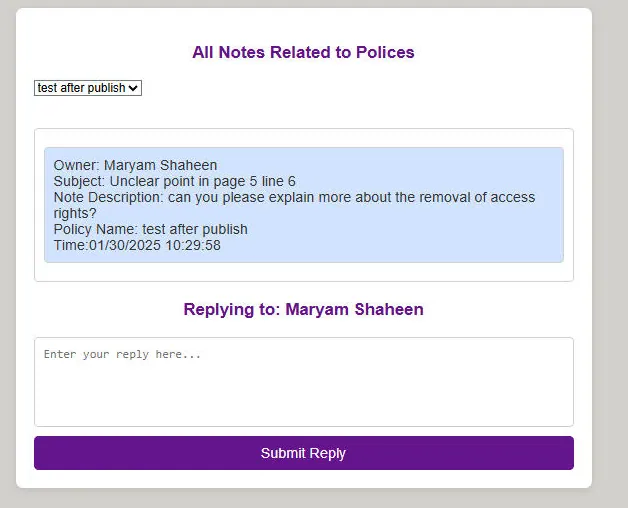
  1. Klicken Sie auf eine Anmerkung, um darauf zu antworten.
  1. Geben Sie Ihre Antwort in das Textfeld ein und senden Sie sie ab.

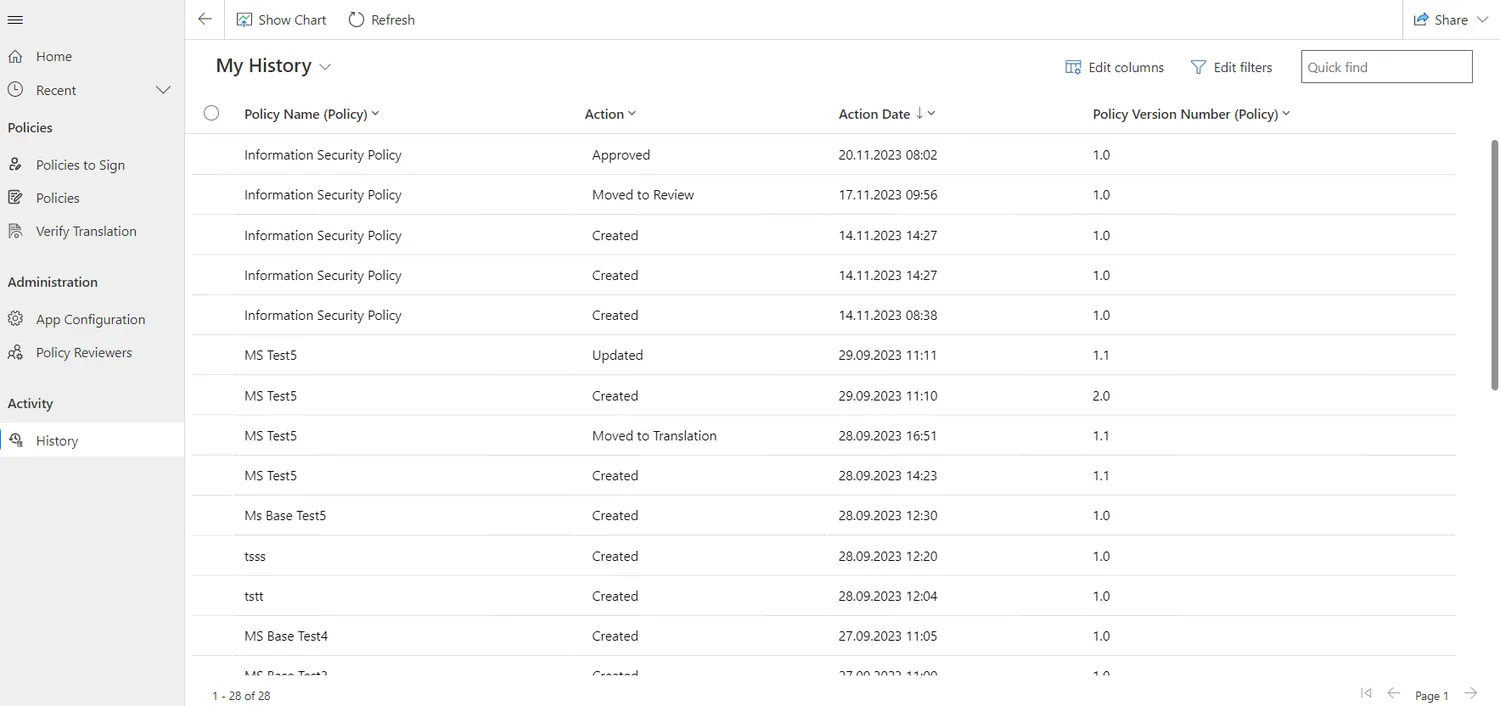
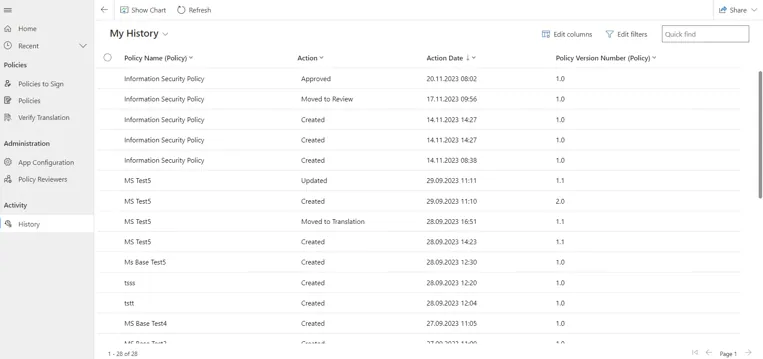
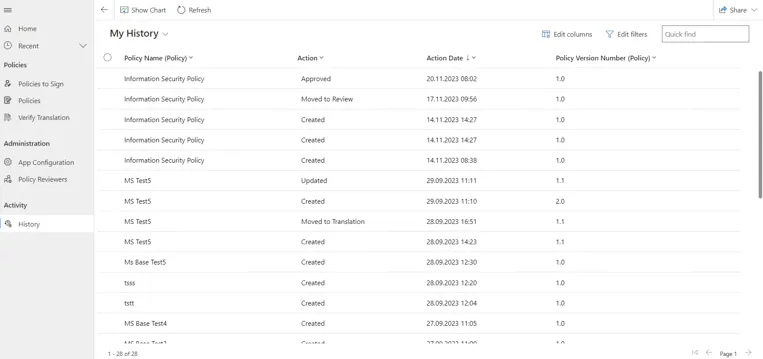
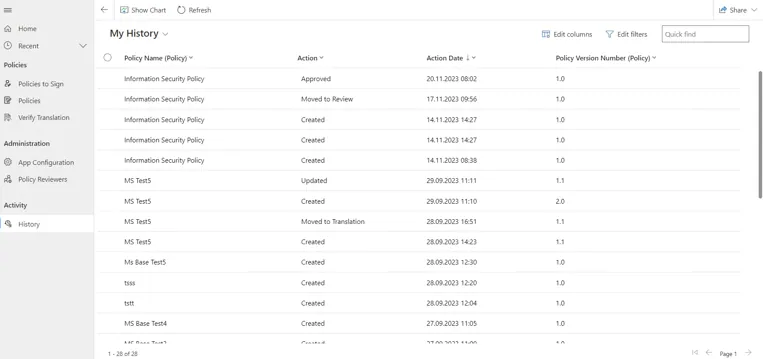
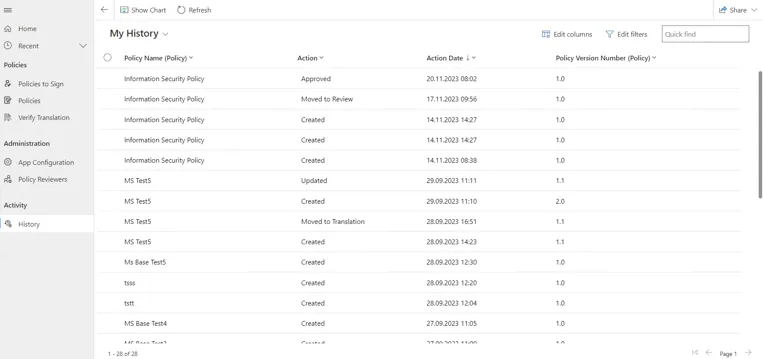
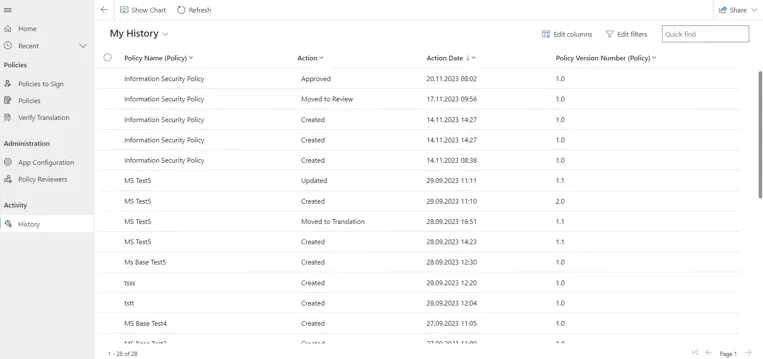
Als Administrator können Sie Ihren Aktionsverlauf aufrufen. Gehen Sie dazu wie folgt vor:


  1. Wechseln Sie im Menü zur Registerkarte „History“:
  1. Sehen Sie sich die Liste Ihrer durchgeführten Aktionen an:
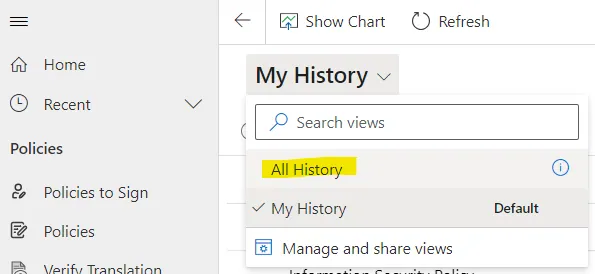
  1. Sehen Sie sich die Liste aller im System durchgeführten Aktionen an, indem Sie in der Dropdown-Liste die Ansicht „All History“ auswählen:

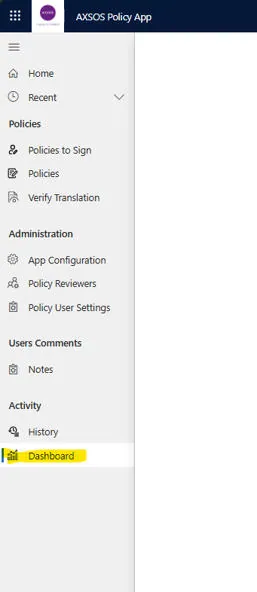
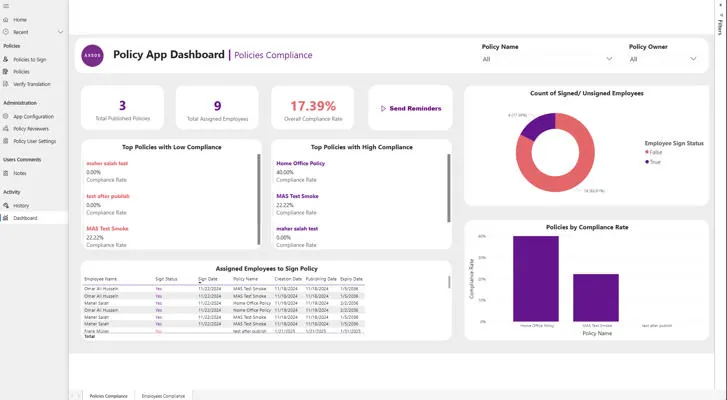
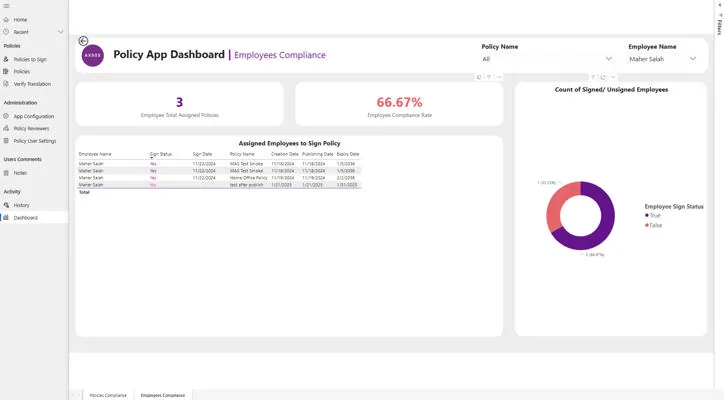
Das auf Power BI basierende Dashboard bietet Ihnen als Administrator einen Überblick über die Einhaltung der Richtlinien in der gesamten Organisation. Außerdem können Sie darüber Erinnerungen für ausstehende Unterschriften auslösen.

So rufen Sie das Dashboard auf:

  1. Wechseln Sie im Menü zur Registerkarte „Dashboard
  1. Melden Sie sich bei Power BI an.
  1. Sehen Sie sich die Registerkarten des Dashboards an.
  1. Klicken Sie auf „Send Reminders“, um alle Benutzer zu benachrichtigen, die die Richtlinie noch nicht unterzeichnet haben. So werden sie daran erinnert, die Unterzeichnung abzuschließen.

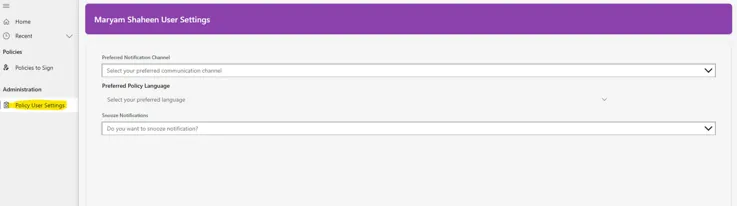
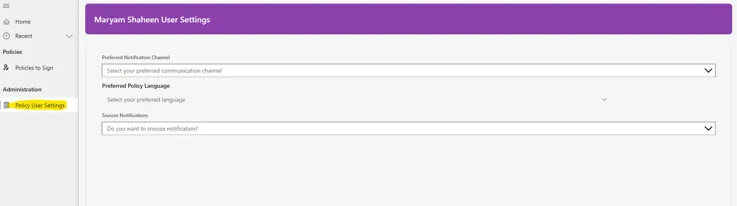
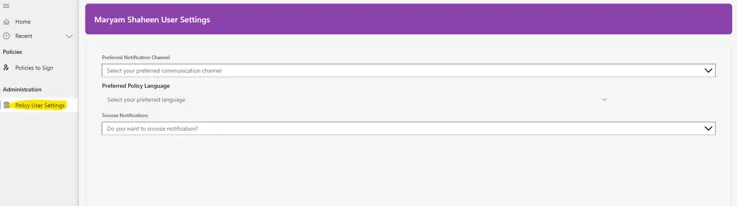
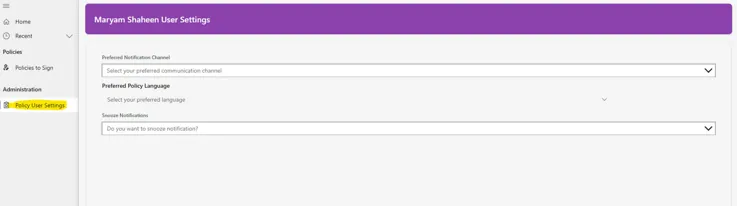
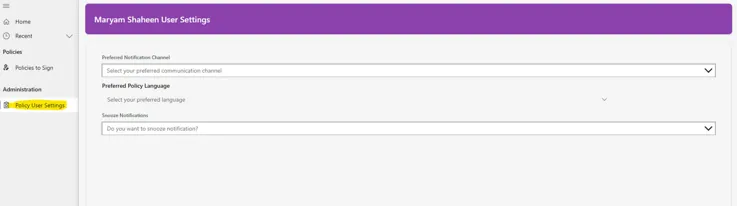
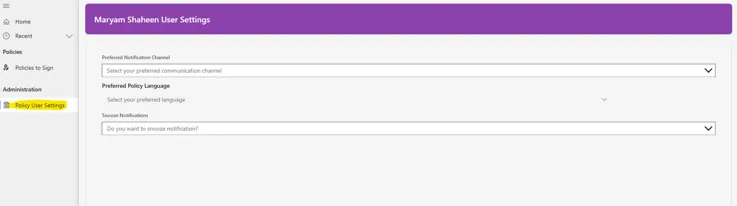
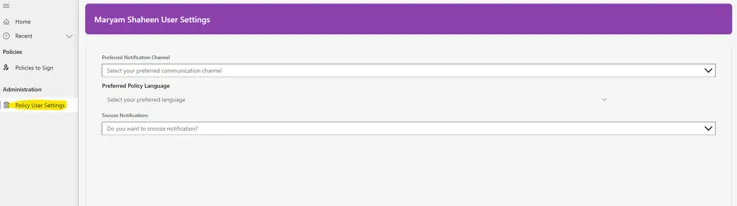
Als Administrator können Sie selbst festlegen, wie und wann Sie Benachrichtigungen erhalten. Zusätzlich können Sie dringende Erinnerungen senden, die die individuellen Einstellungen der Benutzer umgehen, wie in Abschnitt 3.7 beschrieben.


Benachrichtigungen anpassen

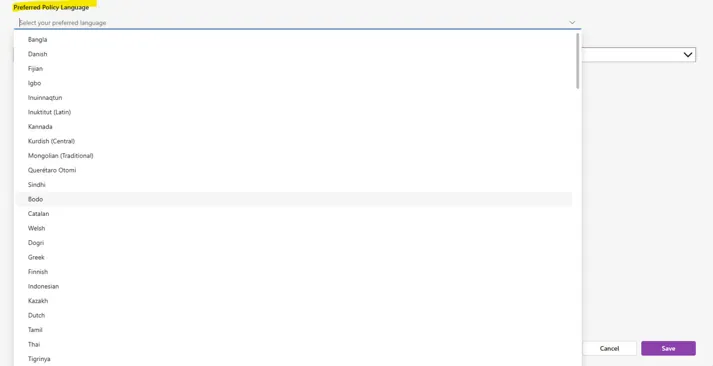
  1. Öffnen Sie die Policy App und wechseln Sie zur Registerkarte „User Settings“ (im Hauptmenü oder im Profil-Dropdown)
  1. Wählen Sie „Notification Preferences“ aus.
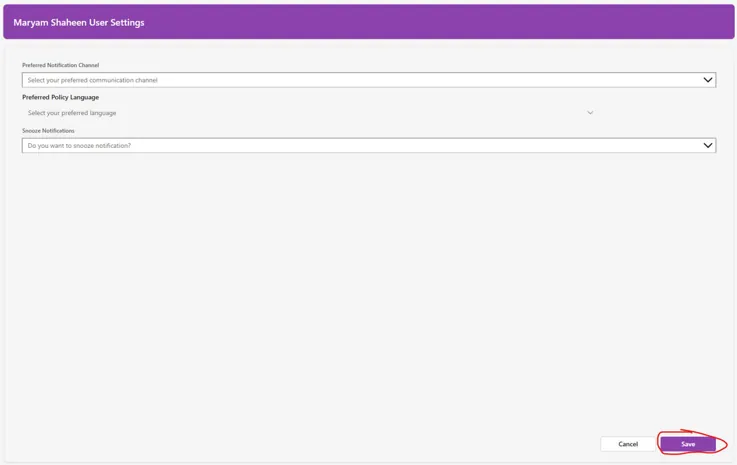
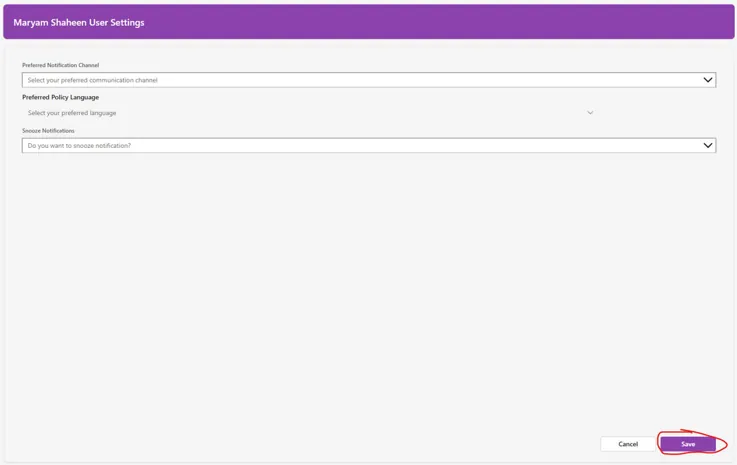
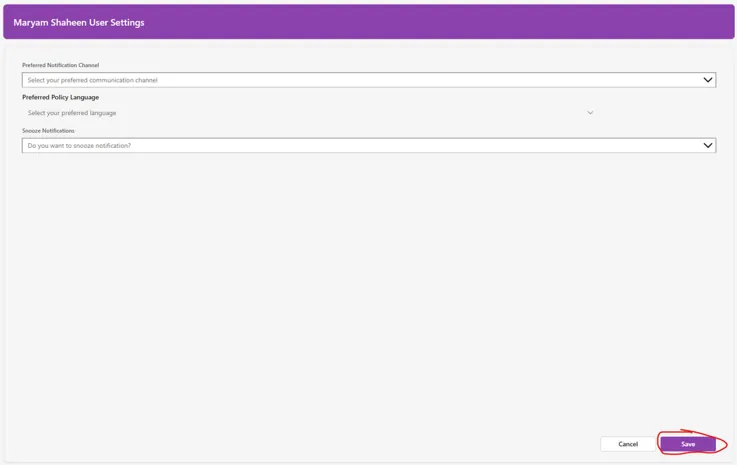
  1. Speichern Sie Ihre Änderungen.

In diesem Abschnitt wurden alle zusätzlichen Funktionen beschrieben, die Ihnen als Administrator zur Verfügung stehen. Darüber hinaus können Sie jede Rolle im System übernehmen und die entsprechenden Aktionen ausführen.

4

Creator Guide

Als Creator sind Sie dafür verantwortlich, Richtlinien zu erstellen, zur Prüfung einzureichen und zu veröffentlichen, die Übersetzungen aktuell zu halten sowie Richtlinien bei Bedarf zu archivieren oder zu aktualisieren.

Auf der Startseite sehen Sie als Creator eine vollständige Übersicht aller Richtlinien, die Sie erstellt haben.

Über das Dropdown-Menü können Sie die Richtlinien nach ihrem Status filtern. Alternativ können Sie über die Suchfunktion gezielt nach dem Namen einer Richtlinie suchen. Außerdem können Sie die Richtlinien alphabetisch nach Namen oder chronologisch nach Erstellungs oder Ablaufdatum sortieren.


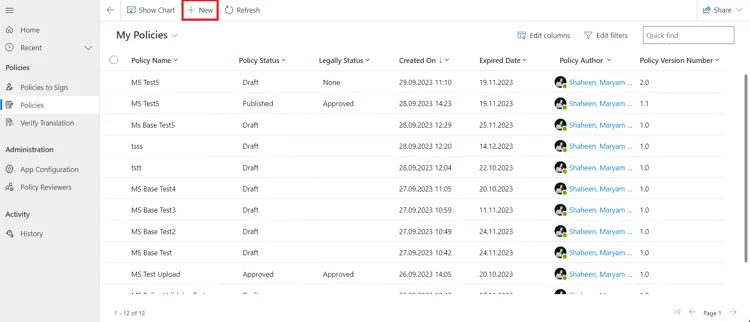
Within the Creator’s Home Page, the Creator can initiate the Policy Creation process by selecting the „New „ button located in the upper-left corner of the page.

Note

The form only shows the sections your Administrator has enabled (see Section 3.2). You may not see every field described below — that's expected.

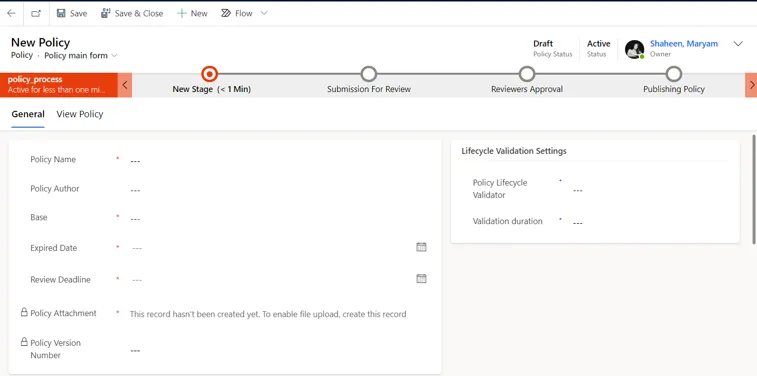
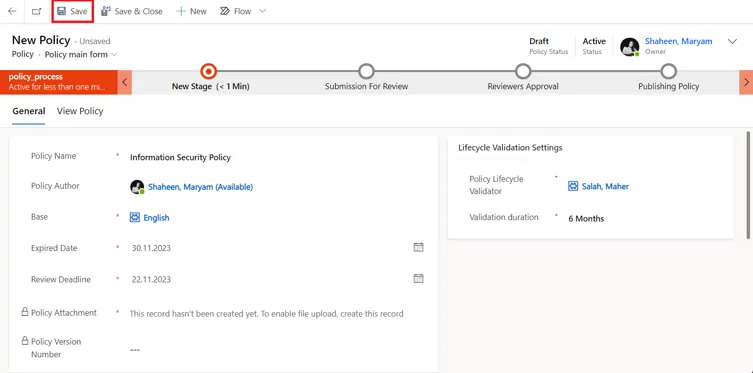
This creation form is where the Creator completes the necessary Policy Information.

Within this form, Creators are required to provide the following information:

Step 1 — Core Details

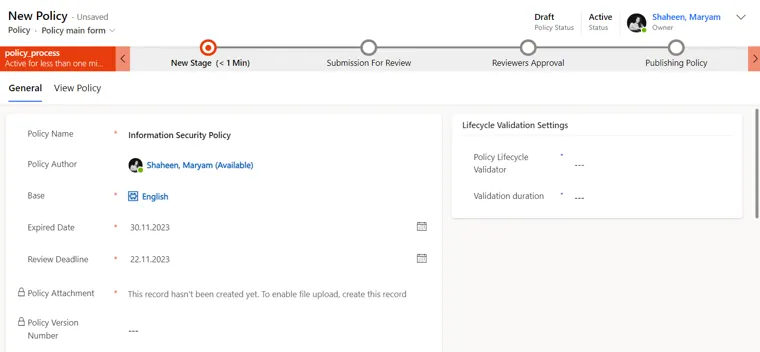
in First Steps the creator must provide the following information in the right section of the form:

  1. Policy Name: Creators should adhere to the naming convention of capitalizing the first letter of each word.
  1. Policy Author: Creators need to specify the main author who wrote the policy document, if no name was added, the author field will be automatically filled with the creator’s name.
  1. Base Language: Creators should select the base language of the policy folder being uploaded.
  1. Expiration Date: Creators must enter the expiration date of the policy. This applies to both annual renewal policies and those with specific expiration dates, such as policies that expire after 10 years or within one month. If the expiration date is exceeded, the policy will be Archived then the creator can update it later with an incremented version number (e.g., 1, 2, 3, and so forth)
  1. Reviewer Deadline: Creators should specify the deadline by which the reviewers must complete their policy review.

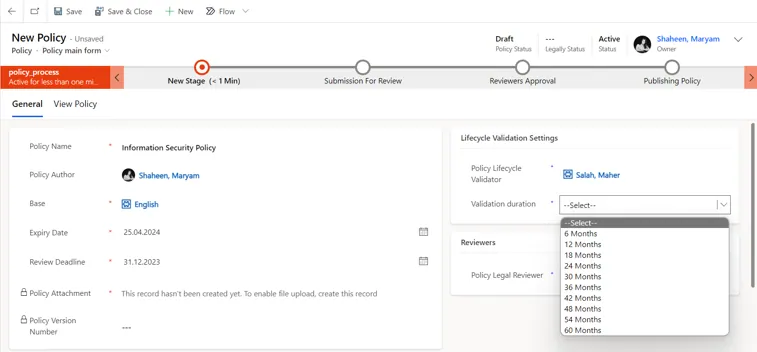
Step 2 — Lifecycle Validation (if enabled)

  1. Life-Cycle Validator: Creators must choose one life-cycle validator from the list provided.
  1. Validation Duration: Creators must choose a duration that establishes the subsequent validation date. For instance, certain policies may necessitate validation every three months, while others may require annual validation. This is the parameter that the creator sets to determine the validation frequency. Successful validation results in the extension of the current version, progressing incrementally (e.g., 1.2, 1.3, 1.4, and so forth).

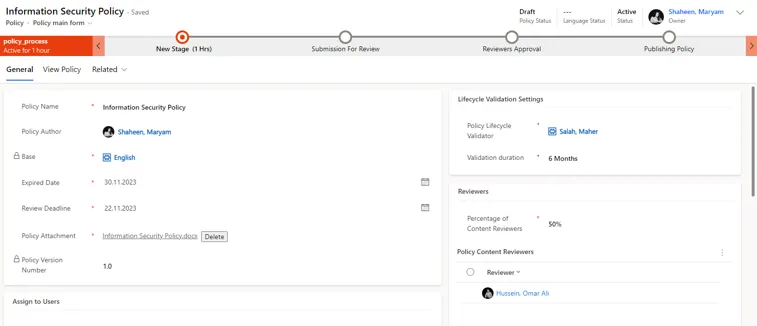
After adding these details creator must hit „Save“ button, to be directed to the second part of the creation form:

Step 3 — Attachment and Audience

in the left section:

  1. Policy Attachment: Creators must attach the policy document in either Word document or PDF format, and it should be stored within the specified policy template.
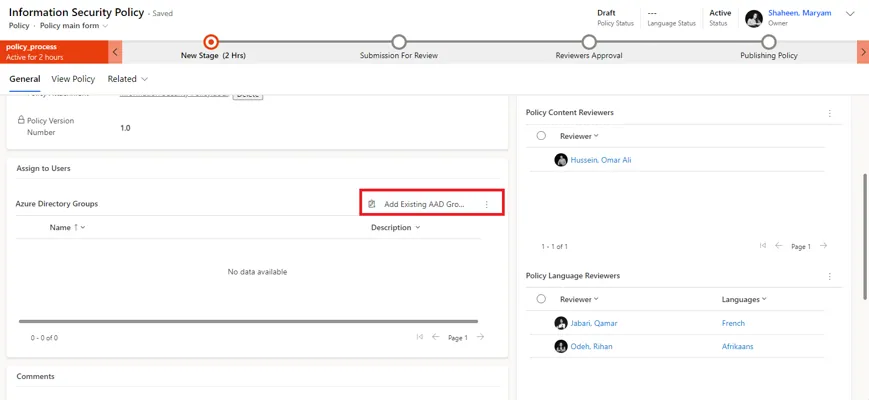
  1. Assign to Users: Creators are required to assign the policy to multiple Azure Active Directory Groups. Users designated within these Azure Groups will be mandated to view and sign the policy.

    this is how you select an Azure Active Directory Group to the list:

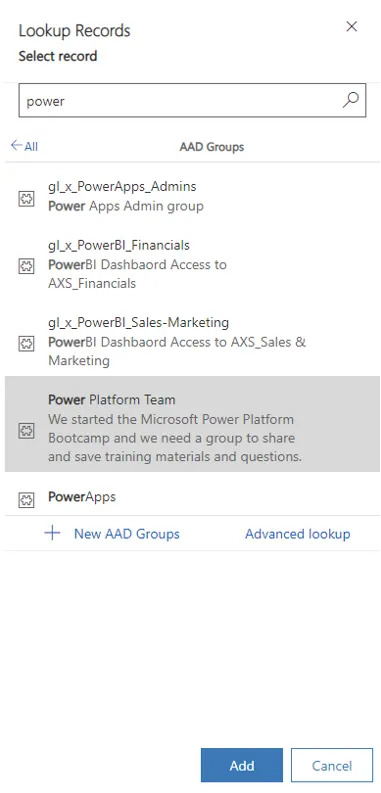
To add an Azure Active Directory Group to the list, begin by searching for the group. Type its name or at least one keyword to initiate the selection process.

and then click on „Add“ button.

Step 4 — Reviewers

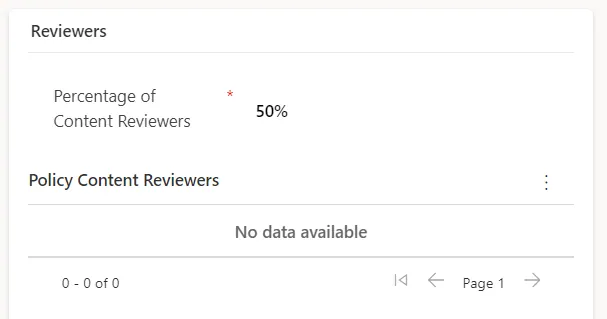
  1. Policy Content Reviewers: Creators can add multiple content reviewers to review the policy.
  1. Percentage of Content Reviewers: Creators must select the percentage of approvals needed for this policy based on the number of reviewers selected, for example if the creator selected 4 reviewers and then selects 50% of reviewers‘ approvals, then we are waiting for 2 approvals only from these 4 reviewers.

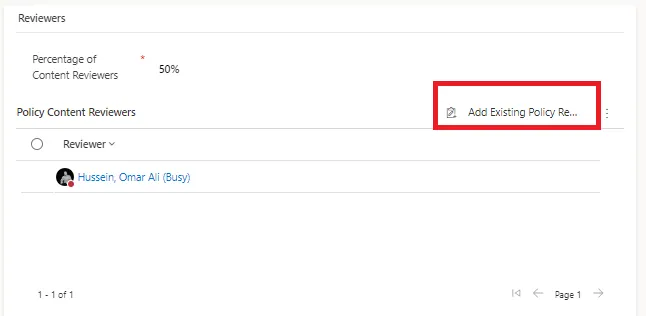
this is how you select a reviewer to be added to the list:

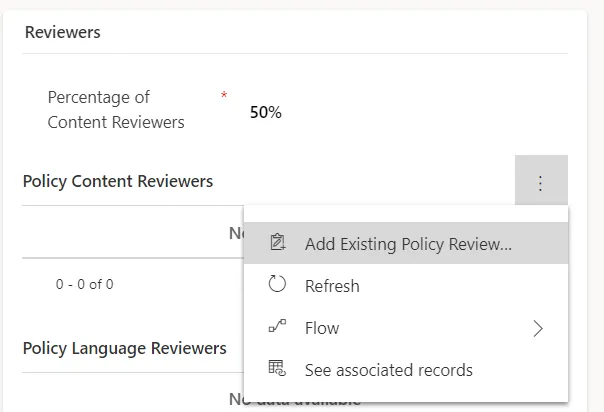
On smaller screens like tablets or iPads, you can access the selection from the three dots menu:

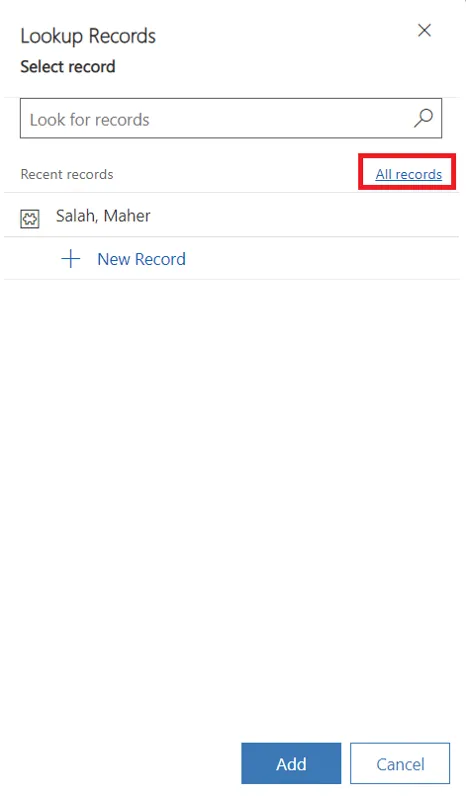
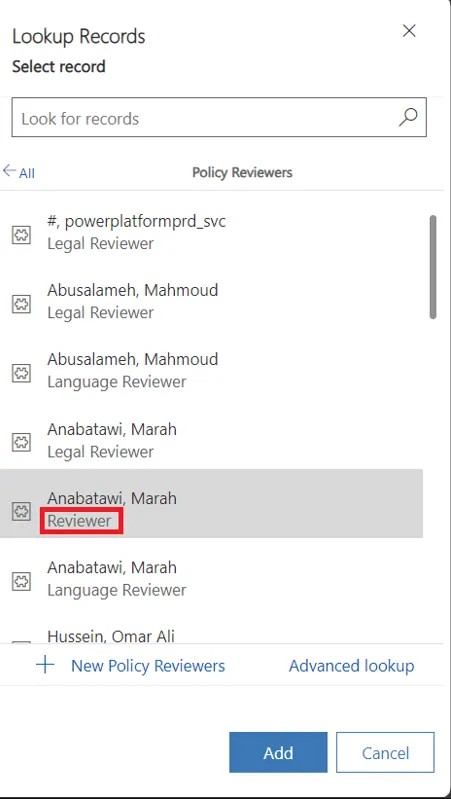
To view all reviewers, please select „All Records.“ If not selected, only recently added reviewers will be accessible.

Make sure to select only the names of reviewers that have the label „Reviewer“ beneath their name.

and then click on „Add“ button.

Note

Select only reviewers from the full list, not from Recent Records — recent entries can display the wrong reviewer type for someone who holds more than one role. Confirm the label under the reviewer's name (Content Reviewer, Legal Reviewer, or Language Reviewer) matches what you intend to assign.

Approval-threshold quick reference:

CaseReviewers SelectedApproval PercentageApprovals Required
a225%1
50%1
75%2
100%2
b325%1
50%2
75%3
100%3
c425%1
50%2
75%3
100%4
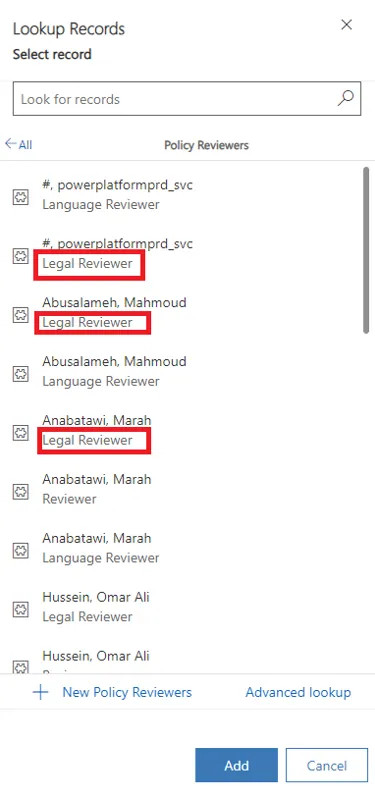
  1. Legal Reviewer: Creators must choose one legal reviewer for the policy.

    For the legal reviewer, the selection process is similar to choosing a reviewer from the list explained above in the content reviewer section. However, please ensure to pick only the names of reviewers who have the label „Legal Reviewer“ beneath their name.

Note

Select only reviewers from the full list, not from Recent Records — recent entries can display the wrong reviewer type for someone who holds more than one role. Confirm the label under the reviewer's name (Content Reviewer, Legal Reviewer, or Language Reviewer) matches what you intend to assign.

and then click on „Add“ button.

  1. Language Reviewers: Creators have the option to select a language reviewer, enabling the translation of the policy into a specific language.

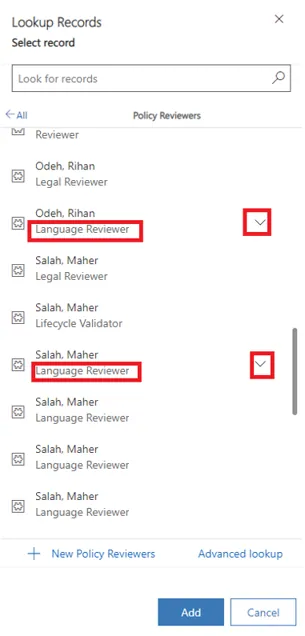
    For the Language reviewer, the selection process is similar to choosing a reviewer from the list explained above in the content reviewer section. However, please ensure to pick only the names of reviewers who have the label „Language Reviewer“ beneath their name.

Note

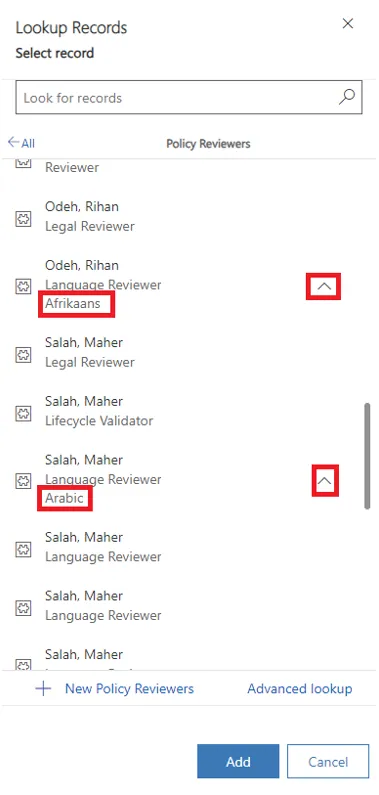
Additionally, for the language reviewer, please ensure to select only those language reviewers who have an arrow beside their name. Clicking on this arrow will reveal the language assigned to this reviewer for the review. Language reviewers without an arrow beside their name are not assigned to any language. Selecting them will not result in the translation of your policy to any language.

Note

Select only reviewers from the full list, not from Recent Records — recent entries can display the wrong reviewer type for someone who holds more than one role. Confirm the label under the reviewer's name (Content Reviewer, Legal Reviewer, or Language Reviewer) matches what you intend to assign.

and then click on „Add“ button.

While it is not mandatory to include multiple language reviewers for a Policy creation. in cases where a Policy requires translation into multiple languages, the Creator must specify these languages by selecting the language reviewers for these languages, either during the policy creation phase or at a later stage, such as when editing a draft Policy or updating a new version. Once multiple languages are specified.

Once all details have been added, the policy is now finalized and prepared for approval.

The creator primarily handles the creation phase and initiates the approval process by following these steps:

  1. Within the policy business process flow, the creator advances to the next stage by clicking the „Next Stage“ button.
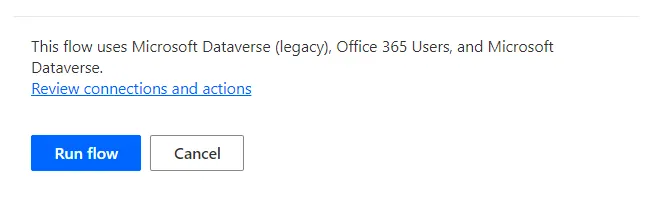
  1. than creator can proceed to send the policy to reviewers by clicking the flow button „Run Flow“

after clicking it a notification will be sent to reviewers in order to take their approval action.

Important

The Legal Reviewer and Content Reviewer assigned to the same policy can never be the same person — the Policy Validation flow will fail if they match.

Always have a look at the comments for clearer update on what has happened:

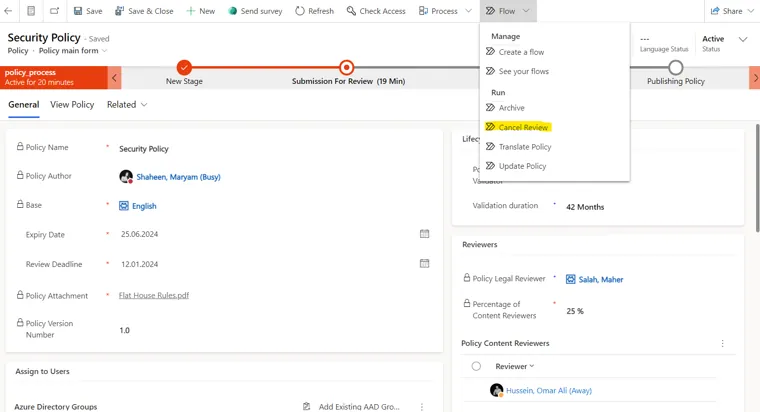
If creators identify any necessary changes after submitting the policy for review, they have the option to cancel the review process, make their edits, and resubmit it for review. To cancel the review process, creators can follow these steps:

  1. Go to the desired policy

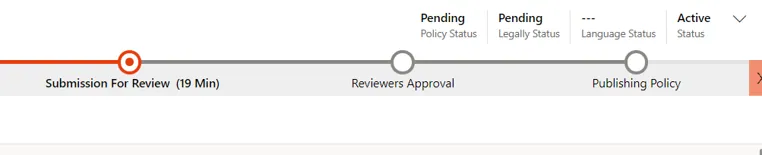
its important to note that the policy status should be “pending” in order to be able to cancel the review process.

  1. Click on „Flow“ dropdown list, and choose „Cancel Review“ Flow and run it:

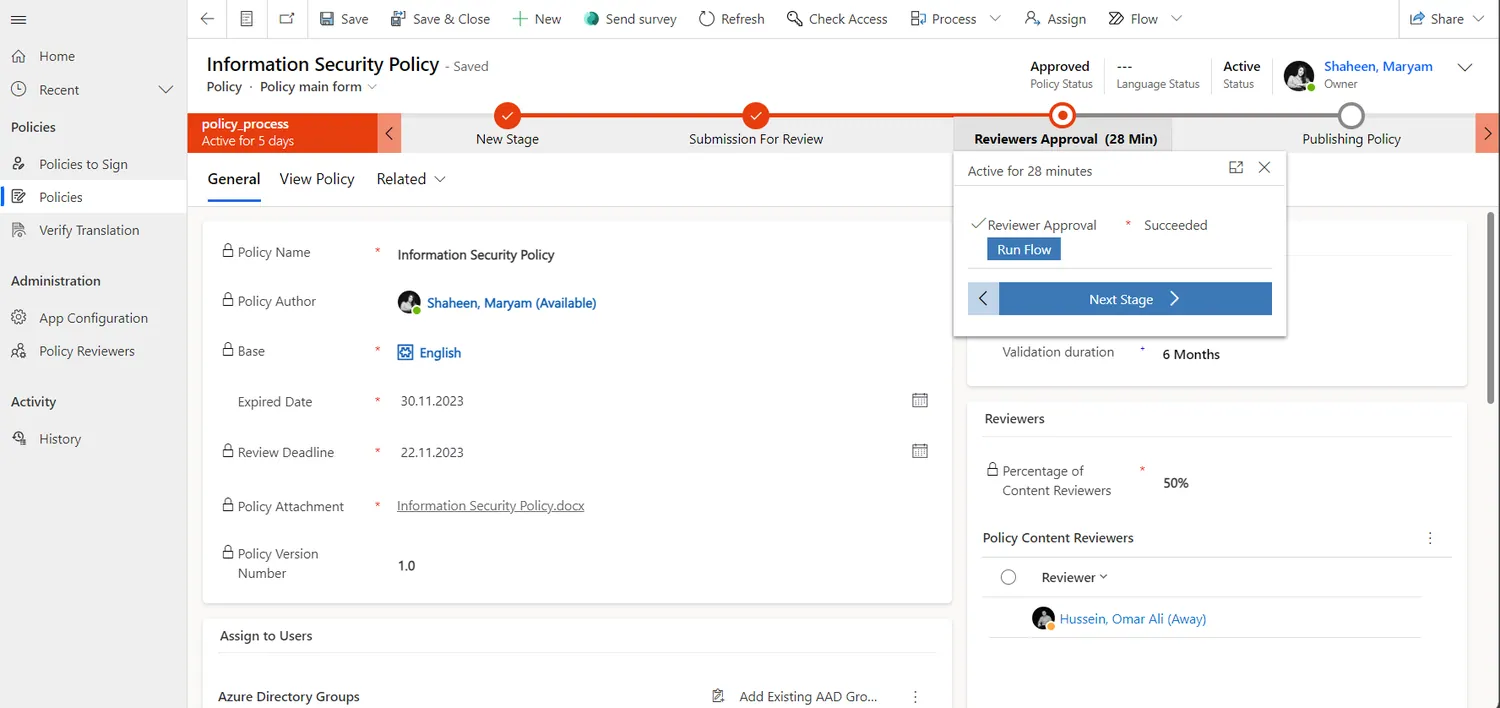
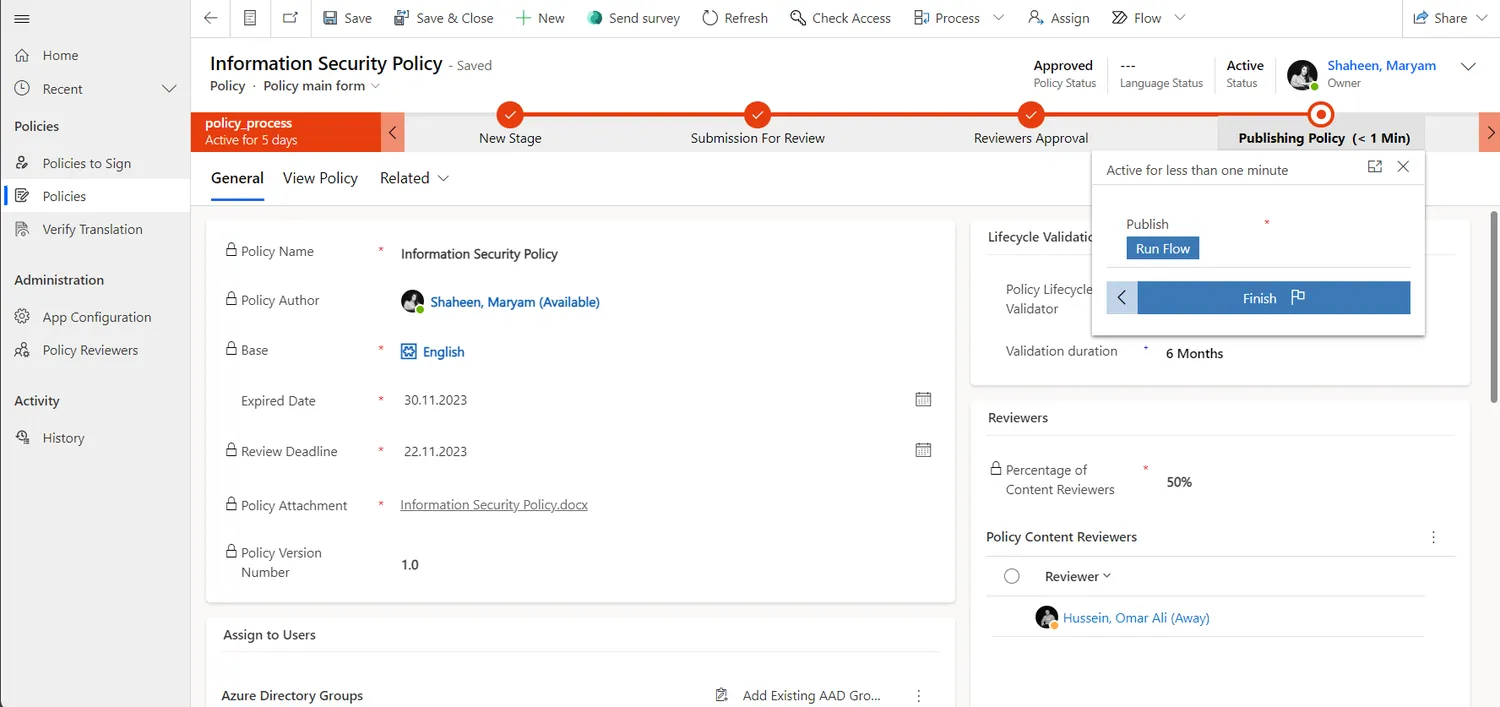
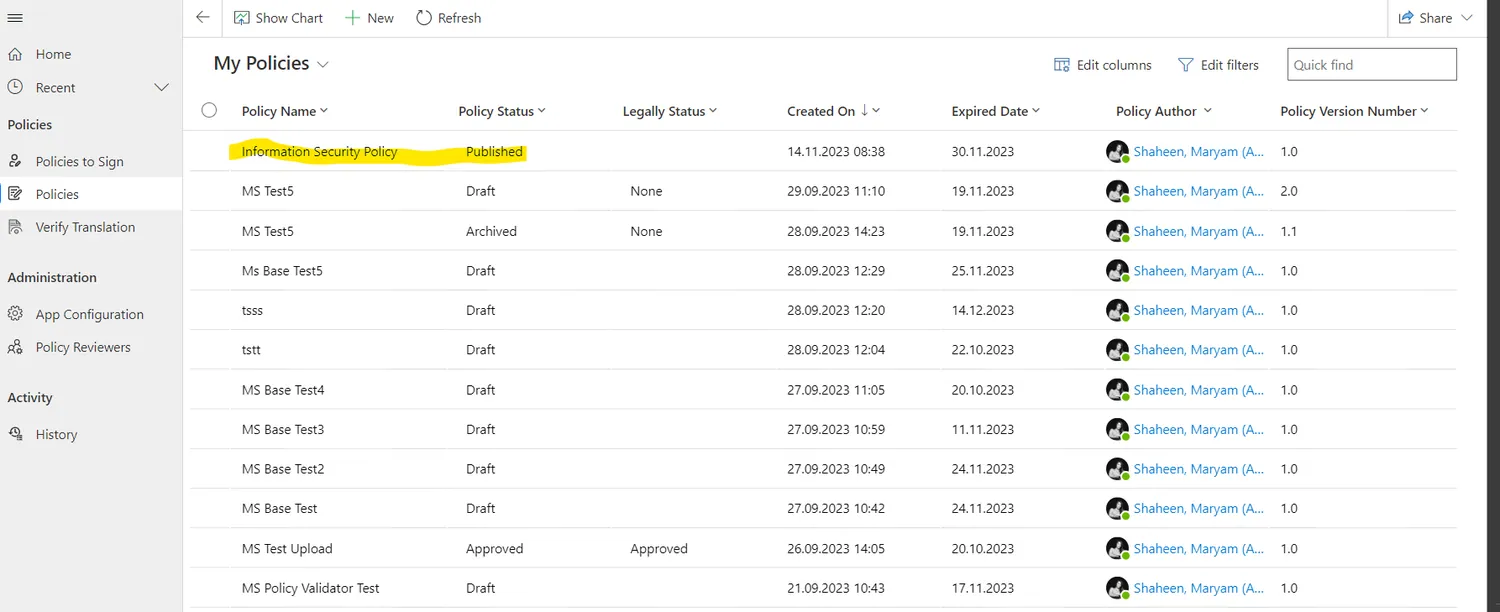
Creators can publish a policy after it is approved by content reviewers and legal reviewers, depending on the app configurations and what is required. Creators can proceed with the publication by following these steps:

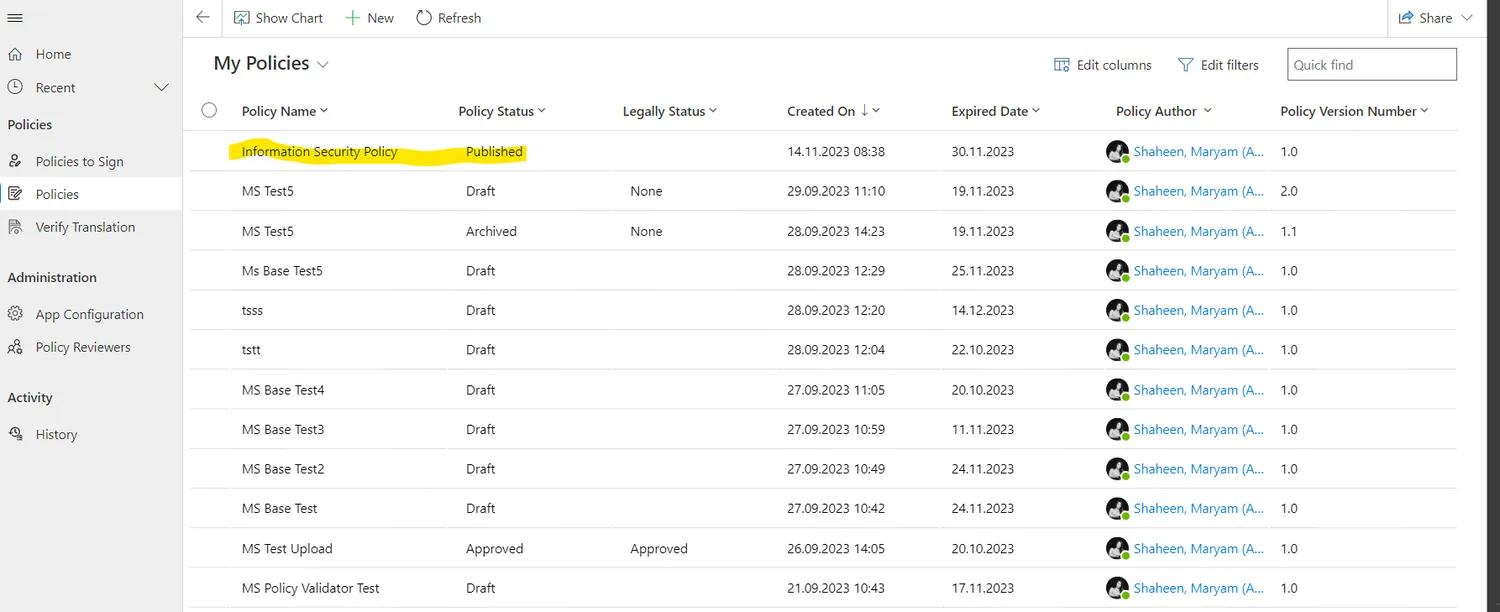
  1. Navigate to the approved policy record:
  1. Click on „Next Stage“ button in the approval stage:
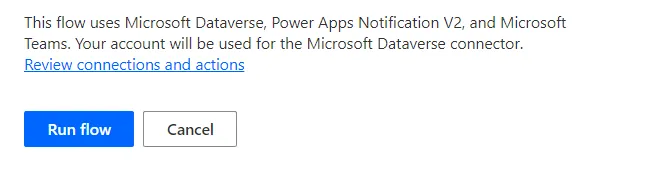
  1. Run the publication flow by clicking on „Run Flow“ in the publishing policy stare:
  1. Click on „Run“

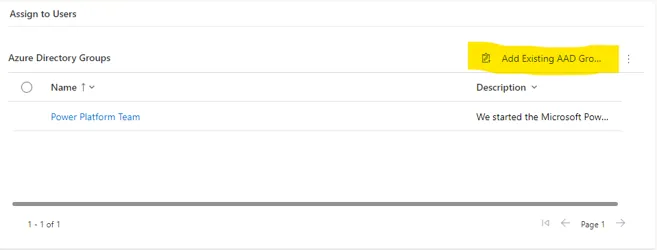
Creators or Administrators can select an additional Active Directory (AD) group for user population after publishing a policy. Creators can proceed with the publication by following these steps:

  1. Navigate to the Published policy record:
  1. Add AD Group:
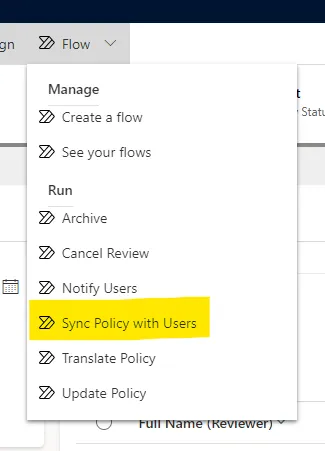
  1. Click on „Flow“ dropdown list, and choose „Sync Policy with User“ Flow and run it:

Creators must send policies to be translated after the policy is published or approved, and they can do that by following these steps:

  1. Navigate to the published policy record:
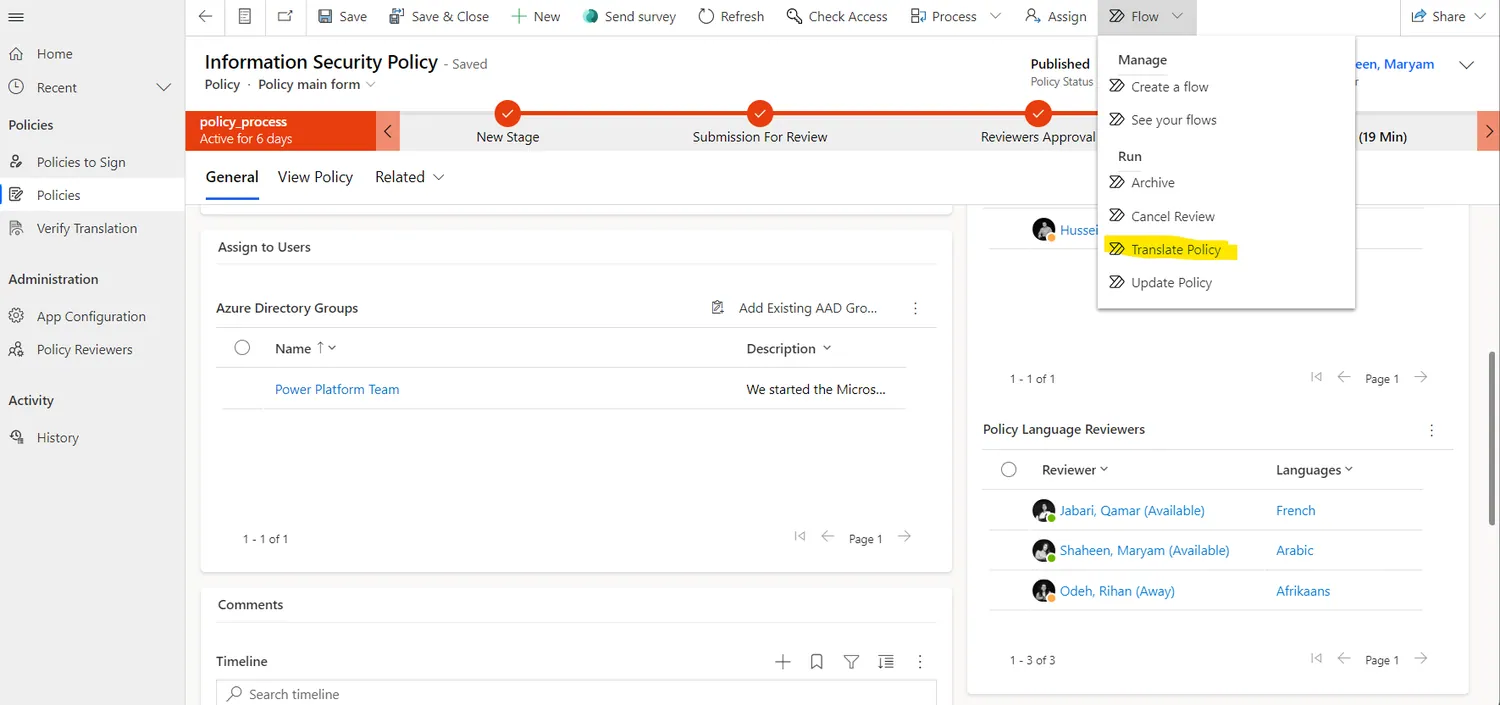
  1. Click on „Flow“ dropdown list, and choose „Translate Policy“ Flow and run it:

Note

Publish the policy before translating it, so all required languages are captured. If a new language is added after publishing, rerun the translation flow to include it.

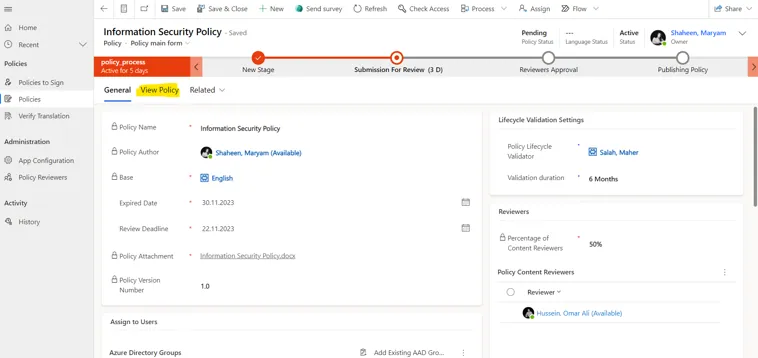
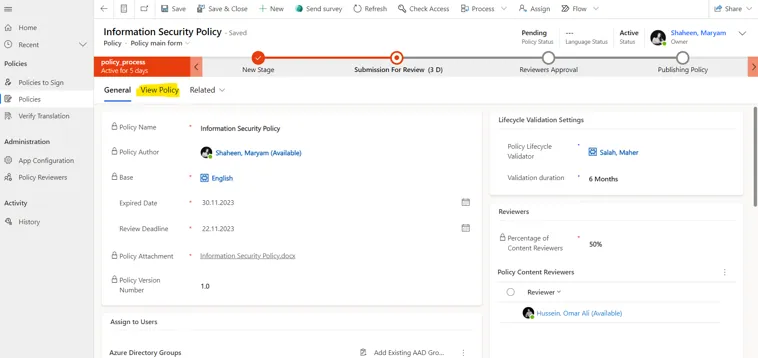
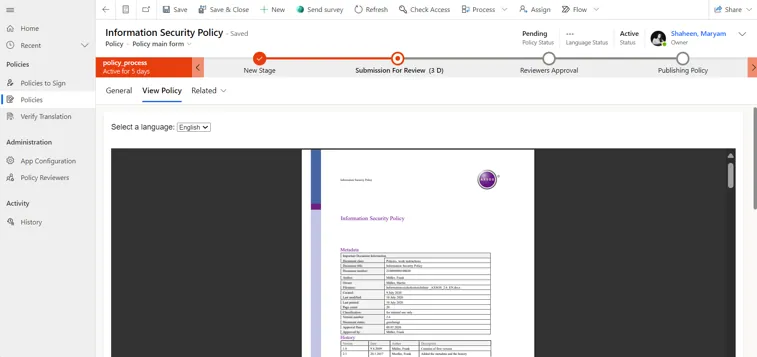
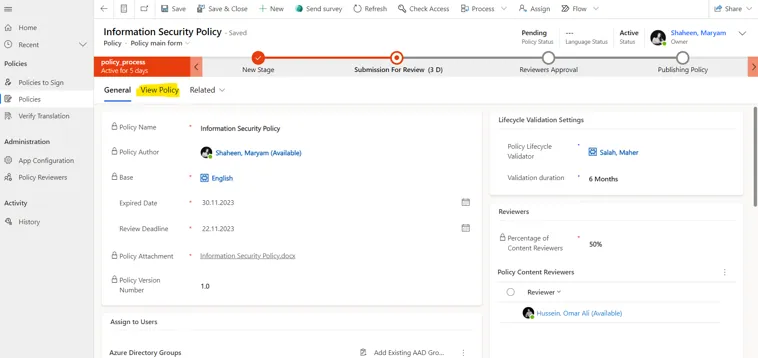
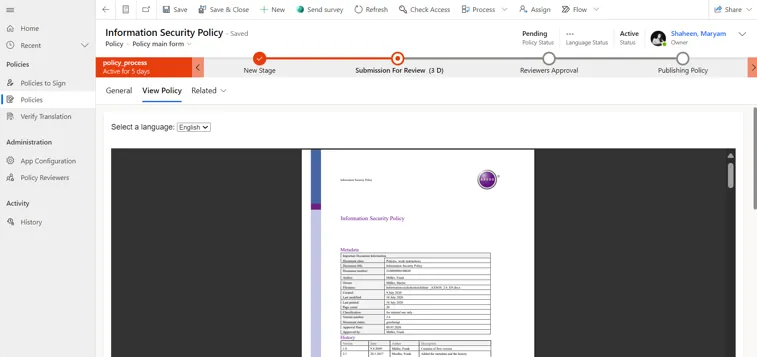
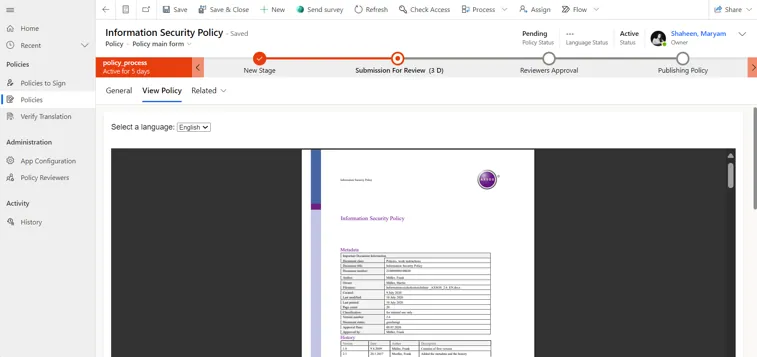
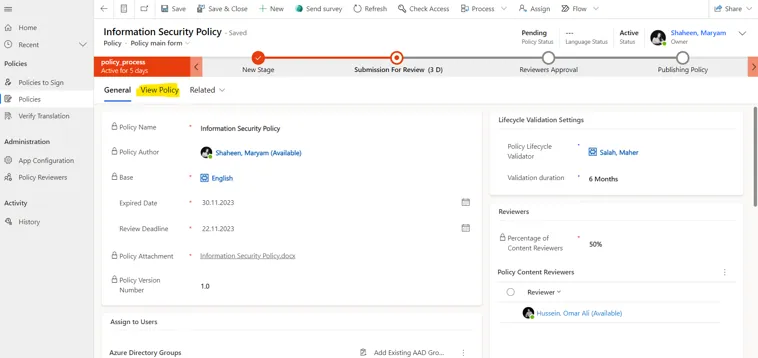
Creators can access the policy document from the View Policy tab, which opens the policy stored in its base language folder.

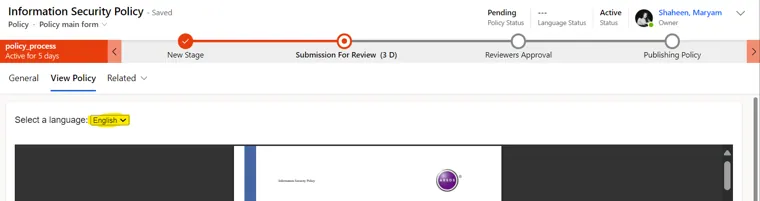
After a policy is published and translated, Admins can access the translated versions by navigating through a dropdown list and selecting their desired language.

This access is granted once the policy has been assigned to language reviewers for validation and has undergone the approval process, is published and its translation is validated.

Policy Document Viewing Options

Policy app offers two ways to view policy documents in full view, providing users with a more flexible and improved reading experience..

  1. Open in a New Tab: Users can now open the policy document in a new browser tab, allowing for easier navigation and access to the document alongside other application features. To use this option, click on „Having trouble viewing? Click here“ as shown in the screenshot below.
  1. Open in a New Window: Alternatively, users can open the policy document in a separate window. This option is ideal for those who prefer to focus solely on the document without distractions. To use this option, click on „Full Screen“ as shown in the screenshot below.

Both options enable users to utilize standard PDF viewing features, such as zooming in and out, scrolling, and searching, ensuring a more comfortable and customizable experience when reading policies.

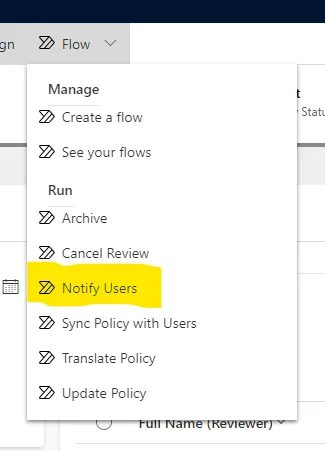
Creators can trigger a manual sign-reminder to all assigned users at any time.

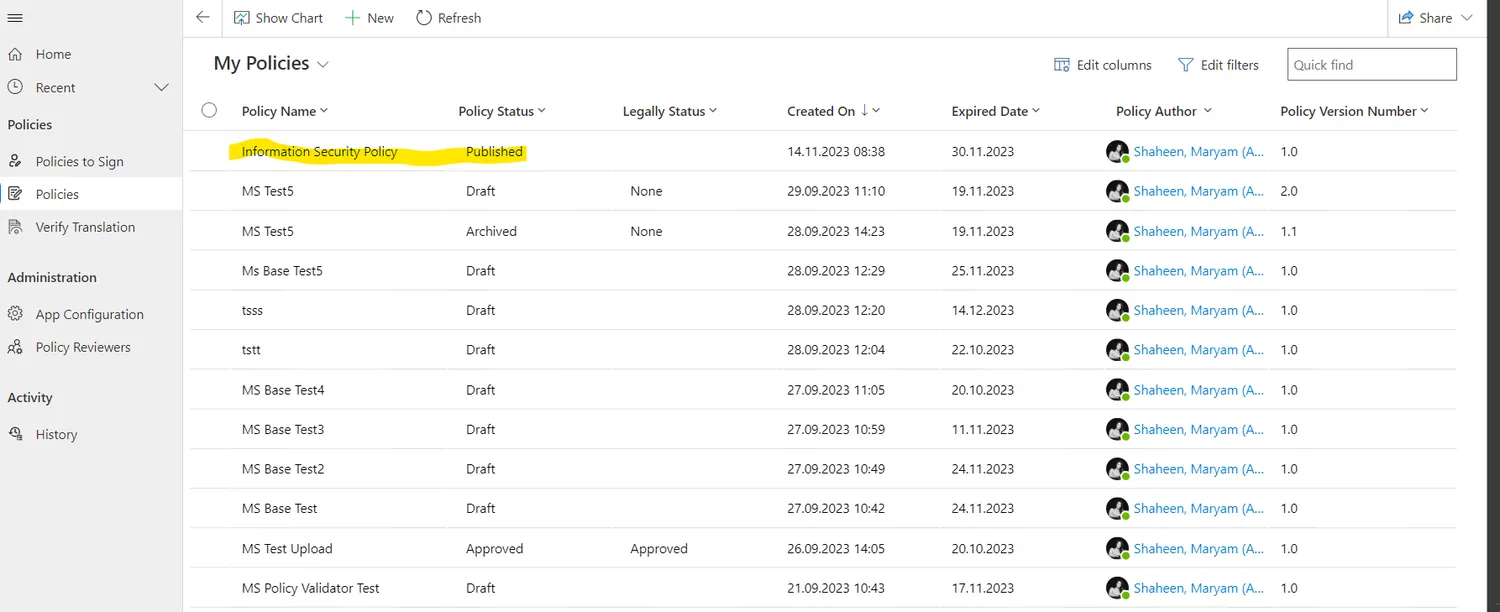
Creators can proceed with the publication by following these steps:

  1. Navigate to the published policy record:
  1. Click on „Flow“ dropdown list, and choose „Notify Users“ Flow and run it:

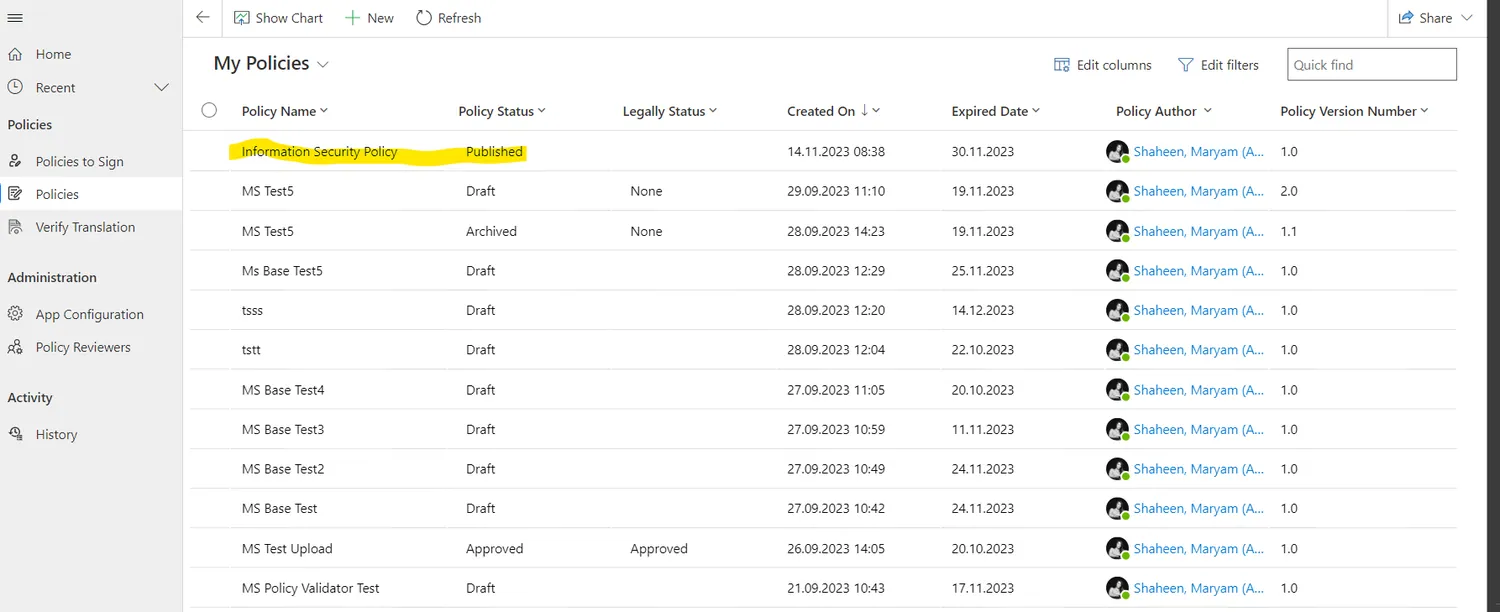
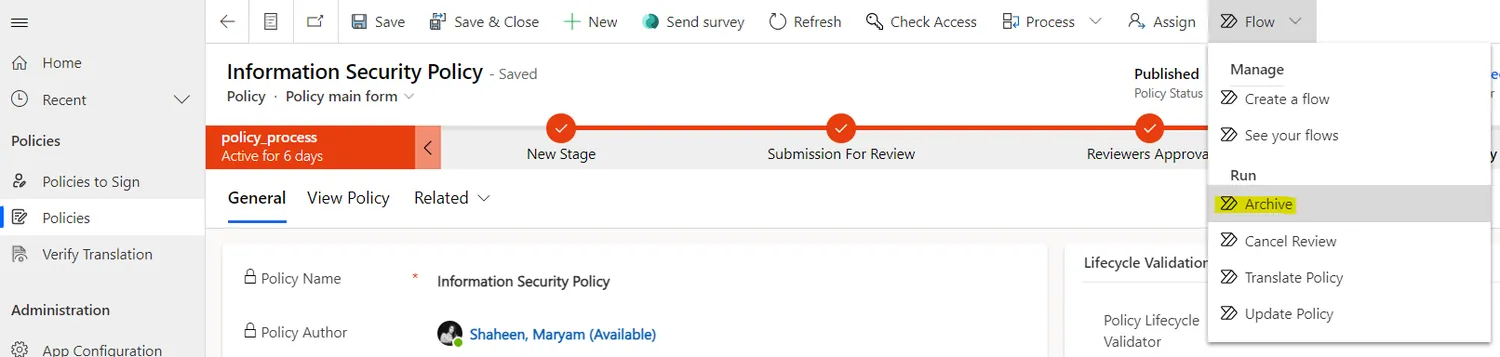
Creators can archive a policy manually if the policy is no longer needed to be published to users. they can do that by following these steps:

  1. Navigate to the published policy record:
  1. Click on „Flow“ dropdown list, and choose „Archive“ Flow and run it:

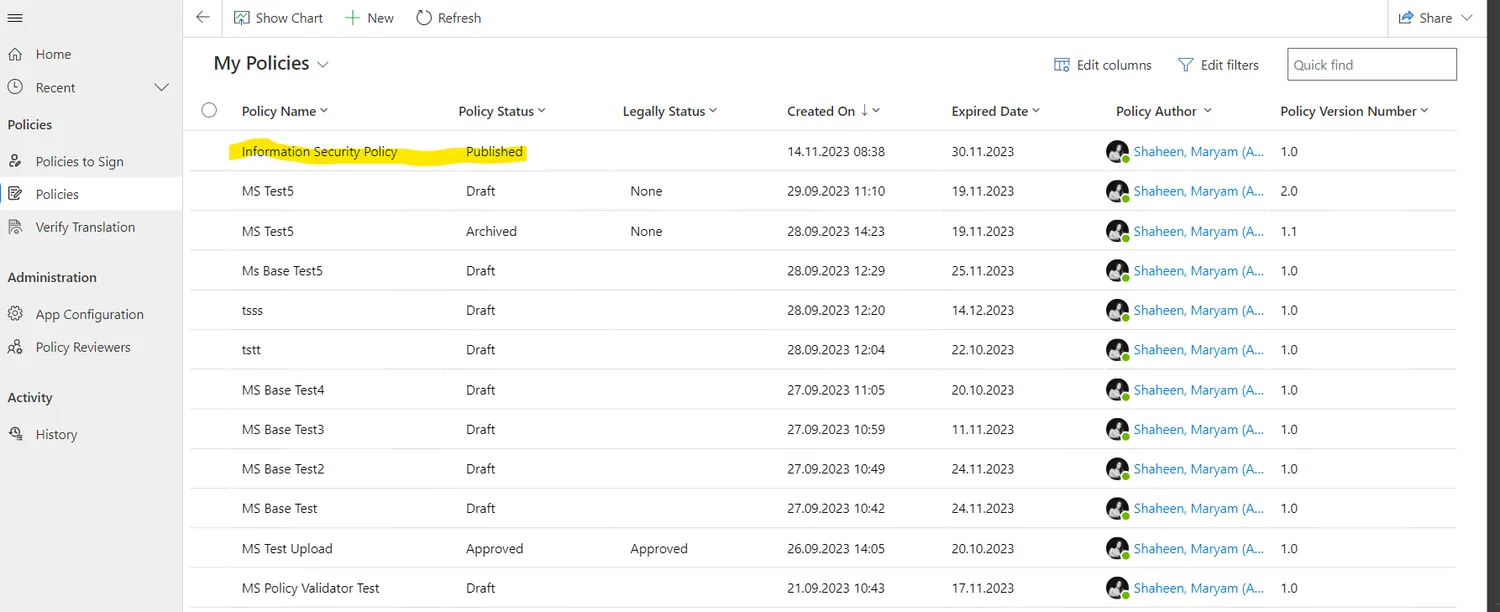
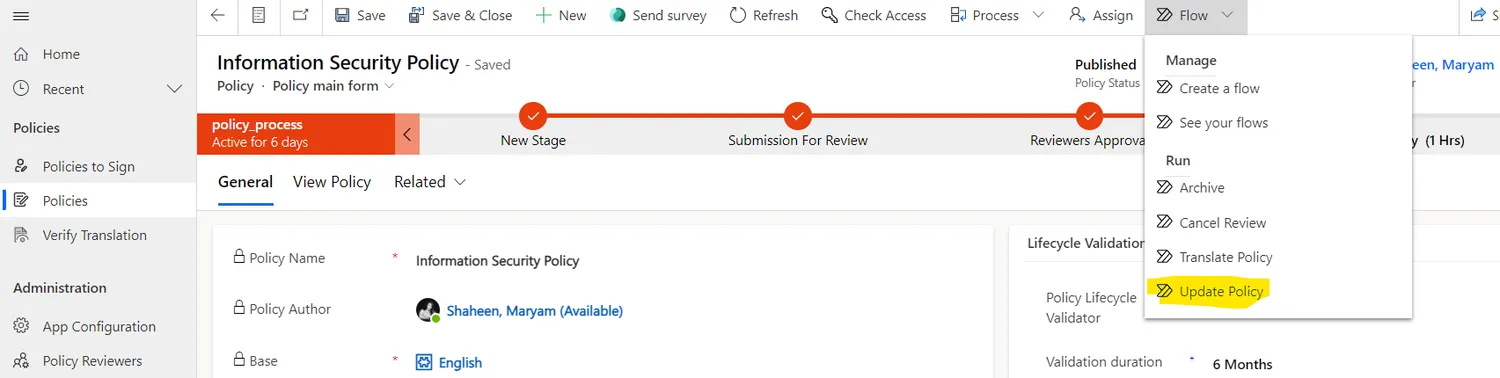
Creators can Update a policy manually if the policy document needs to be replaced with a newer version, or the policy details needs to be edited. Creator can update a policy by following these steps:

  1. Navigate to the published policy record:
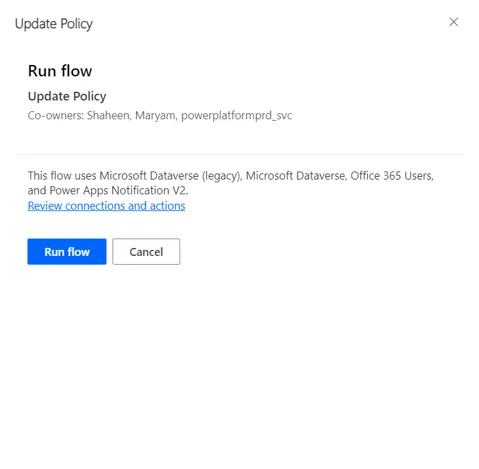
  1. Click on „Flow“ dropdown list, and choose „Update Policy“ Flow and run it:
  1. run the update policy flow by clicking on „run flow“
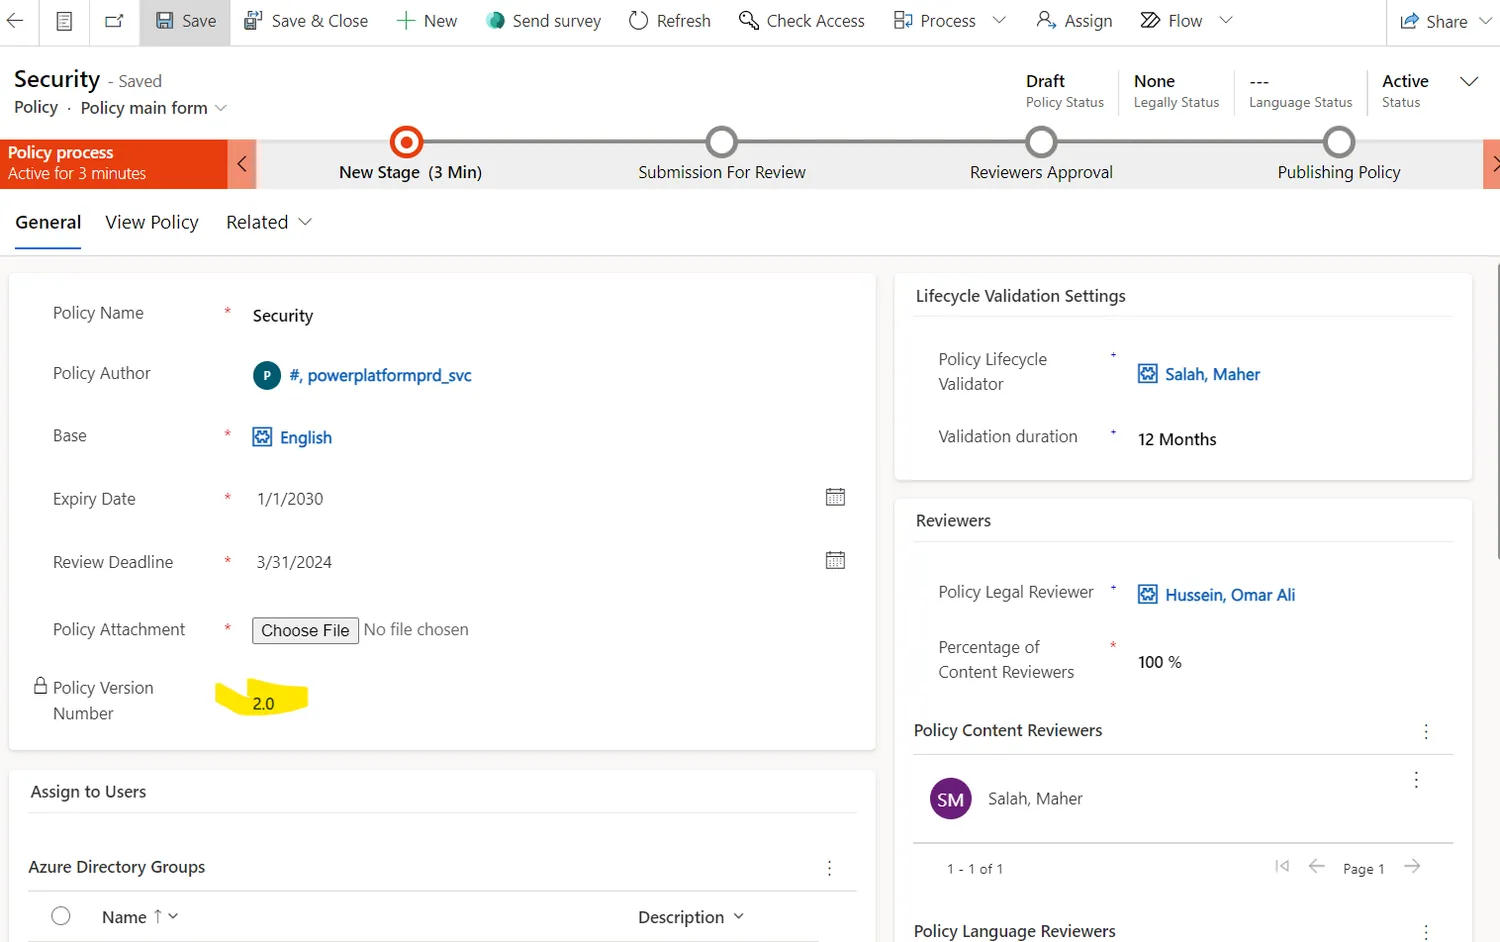
  1. After running the update policy flow, you will have a new version of the policy as draft that you can edit and upload the new version folder:
  1. Enter to the newly created version of the policy and edit what you like to change, don’t forget to upload the new version document of this policy, and to make sure of the document name to be including the correct version number.

Policy creators can now view, filter, and reply to user notes directly through a user-friendly interface. This feature streamlines communication and ensures timely responses to user queries or feedback.

How to View and Reply to Notes:

  1. Open the Policy App.
  1. Navigate to the Notes section in the menue.
  1. Use the Filter by Policy Name option to locate notes for a specific policy.
  1. Click on a note to reply.
  1. Type your reply in the provided text box and submit it.

Creators can access the list of their history of action by following these steps:

  1. Navigate to the „History“ tab in the menu:
  1. View the list of actions took by them:

Creators can personalize how and when they receive notifications, while admins can send critical reminders that bypass user preferences.

Customizing Notifications

  1. Open the Policy App and go to the User Settings tab (found in the main menu or profile dropdown).
  1. Select Notification Preferences.
  1. Save your changes.
5

Leitfaden für Inhaltsprüfer

Als Content Reviewer prüfen Sie die Ihnen zugewiesenen Richtlinien und genehmigen oder lehnen diese ab.

Content Reviewers can access their list of policies that needs to be reviewed, and review them by following these steps:

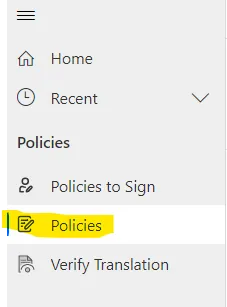
  1. Navigate to the „Policies“ tab in the menu:
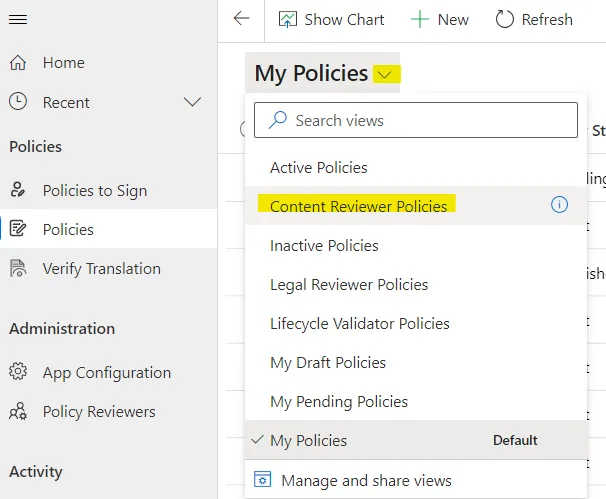
  1. Navigate to the „Content Reviewer Policies“ View in the dropdown list:
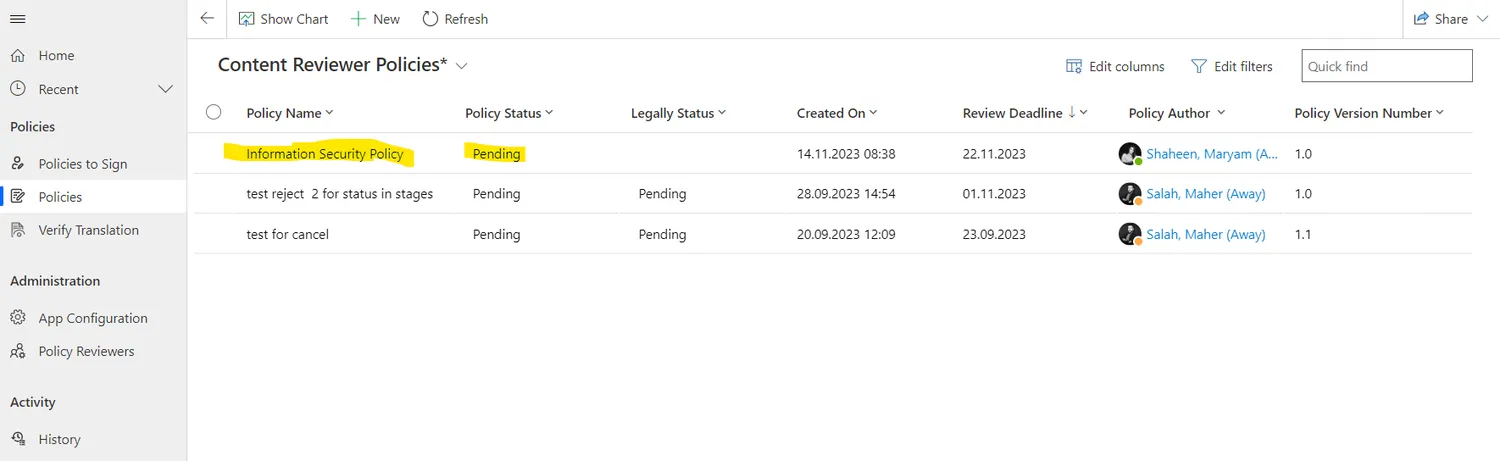
  1. Click on the desired policy record to review:
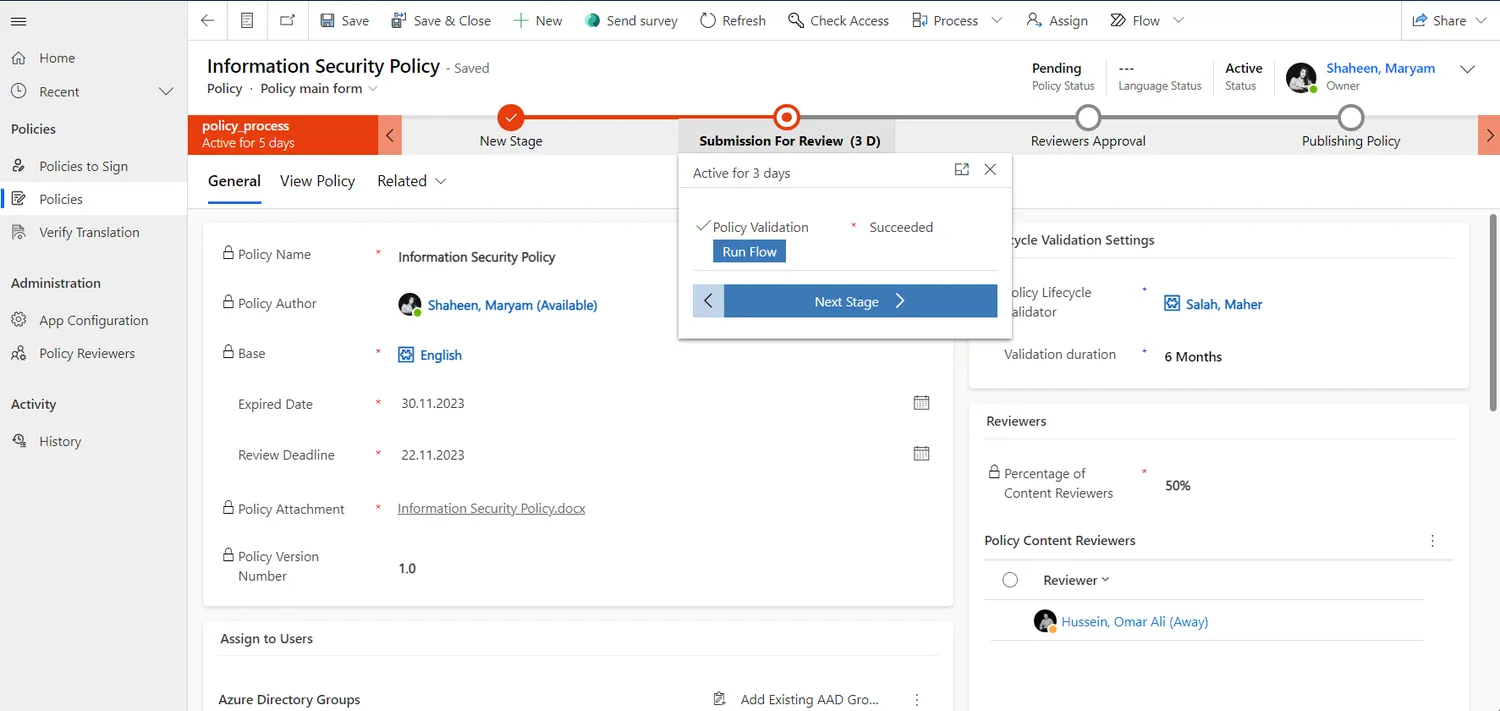
  1. Click „Next Stage“ in the Business Process Flow to move to the approval stage:
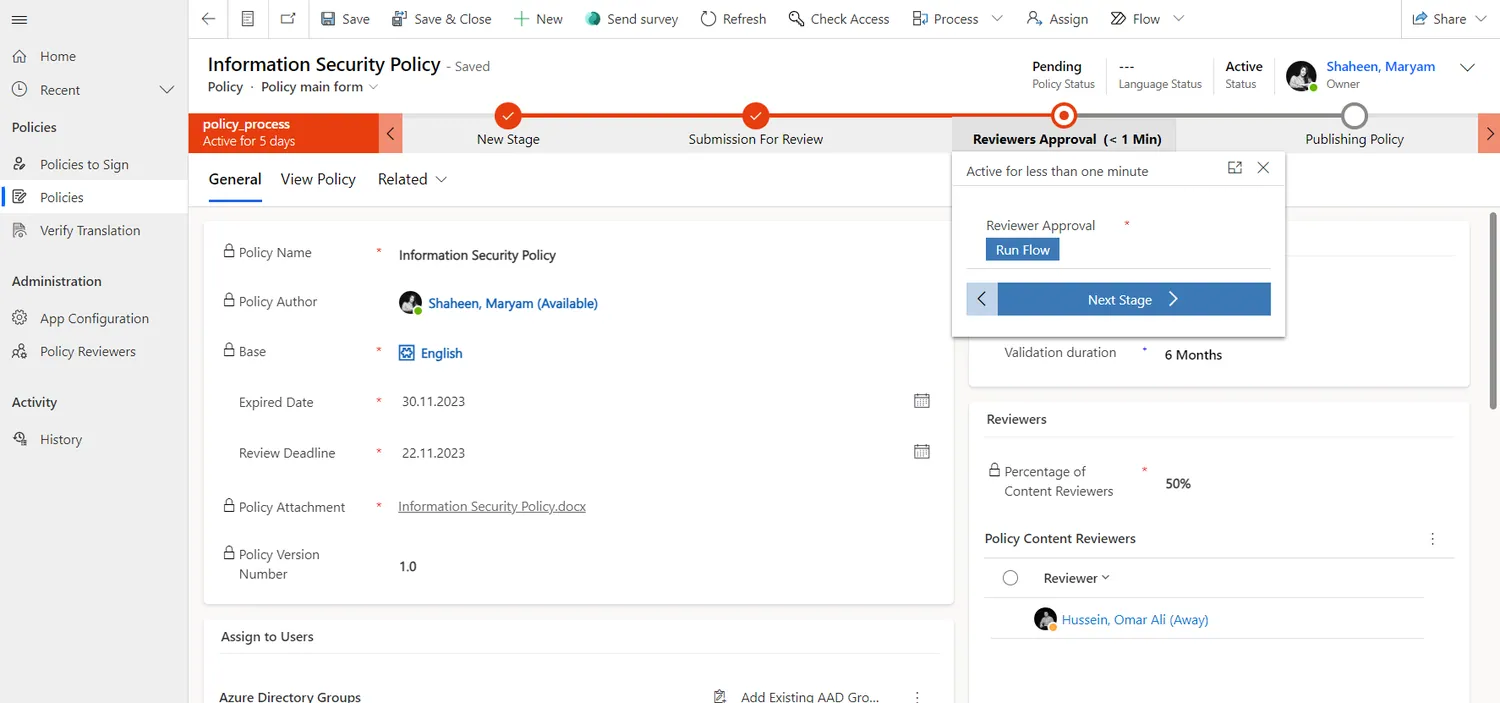
  1. Run the Approval flow, by clicking on the „Run Flow“ button:
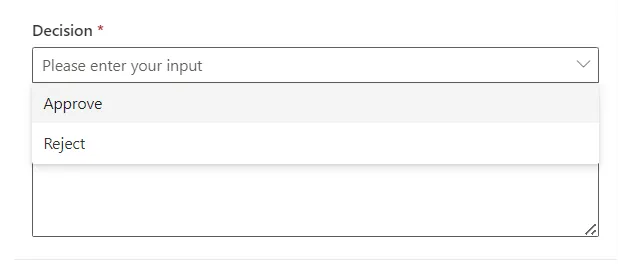
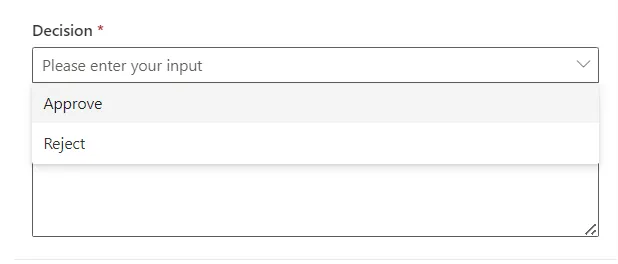
  1. Select your decision to approve or reject the policy (Mandatory):
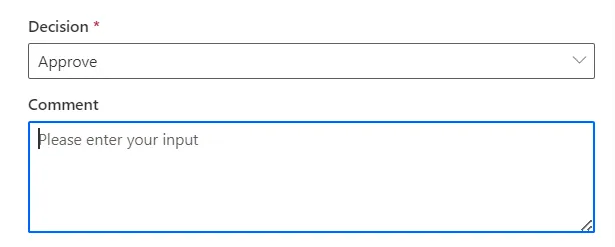
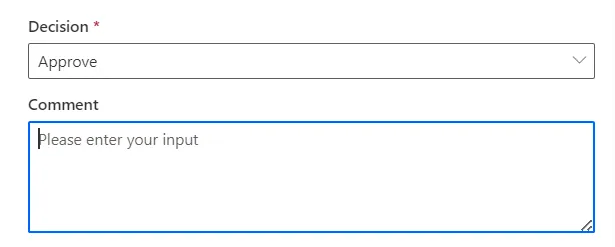
  1. Add your comment if you have any comments on the reason of rejection or approval (Optional):

Reviewers can access the policy document by clicking on the ‚View Policy‘ tab. This will lead them to the policy stored in its base language folder.

After a policy is published and translated, Admins can access the translated versions by navigating through a dropdown list and selecting their desired language.

This access is granted once the policy has been assigned to language reviewers for validation and has undergone the approval process, is published and its translation is validated.

Policy Document Viewing Options

Policy app offers two ways to view policy documents in full view, providing users with a more flexible and improved reading experience..

  1. Open in a New Tab: Users can now open the policy document in a new browser tab, allowing for easier navigation and access to the document alongside other application features. To use this option, click on „Having trouble viewing? Click here“ as shown in the screenshot below.
  1. Open in a New Window: Alternatively, users can open the policy document in a separate window. This option is ideal for those who prefer to focus solely on the document without distractions. To use this option, click on „Full Screen“ as shown in the screenshot below.

Both options enable users to utilize standard PDF viewing features, such as zooming in and out, scrolling, and searching, ensuring a more comfortable and customizable experience when reading policies.

Reviewers can access the list of their history of action by following these steps:

  1. Navigate to the „History“ tab in the menu:
  1. View the list of actions took by them:

Reviewers can personalize their notification settings, while admins can send critical reminders that bypass user preferences.

Customizing Notifications

  1. Open the Policy App and go to the User Settings tab (found in the main menu or profile dropdown).
  1. Select Notification Preferences.
  1. Save your changes.
6

Legal Reviewer Guide

The Legal Reviewer legally approves or rejects policies that require a legal review.

Legal Reviewers can access their list of policies that needs to be reviewed, and review them by following these steps:

  1. Navigate to the „Policies“ tab in the menu:
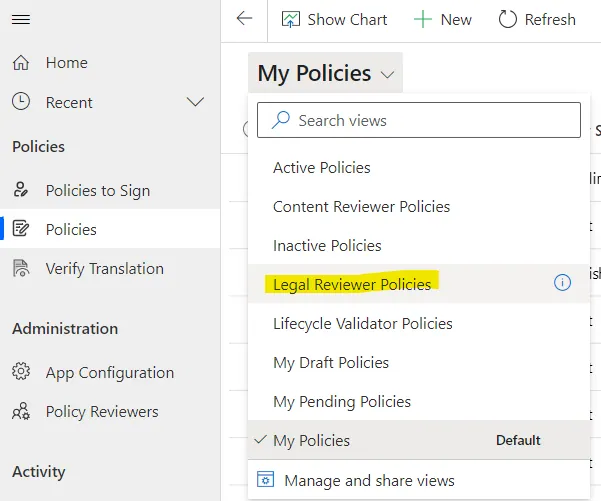
  1. Navigate to the „Legal Reviewer Policies“ View in the dropdown list:
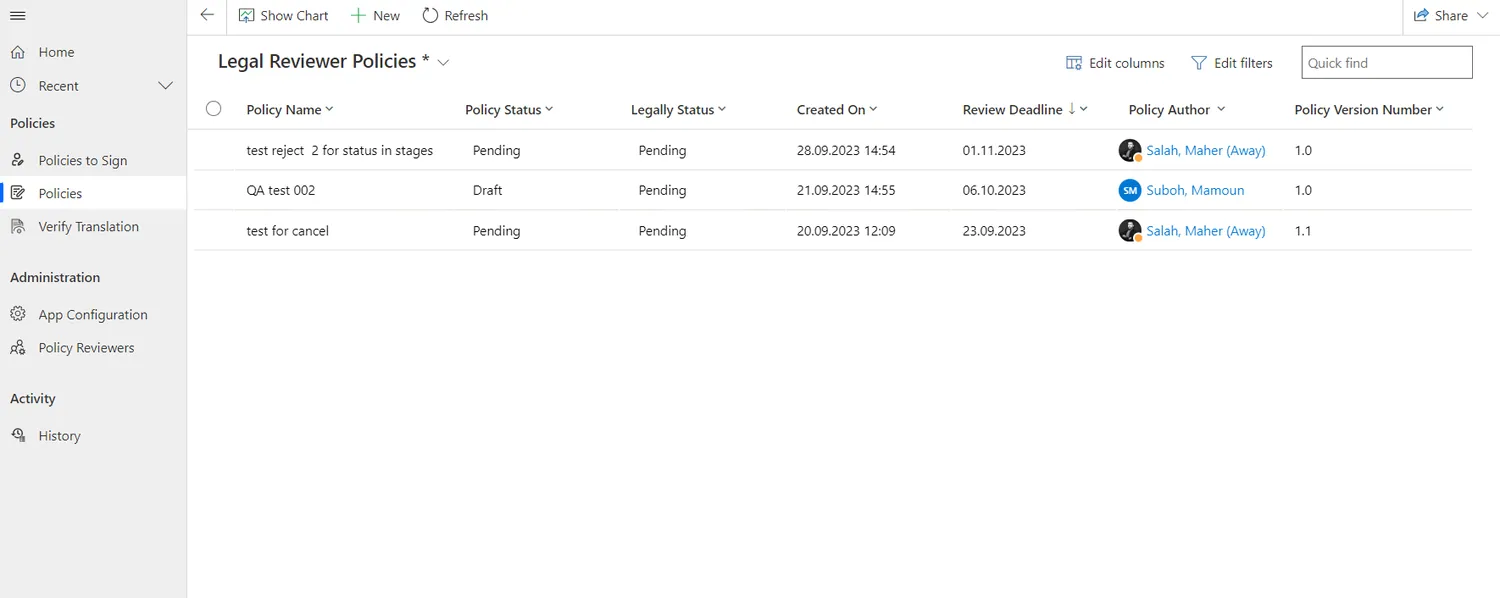
  1. Click on the desired policy record to review:
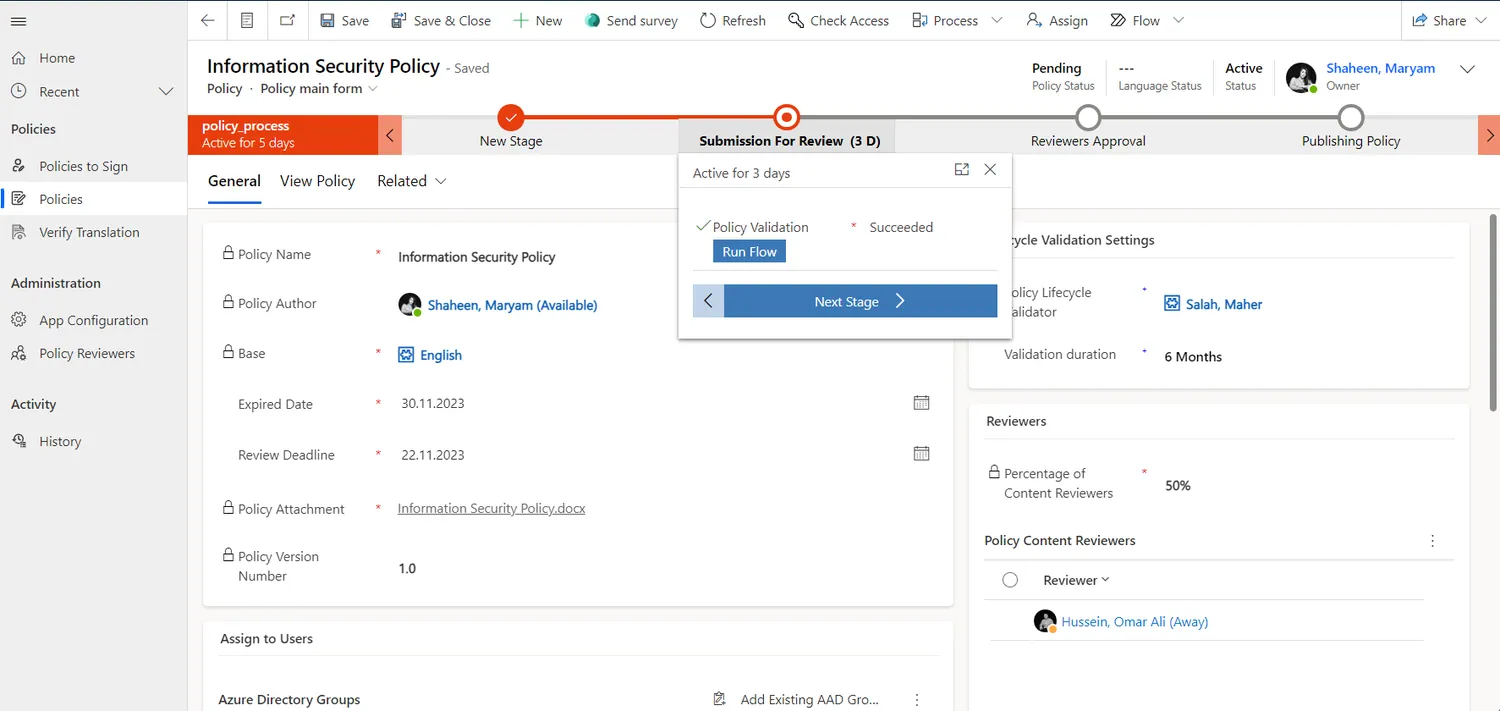
  1. Click „Next Stage“ in the Business Process Flow to move to the approval stage:
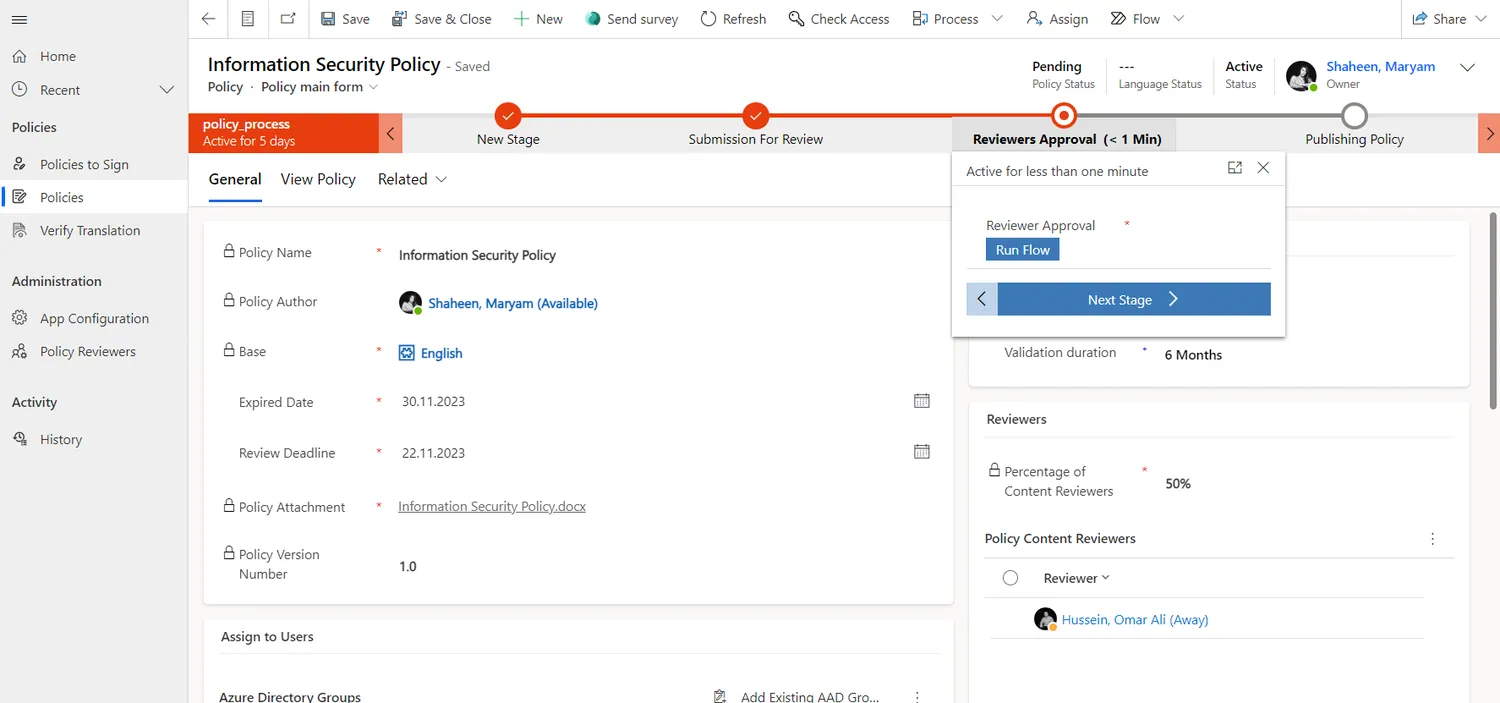
  1. Run the Approval flow, by clicking on the „Run Flow“ button:
  1. Select your decision to approve or reject the policy (Mandatory):
  1. Add your comment if you have any comments on the reason of rejection or approval (Optional):

Reviewers can access the policy document by clicking on the ‚View Policy‘ tab. This will lead them to the policy stored in its base language folder.

After a policy is published and translated, Admins can access the translated versions by navigating through a dropdown list and selecting their desired language.

This access is granted once the policy has been assigned to language reviewers for validation and has undergone the approval process, is published and its translation is validated.

Policy Document Viewing Options

Policy app offers two ways to view policy documents in full view, providing users with a more flexible and improved reading experience..

  1. Open in a New Tab: Users can now open the policy document in a new browser tab, allowing for easier navigation and access to the document alongside other application features. To use this option, click on „Having trouble viewing? Click here“ as shown in the screenshot below.
  1. Open in a New Window: Alternatively, users can open the policy document in a separate window. This option is ideal for those who prefer to focus solely on the document without distractions. To use this option, click on „Full Screen“ as shown in the screenshot below.

Both options enable users to utilize standard PDF viewing features, such as zooming in and out, scrolling, and searching, ensuring a more comfortable and customizable experience when reading policies.

Reviewers can access the list of their history of action by following these steps:

  1. Navigate to the „History“ tab in the menu:
  1. View the list of actions took by them:

Reviewers can personalize their notification settings, while admins can send critical reminders that bypass user preferences.

Customizing Notifications

  1. Open the Policy App and go to the User Settings tab (found in the main menu or profile dropdown).
  1. Select Notification Preferences.
  1. Save your changes.
7

Language Reviewer Guide

The Language Reviewer verifies the accuracy of automatic translations in their assigned language.

Language Reviewers can access their list of policies that needs translation validation, and validate them by following these steps:

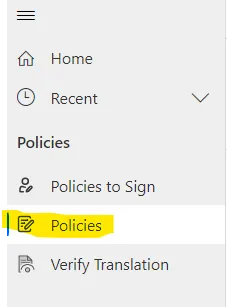
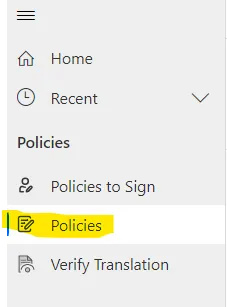
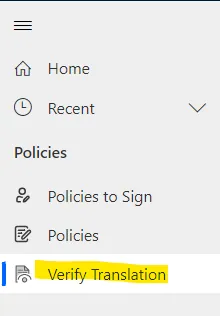
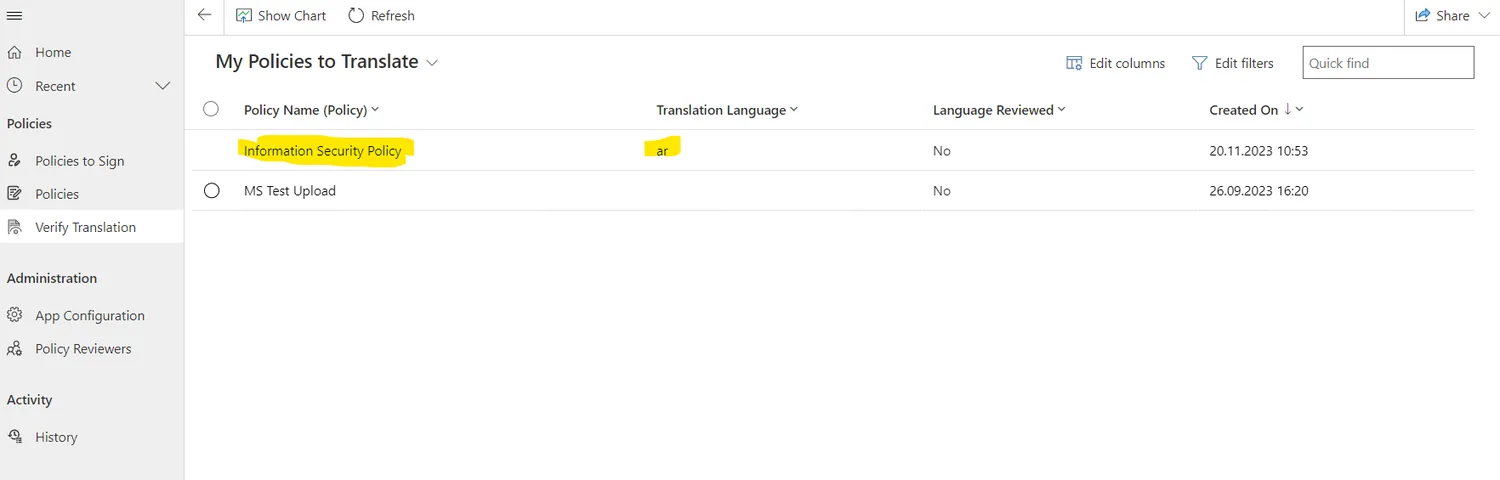
  1. Navigate to the „Verify Translation“ tab in the menu:
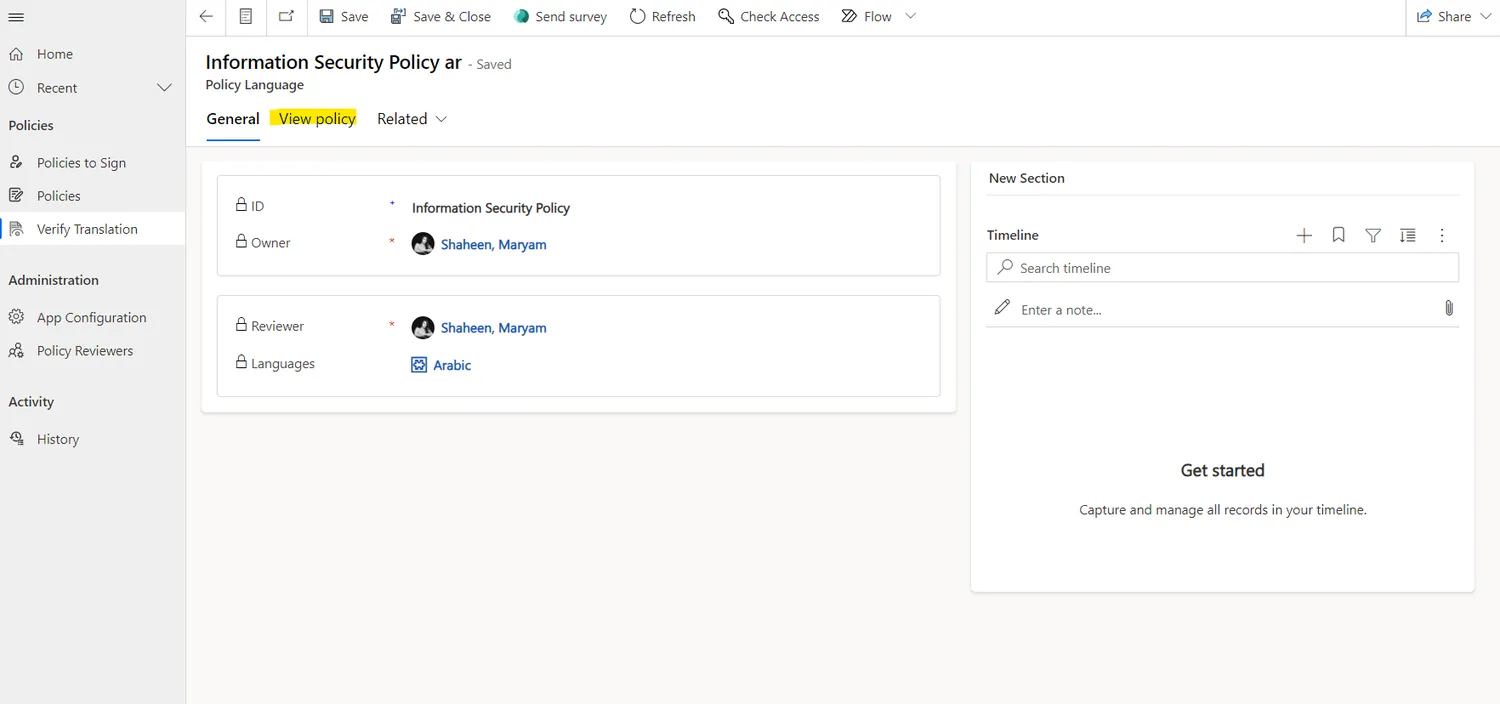
  1. Click on the desired policy record to Verify Translation:
  1. Navigate to the „View Policy“ tab:
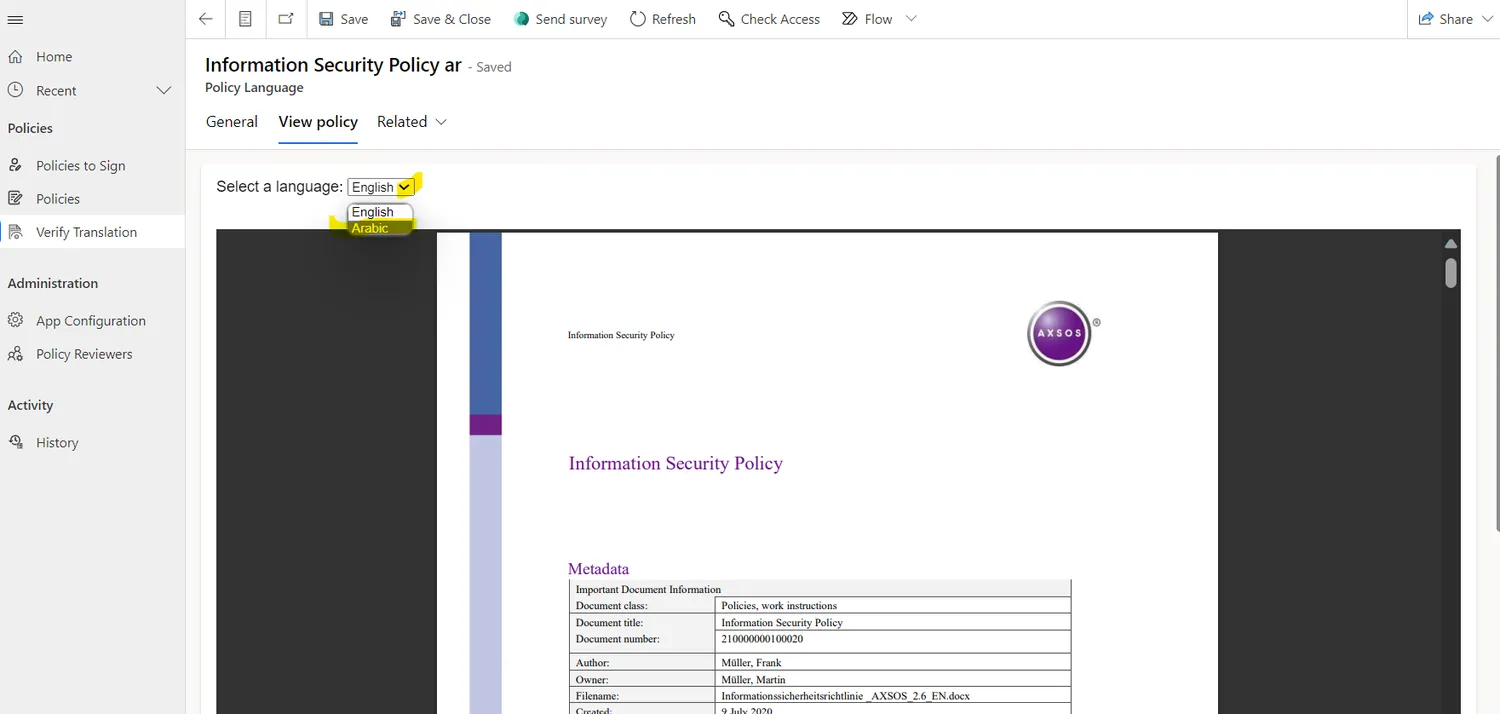
  1. Select the Language that the language reviewer is verifying from the dropdown list:
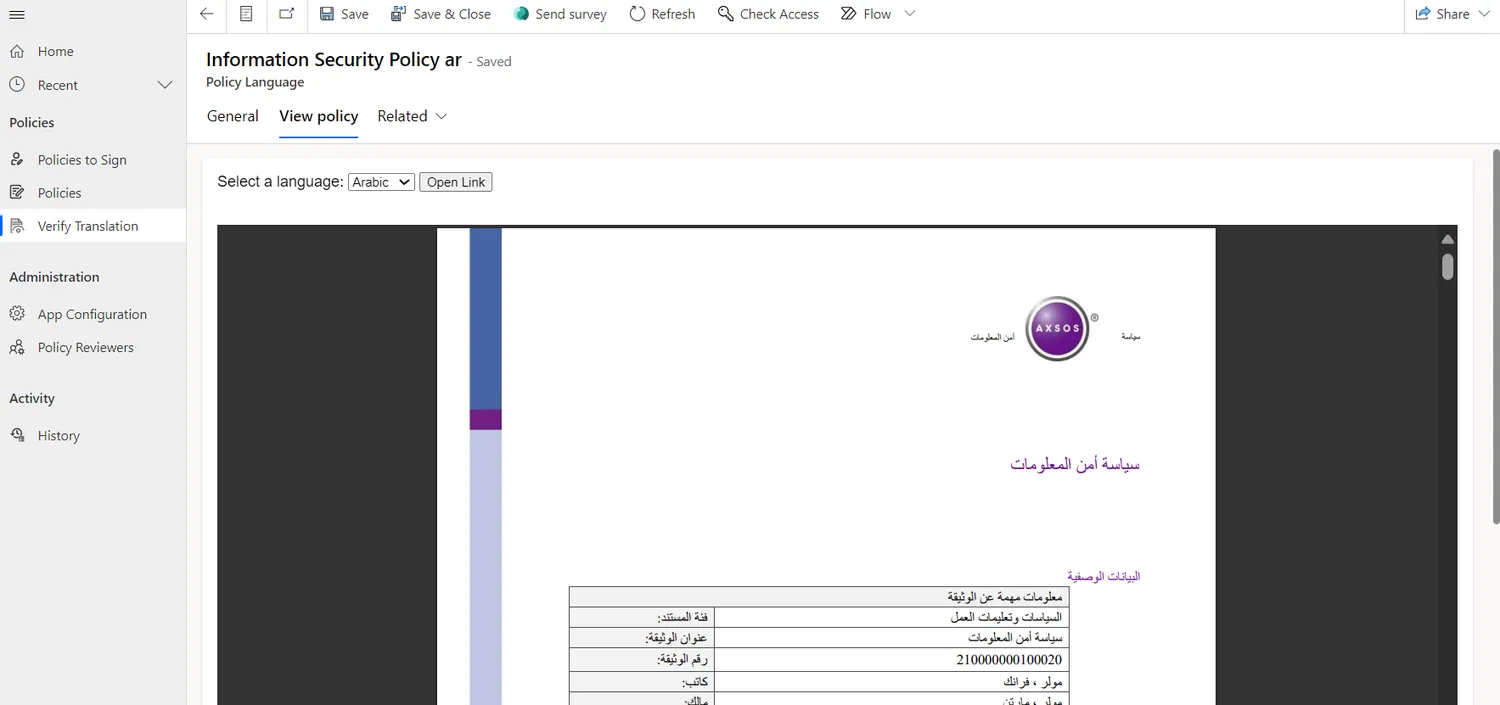
  1. Read the translated document in the language selected, and see if it needs any edits:
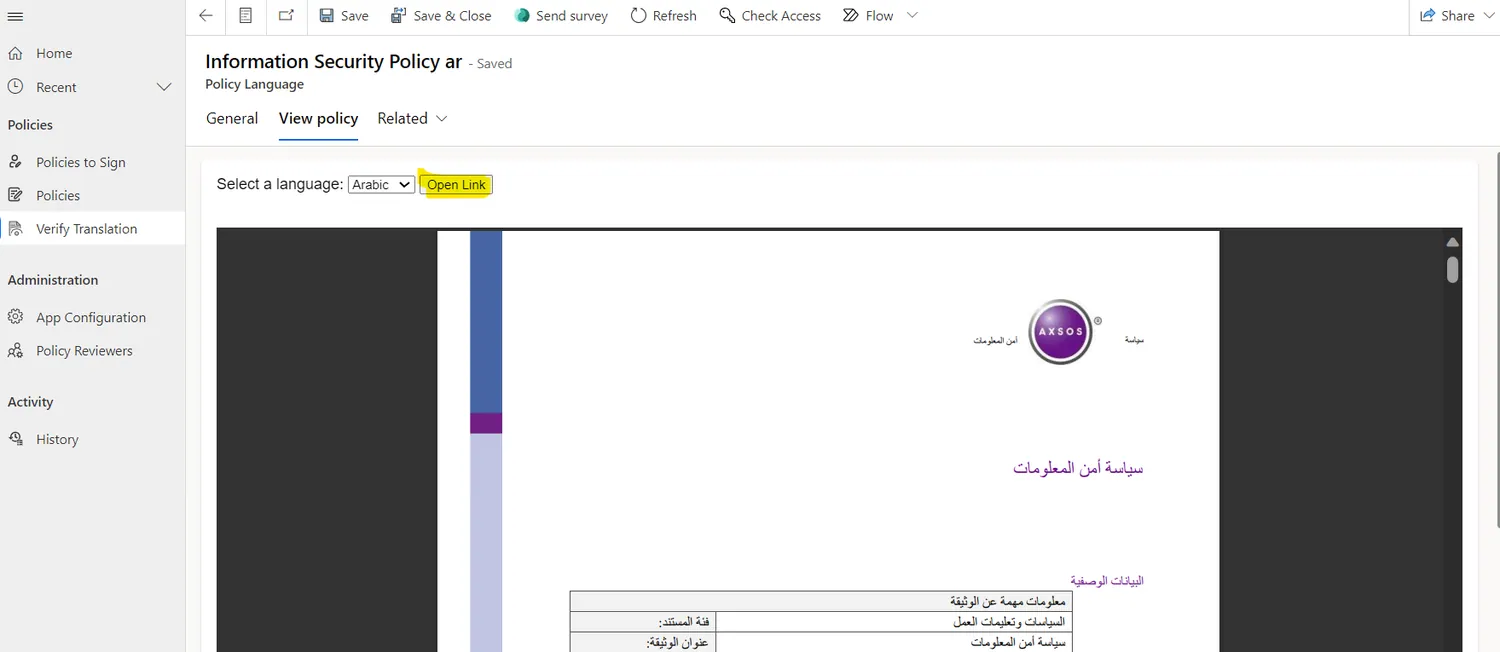
  1. If Language Reviewers find some needed edits, they can click on „Open Link“ button, to open the current translation in a word file that can be edited by them:
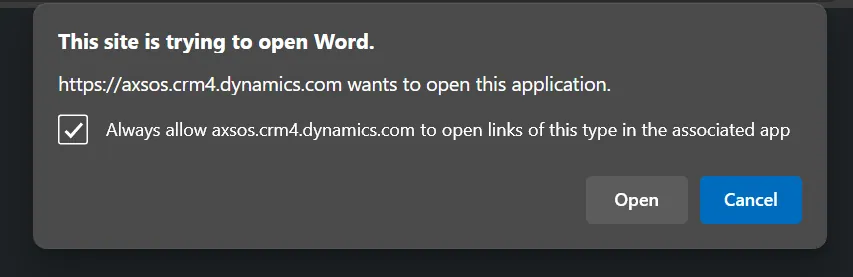
  1. Language reviewers have to allow the browser to open word on their desktop by checking the checkbox, and clicking on „Open“:
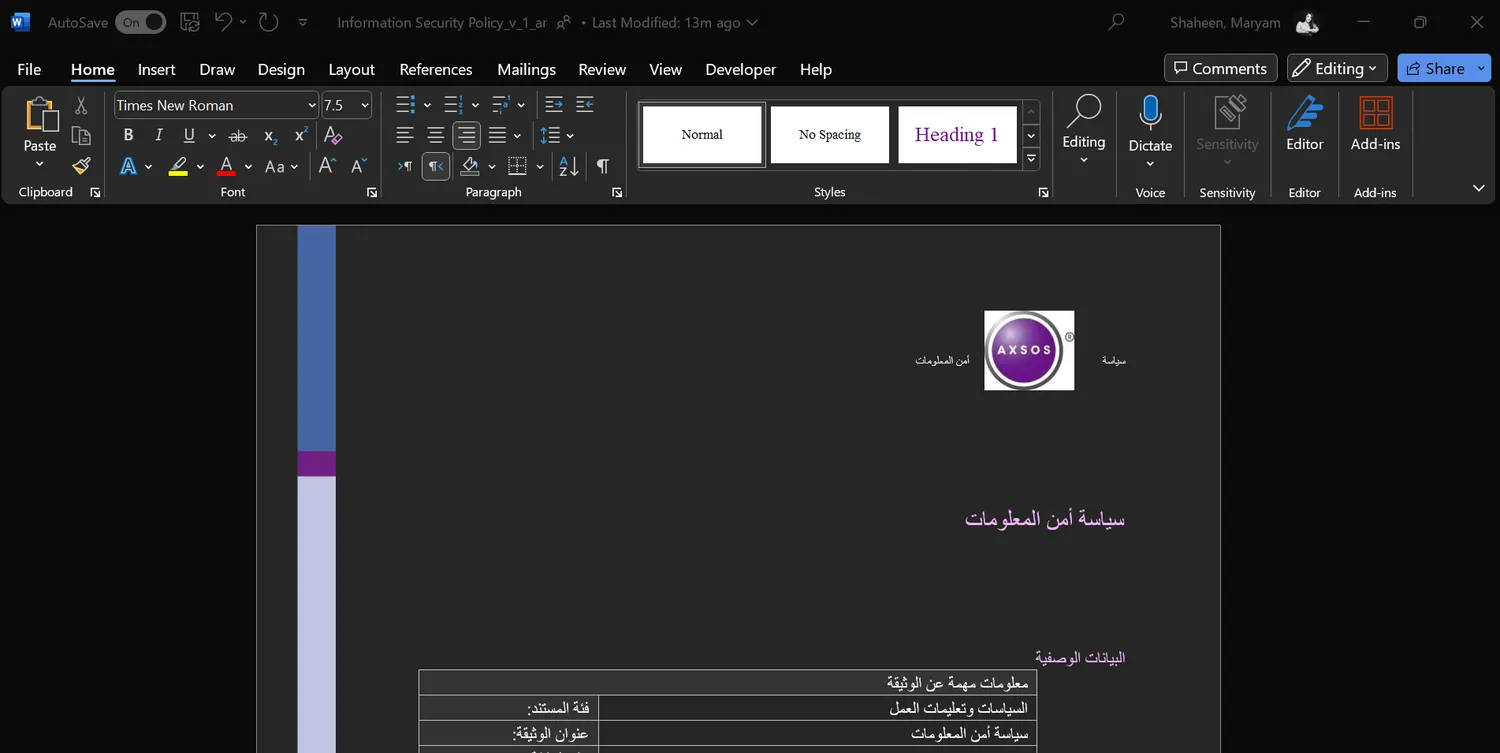
  1. The policy in the assigned language will be opened in Microsoft Word on the language reviewer Desktop, here language reviewer is asked to make the edits needed and save the file, all changes will be directly reflected on the file:
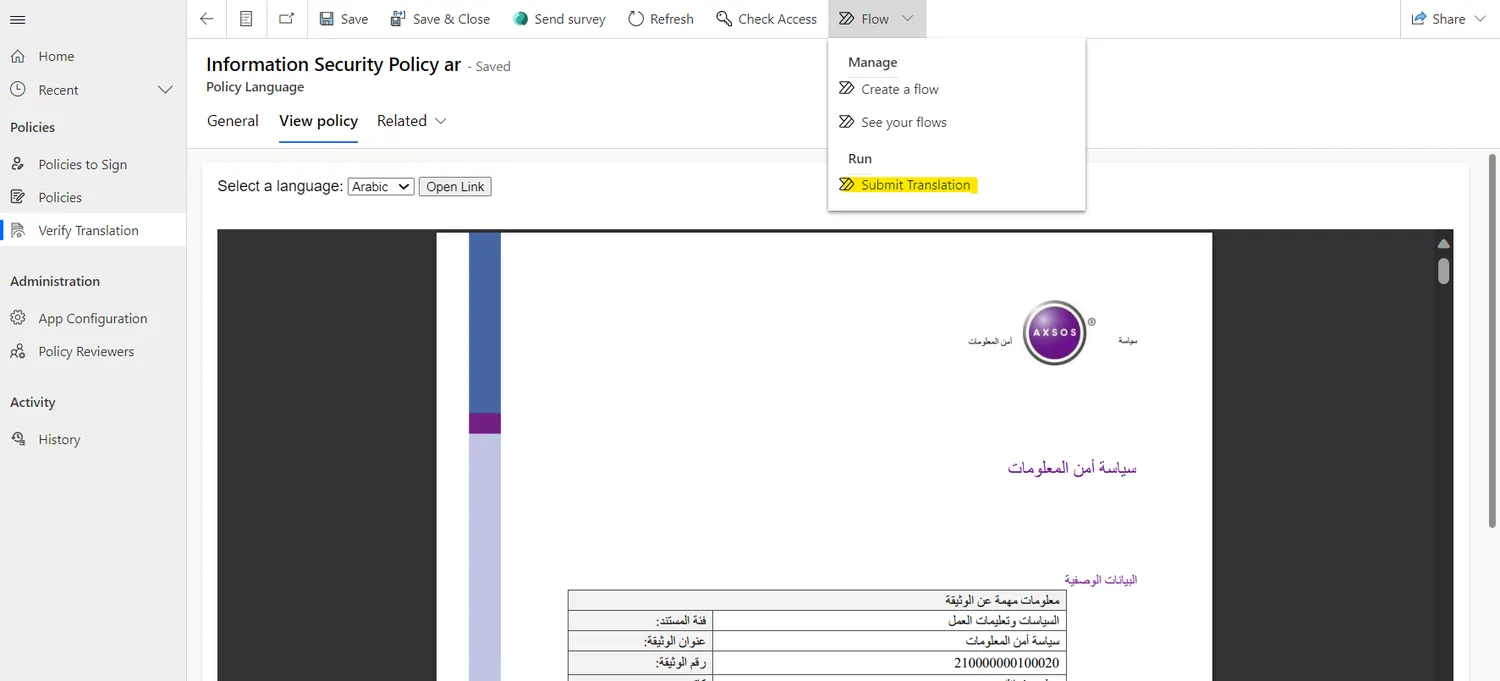
  1. once the edit is done, or if the translation doesn’t need to be edited, language reviewer can navigate to the „Flow“ button, and then run the flow by clicking on „Submit Translation.“
  1. And finally, click on „Run Flow“:

Reviewers can access the policy document by clicking on the ‚View Policy‘ tab. This will lead them to the policy stored in its base language folder.

After a policy is published and translated, Admins can access the translated versions by navigating through a dropdown list and selecting their desired language.

This access is granted once the policy has been assigned to language reviewers for validation and has undergone the approval process, is published and its translation is validated.

Policy Document Viewing Options

Policy app offers two ways to view policy documents in full view, providing users with a more flexible and improved reading experience..

  1. Open in a New Tab: Users can now open the policy document in a new browser tab, allowing for easier navigation and access to the document alongside other application features. To use this option, click on „Having trouble viewing? Click here“ as shown in the screenshot below.
  1. Open in a New Window: Alternatively, users can open the policy document in a separate window. This option is ideal for those who prefer to focus solely on the document without distractions. To use this option, click on „Full Screen“ as shown in the screenshot below.

Both options enable users to utilize standard PDF viewing features, such as zooming in and out, scrolling, and searching, ensuring a more comfortable and customizable experience when reading policies.

Reviewers can access the list of their history of action by following these steps:

  1. Navigate to the „History“ tab in the menu:
  1. View the list of actions took by them:

Reviewers can personalize their notification settings, while admins can send critical reminders that bypass user preferences.

Customizing Notifications

  1. Open the Policy App and go to the User Settings tab (found in the main menu or profile dropdown).
  1. Select Notification Preferences.
  1. Save your changes.
8

Life-Cycle Validator Guide

The Life-Cycle Validator periodically re-validates published policies at the interval the Creator specified.

Life-Cycle Validators can validate the policy only after the validation duration has elapsed, and they have to do this validation only during the Validation Review Period. Life-Cycle Validators can validate a policy by following these steps:

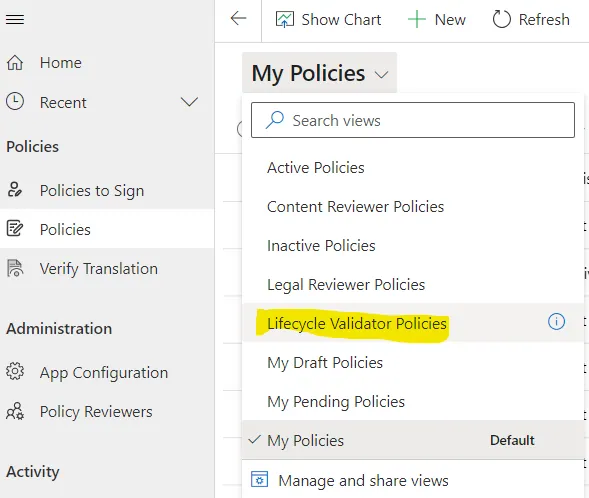
  1. Navigate to the „Policies“ tab in the menu:
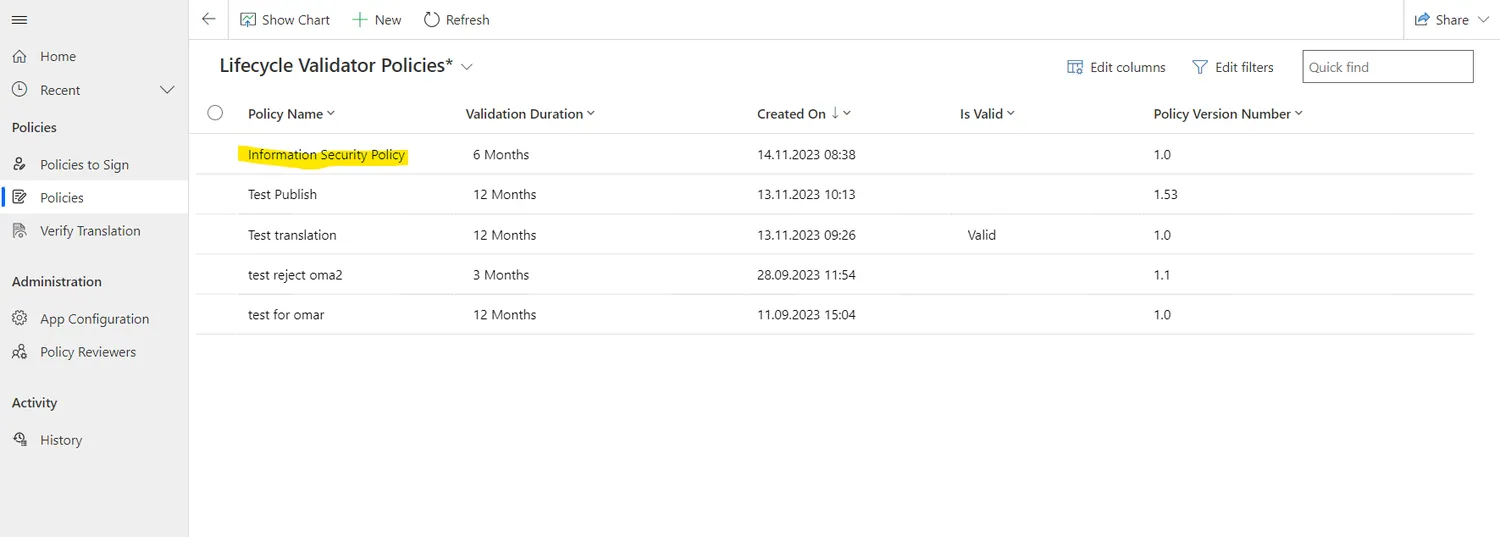
  1. Navigate to the „Lifecycle Validator Policies“ View in the dropdown list:
  1. Click on the desired policy record to review:
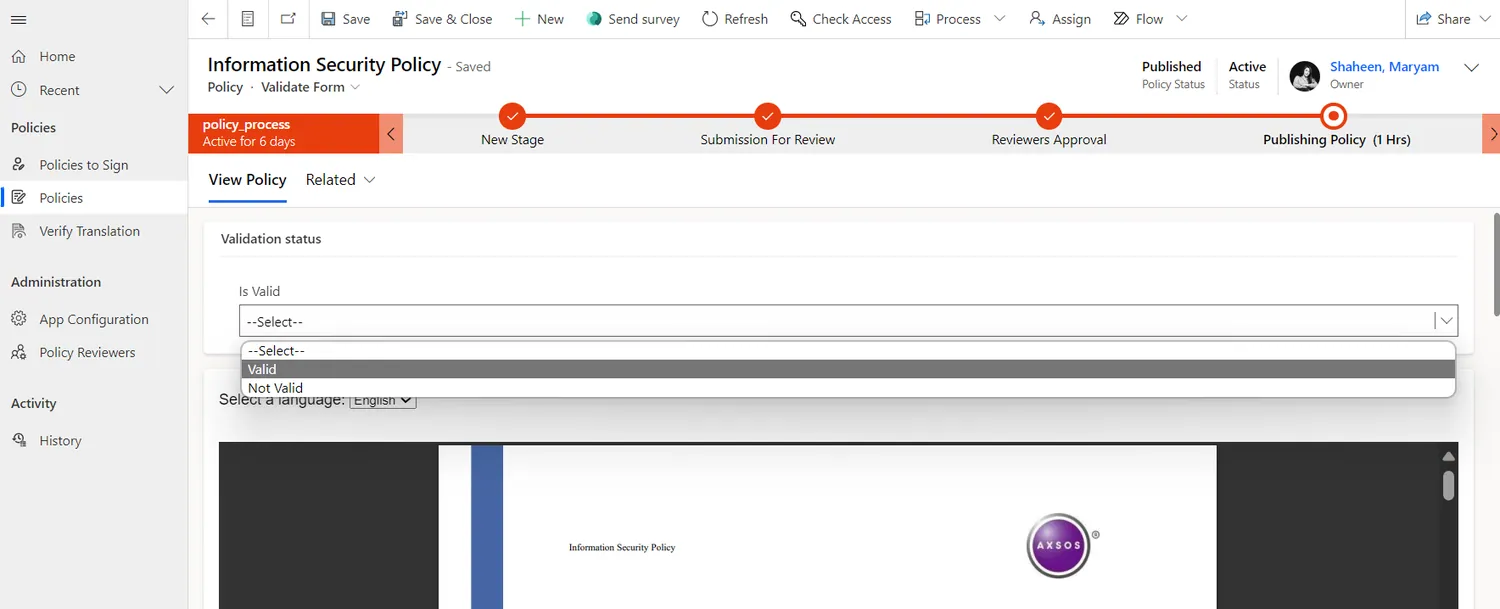
  1. Navigate to the „Validator Form“ from the policy dropdown list under the policy name:
  1. choose your validation decision by clicking on „Valid“ or „Not Valid“:
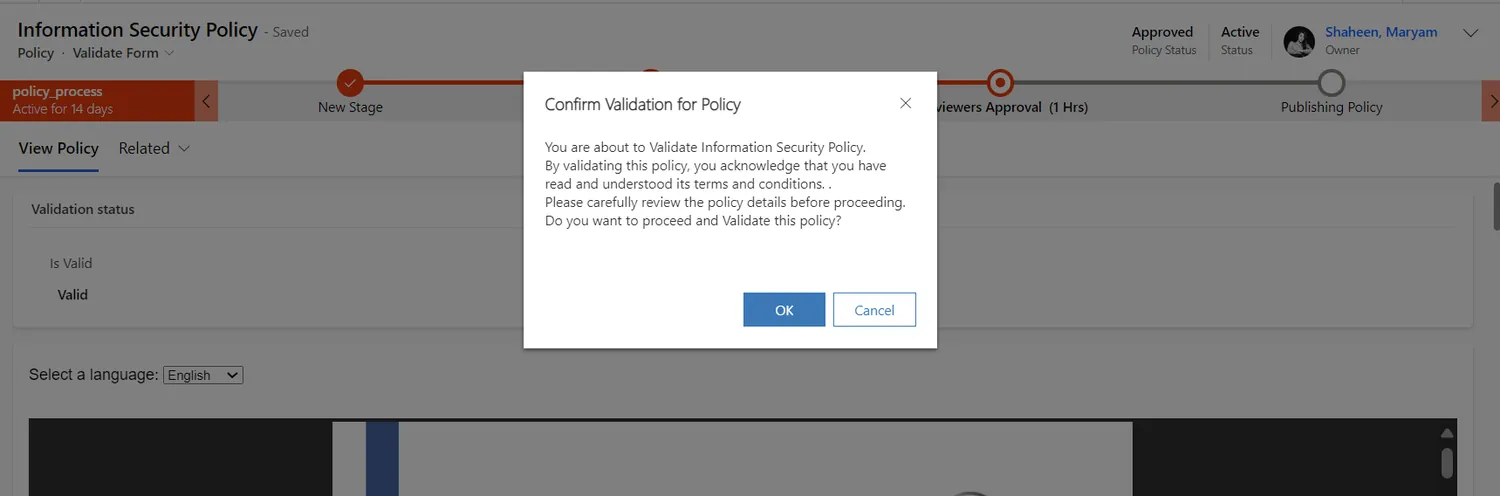
  1. Click on „Ok“ in the confirmation popup:

Note

Selecting 'Valid' as a Life-Cycle Validator extends the current version incrementally (e.g., 1.2, 1.3, 1.4, and so on). Choosing 'Not Valid' triggers a notification to the creator, prompting a manual update to the policy. This update involves replacing the document with a newer version, resulting in an incremented version number (e.g., 1, 2, 3, and so forth).

Reviewers can access the policy document by clicking on the ‚View Policy‘ tab. This will lead them to the policy stored in its base language folder.

After a policy is published and translated, Admins can access the translated versions by navigating through a dropdown list and selecting their desired language.

This access is granted once the policy has been assigned to language reviewers for validation and has undergone the approval process, is published and its translation is validated.

Policy Document Viewing Options

Policy app offers two ways to view policy documents in full view, providing users with a more flexible and improved reading experience..

  1. Open in a New Tab: Users can now open the policy document in a new browser tab, allowing for easier navigation and access to the document alongside other application features. To use this option, click on „Having trouble viewing? Click here“ as shown in the screenshot below.
  1. Open in a New Window: Alternatively, users can open the policy document in a separate window. This option is ideal for those who prefer to focus solely on the document without distractions. To use this option, click on „Full Screen“ as shown in the screenshot below.

Both options enable users to utilize standard PDF viewing features, such as zooming in and out, scrolling, and searching, ensuring a more comfortable and customizable experience when reading policies.

Life-Cycle Validators can access the list of their history of action by following these steps:

  1. Navigate to the „History“ tab in the menu:
  1. View the list of actions took by them:

Life-Cycle Validators can personalize their notification settings, while admins can send critical reminders that bypass user preferences.

Customizing Notifications

  1. Open the Policy App and go to the User Settings tab (found in the main menu or profile dropdown).
  1. Select Notification Preferences.
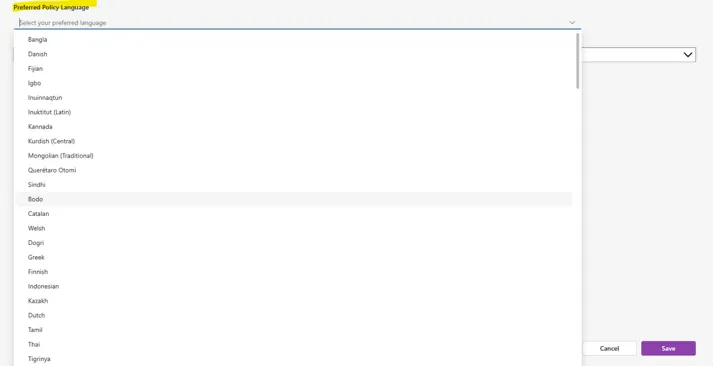
  • Select your preferred language for notifications.
  1. Save your changes.
9

End-User Guide (Employee)

End-users view the policies assigned to them and sign to acknowledge that they have read and understood them.

Users can access the policy document by following these steps:

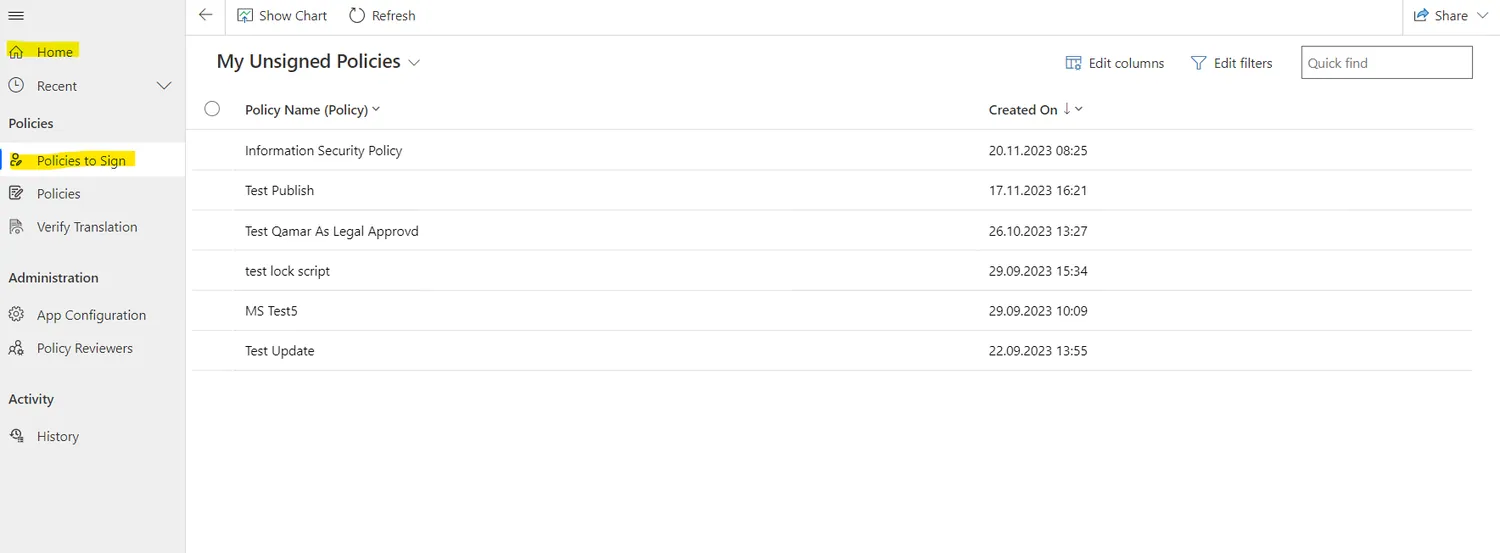
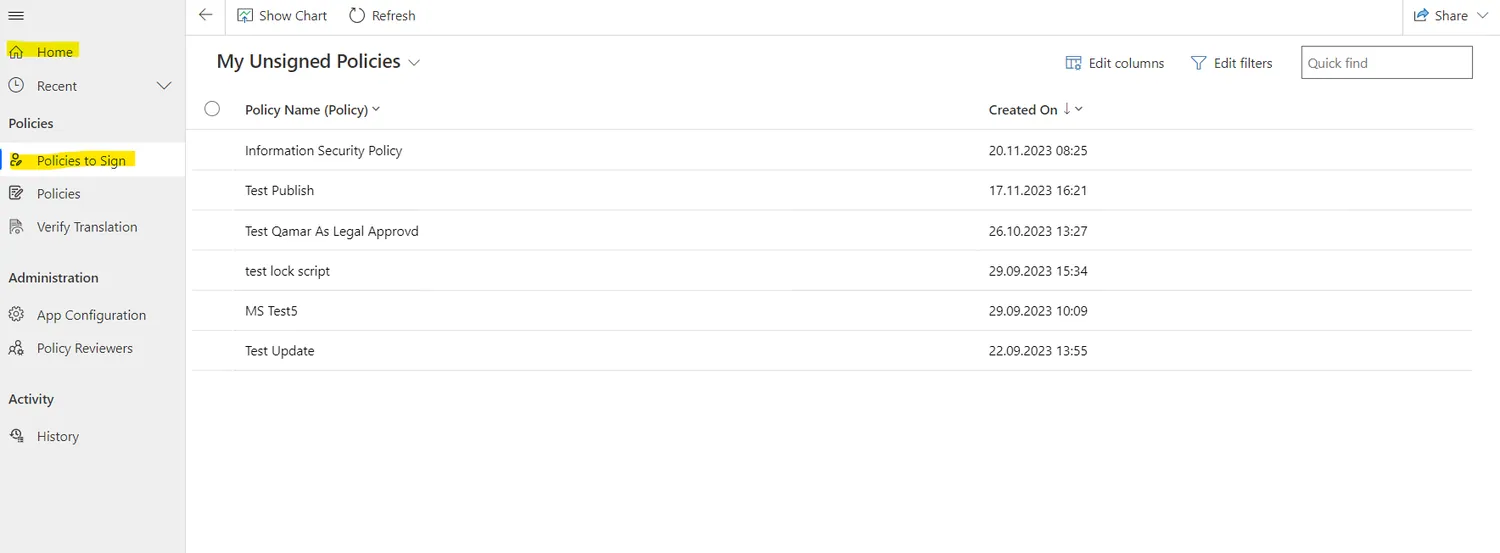
  1. Navigate to „Home“ or „Policies to Sign“ tab in the Menu:
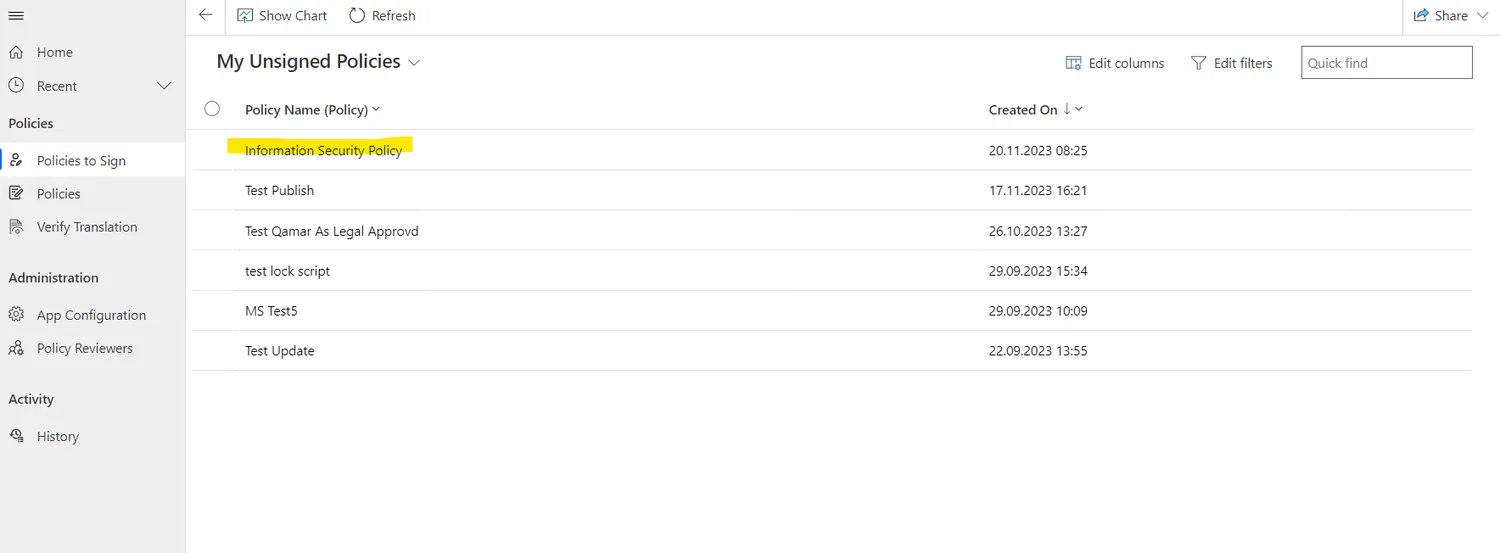
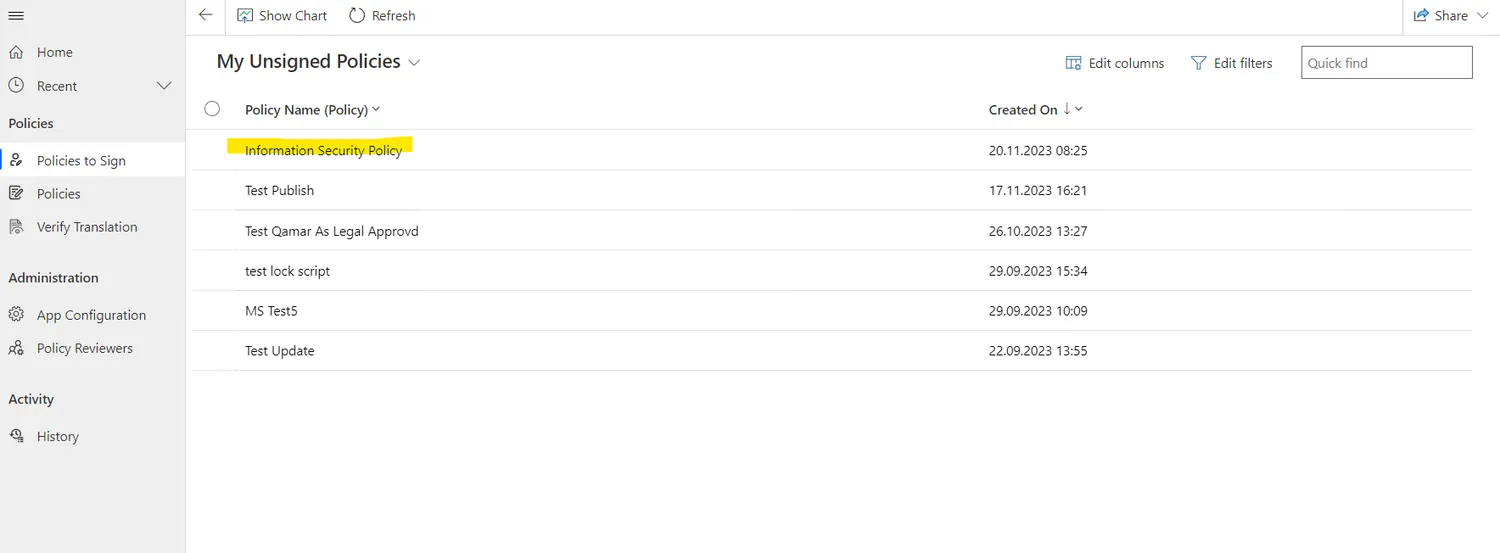
  1. Select the desired Policy record:
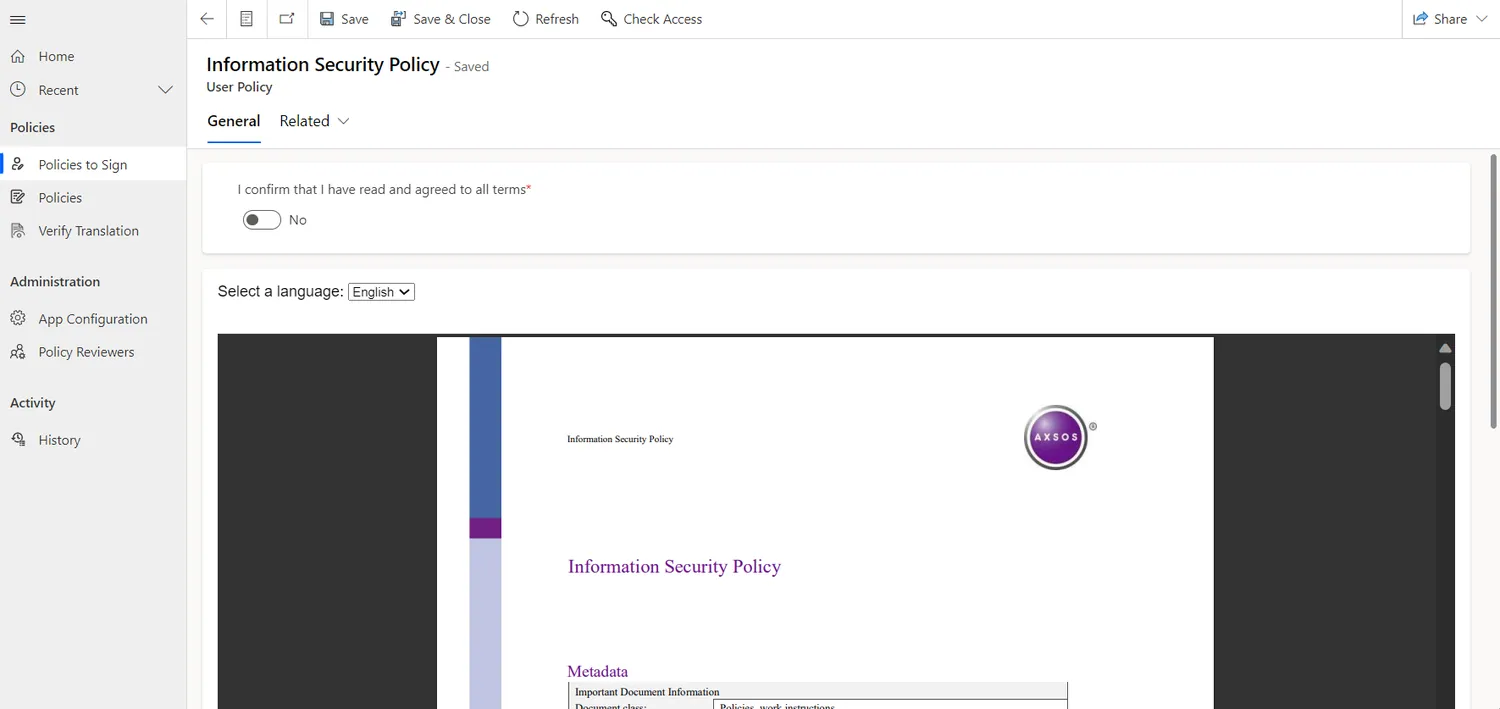
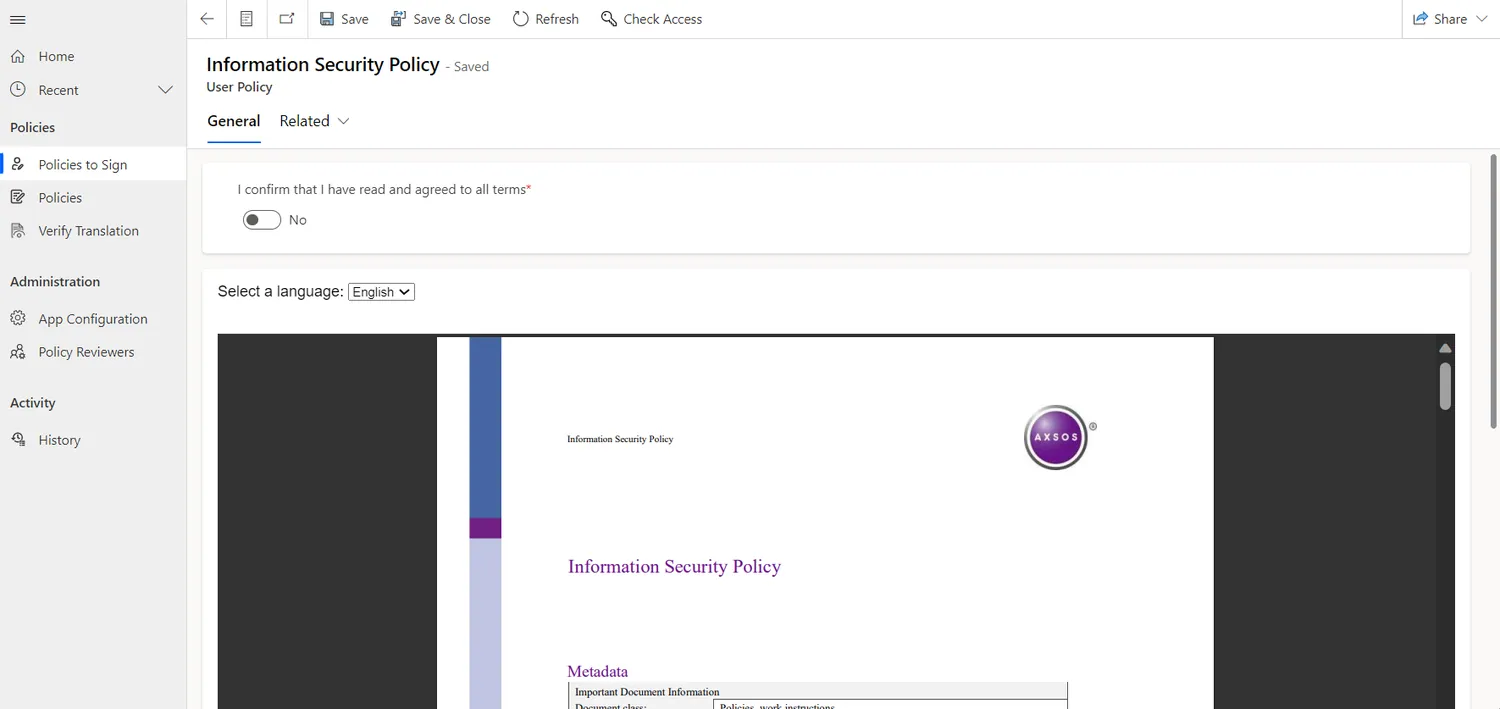
  1. View the policy document in its base language:
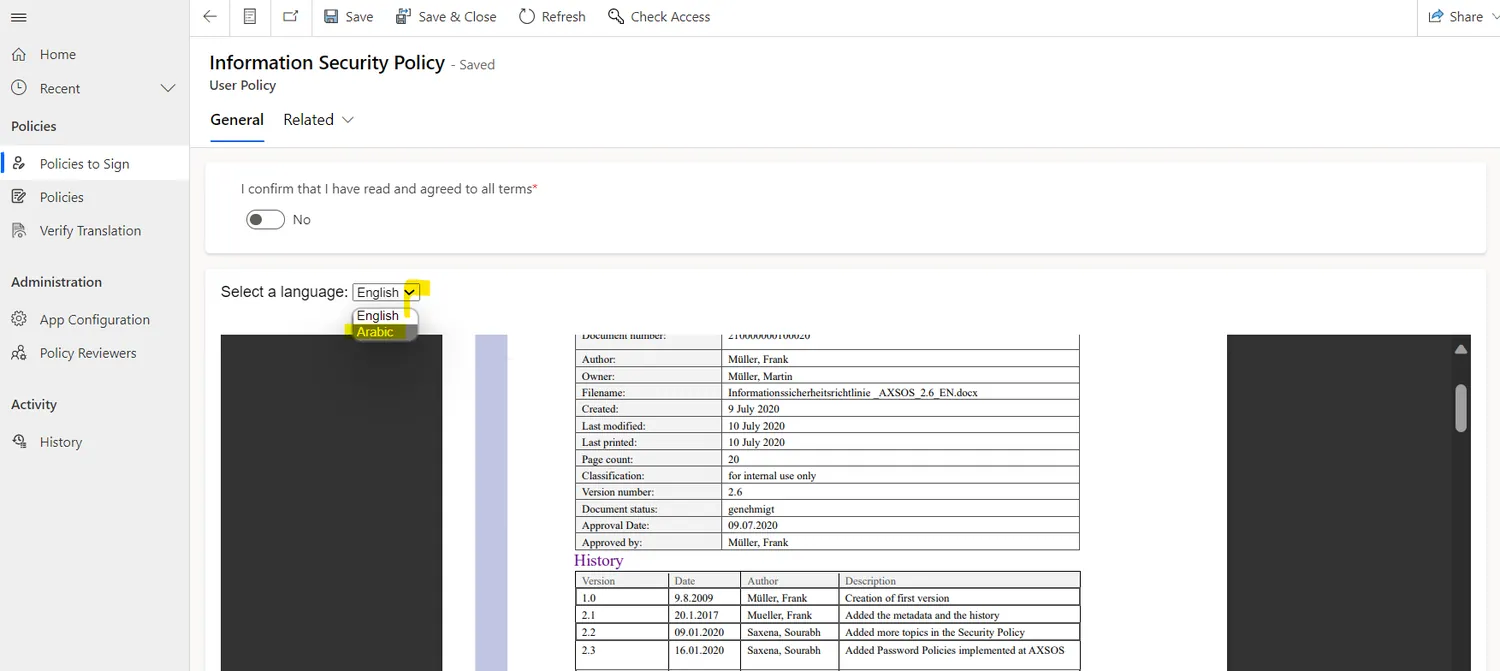
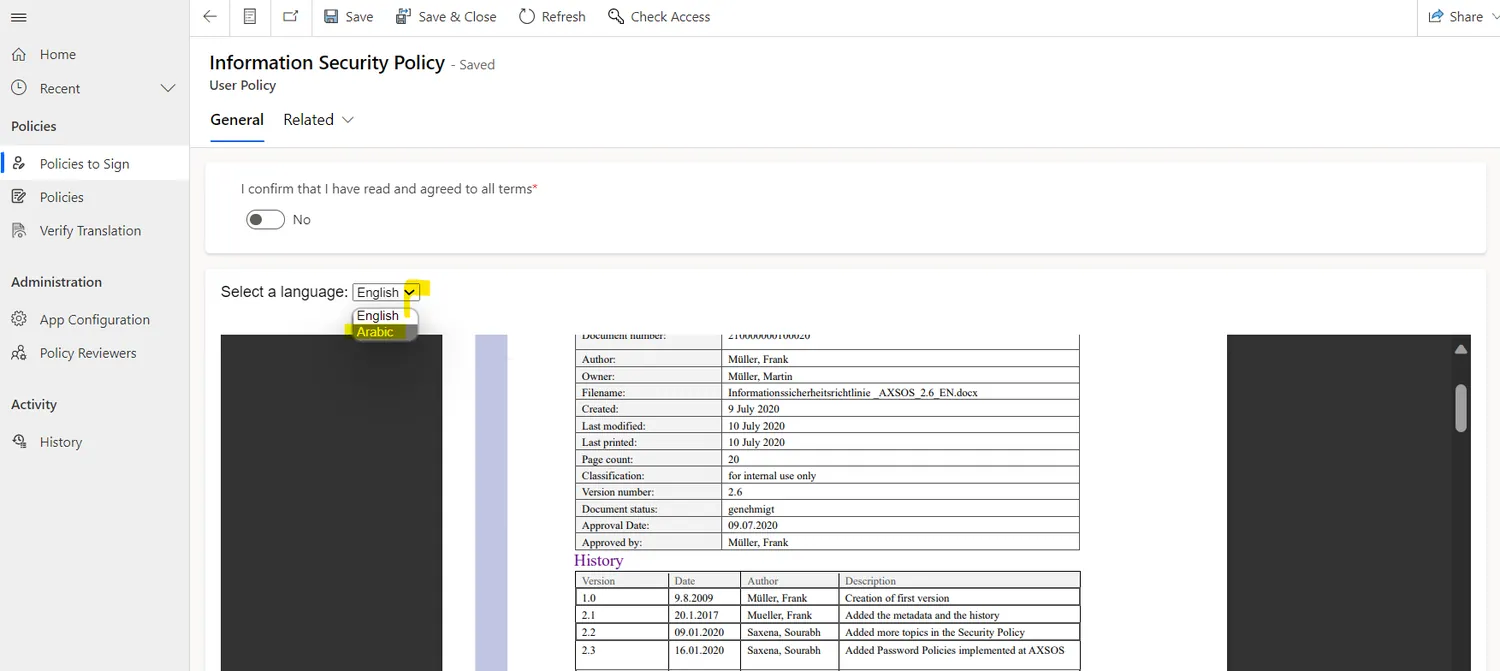
  1. View the policy document in other languages, by selecting one of the available translations in the dropdown list:

Policy Document Viewing Options

Policy app offers two ways to view policy documents in full view, providing users with a more flexible and improved reading experience.

  1. Open in a New Tab: Users can now open the policy document in a new browser tab, allowing for easier navigation and access to the document alongside other application features. To use this option, click on „Having trouble viewing? Click here“ as shown in the screenshot below.
  1. Open in a New Window: Alternatively, users can open the policy document in a separate window. This option is ideal for those who prefer to focus solely on the document without distractions. To use this option, click on „Full Screen“ as shown in the screenshot below.

Both options enable users to utilize standard PDF viewing features, such as zooming in and out, scrolling, and searching, ensuring a more comfortable and customizable experience when reading policies.

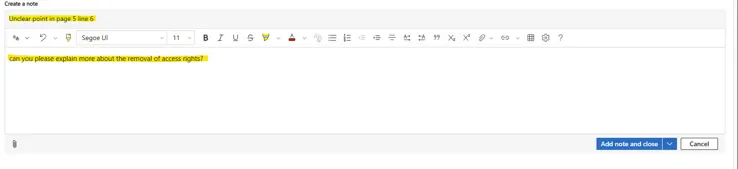
Users can now add notes, comments, or questions on specific points in a policy before signing it. This feature allows you to clarify doubts, provide feedback, or highlight areas of concern directly within the policy.

How to Add Notes or Comments:

  1. Open the policy document you need to review.
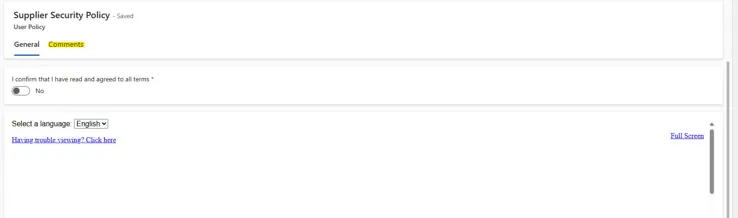
  1. Navigate to the „Comments“ tab
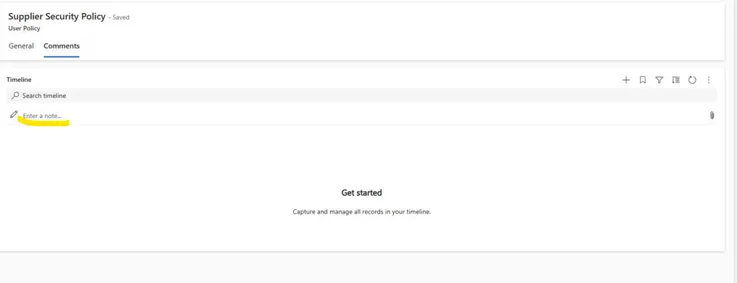
  1. Click on „Enter Note“
  1. Type your note, comment, or question in the text box provided. For the best response, include a title and a short description of your query or feedback.
  1. Click on „Add note and close“. It will be visible to policy creators for review,

Users can sign polices assigned to them by following these steps:

  1. Navigate to „Home“ or „Policies to Sign“ tab in the Menu:
  1. Select the desired Policy record:
  1. View the policy document in its base language:
  1. View the policy document in other languages, by selecting one of the available translations in the dropdown list:
  1. Read the policy carefully.
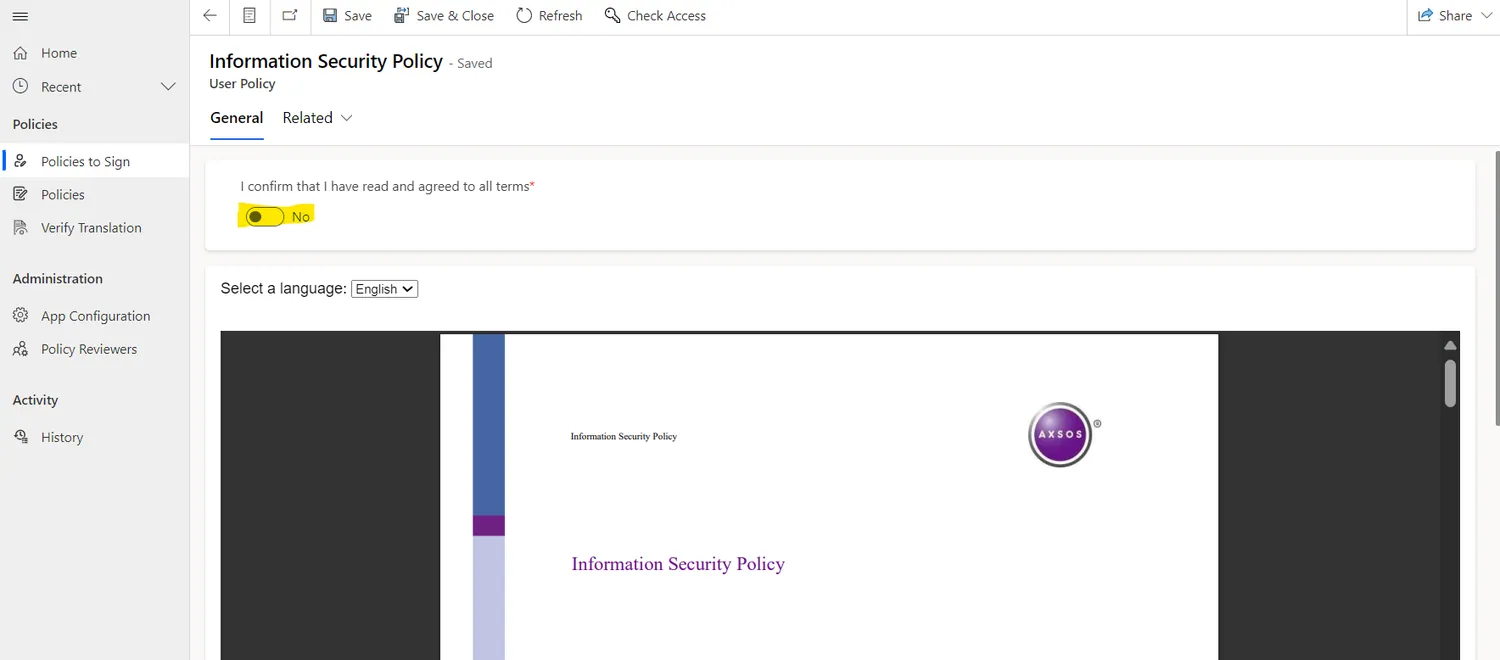
  1. Sign the policy by setting the toggle to „Yes.“
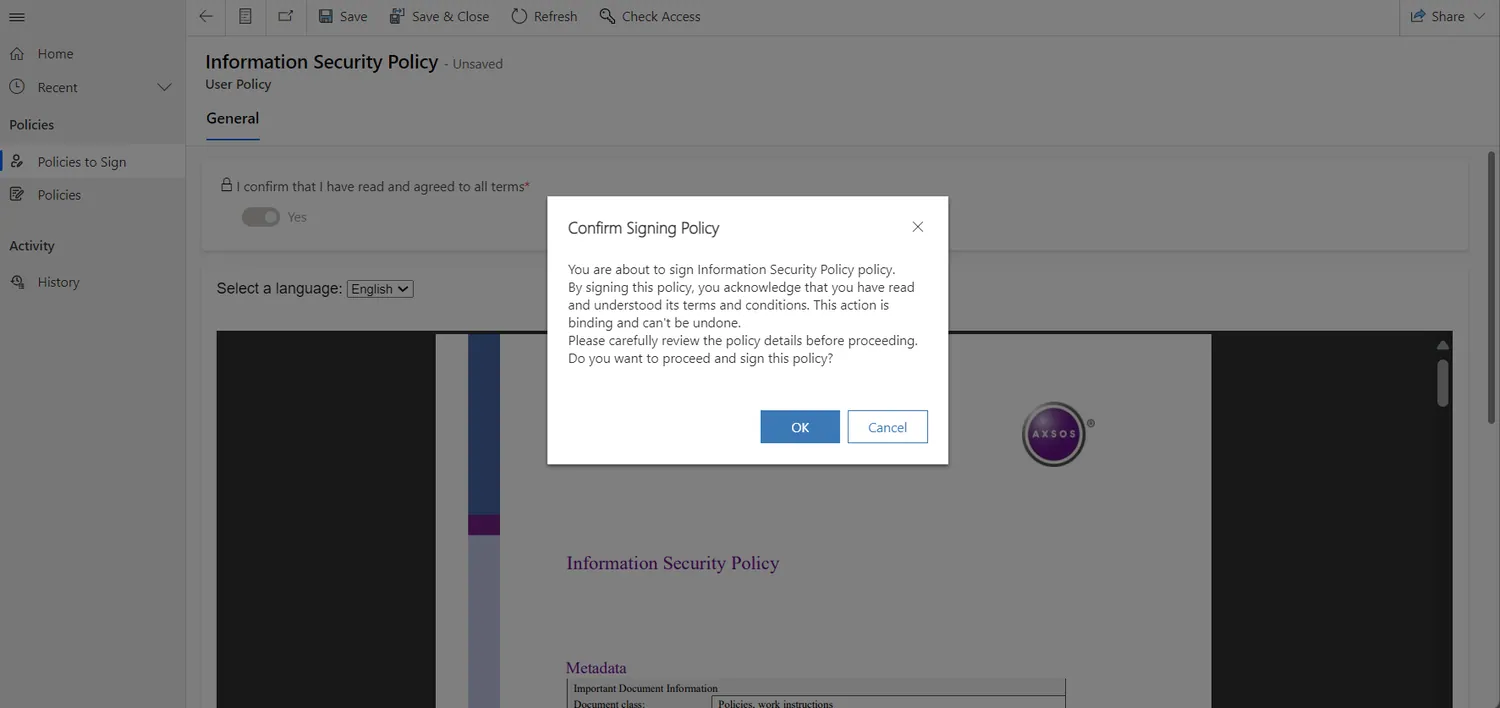
  1. Confirm Signing action by clicking on the „Ok“ button in the confirmation popup:

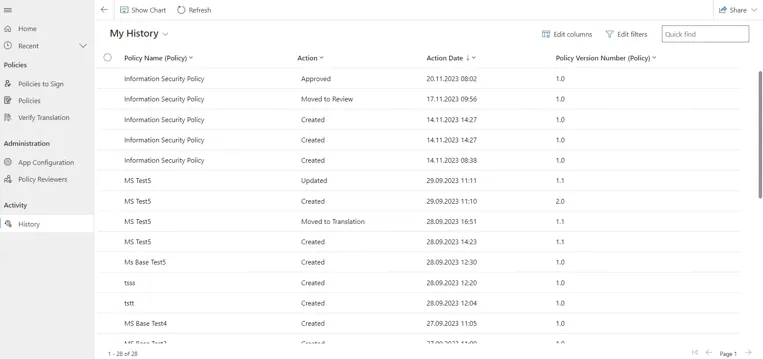
Users can access the list of their history of action by following these steps:

  1. Navigate to the „History“ tab in the menu:
  1. View the list of actions took by them:

Users can personalize their notification settings, while admins can send critical reminders that bypass user preferences.

Customizing Notifications

  1. Open the Policy App and go to the User Settings tab (found in the main menu or profile dropdown).
  1. Select Notification Preferences.
  1. Save your changes.
10

Frequently Asked Questions

Administrator

Administratoren können zusätzlich zu ihren eigenen Konfigurationsaufgaben alle Aufgaben übernehmen, die Creator, Reviewer und End-user ausführen können.

Creator

Die App setzt dies als Validierungsregel durch, um die Funktionstrennung zu gewährleisten. Wenn für eine Richtlinie dieselbe Person als Rechtsprüfer und als Inhaltsprüfer zugewiesen ist, schlägt der Ablauf „Policy Validation“ fehl, sobald der Creator die Richtlinie zur Prüfung einreicht. Weisen Sie in diesem Fall zwei verschiedene Personen zu.

Im Formular zur Erstellung von Richtlinien werden nur die Abschnitte angezeigt, die Ihr Administrator auf der Seite App Configuration aktiviert hat. Rechtsprüfer, Inhaltsprüfer, Lebenszyklus-Prüfer und Übersetzung können jeweils auf (Required, Not Needed oder Optional ) gesetzt werden. Ist ein Parameter auf Not Needed gesetzt, wird der entsprechende Abschnitt vollständig ausgeblendet.

Unter „Recent Records“ kann bei Personen mit mehreren Rollen (zum Beispiel Inhaltsprüfer und Sprachprüfer) der falsche Prüfertyp angezeigt werden. Wählen Sie Prüfer daher immer aus der vollständigen Liste aus und vergewissern Sie sich, dass die unter dem Namen angezeigte Typbezeichnung der Rolle entspricht, die Sie zuweisen möchten.

Ja. Ein Creator kann einer Richtlinie mehrere Sprachprüfer zuweisen, jeweils einen pro Sprache. Das ist sowohl bei der Erstellung als auch später möglich, zum Beispiel beim Bearbeiten eines Entwurfs oder beim Aktualisieren auf eine neue Version. Wählen Sie dabei nur Sprachprüfer aus, neben deren Namen ein Pfeil angezeigt wird. Der Pfeil bestätigt, dass ihnen eine Sprache zugewiesen ist.

Ja, aber nur solange die Richtlinie noch den Status „Pending“ hat. Öffnen Sie die Richtlinie, klicken Sie auf das Dropdown-Menü „Flow“ und führen Sie „Cancel Review“ aus. Dadurch wird die Richtlinie wieder in den Status „Draft“ versetzt, sodass Sie Änderungen vornehmen und sie erneut einreichen können.

Lebenszyklus-Prüfer

Wenn der Lebenszyklus-Prüfer nicht innerhalb des vom Administrator festgelegten Validierungszeitraums reagiert, verlängert sich der Prüfzeitraum einfach um dieselbe Anzahl von Tagen und bleibt so lange offen, bis der Prüfer reagiert. Die Richtlinie bleibt währenddessen weiterhin veröffentlicht.


Wenn Sie „Valid“ wählen, wird die aktuelle Version der Richtlinie schrittweise fortgeführt (zum Beispiel 1.2 → 1.3 → 1.4), ohne dass Änderungen am Dokument erforderlich sind. Wenn Sie „Not Valid“ wählen, wird der Creator benachrichtigt, die Richtlinie manuell zu aktualisieren. Sobald er ein neues Dokument hochgeladen hat, erhöht sich die Versionsnummer (zum Beispiel 1 → 2).

End-user

Nein. Mit Ihrer Unterschrift bestätigen Sie die Richtlinie verbindlich. Dies kann nicht rückgängig gemacht werden. Lesen Sie jede Richtlinie daher sorgfältig durch und nutzen Sie bei Fragen die Notizfunktion, bevor Sie Ihre Unterschrift bestätigen.

Öffnen Sie die Richtlinie, wechseln Sie zur Registerkarte „Kommentare“ und klicken Sie auf „Notiz eingeben“. Beschreiben Sie Ihre Frage anschließend mit einem kurzen Titel und einer Beschreibung. Ihre Notiz ist dann für den Creator der Richtlinie und die Administratoren sichtbar, die Ihnen direkt in der App antworten können.

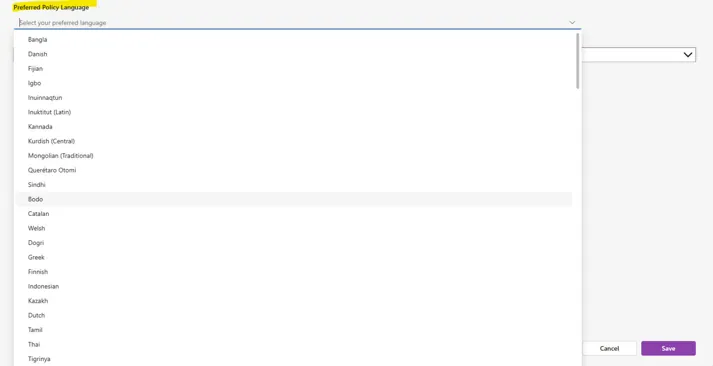
Administratoren können über das Compliance-Dashboard jederzeit manuell Erinnerungen auslösen. Creator können über den Ablauf „Notify Users“ eine Erinnerung zu einer bestimmten Richtlinie senden. In den Benutzereinstellungen können Sie Ihren Benachrichtigungskanal und Ihre Sprache festlegen oder Benachrichtigungen für 14 Tage pausieren. Dringende Erinnerungen können Administratoren Ihnen jedoch auch dann senden, wenn Sie Benachrichtigungen pausiert haben.

Allgemein

Übersetzte Versionen sind erst verfügbar, wenn die Richtlinie den Sprachprüfern zugewiesen, genehmigt und veröffentlicht wurde und der zuständige Sprachprüfer die Übersetzung validiert hat. Bis dahin steht nur die Version in der Ausgangssprache zur Verfügung.

Sobald das Ablaufdatum überschritten ist, wird die Richtlinie automatisch archiviert. Der Creator kann sie anschließend aktualisieren. Dabei wird eine neue Version mit einer höheren Versionsnummer erstellt.

Benötigen Sie weitere Unterstützung?

Wenn Sie Fragen haben oder weitere Unterstützung zur Policy App benötigen, wenden Sie sich bitte an unser Support-Team. Wir helfen Ihnen gerne, damit Sie die App optimal nutzen können.

Nach oben scrollen

Jamil Isayyed

Jamil ist ein erfahrener Fachmann für digitale Prozesse, verfügt über einen reichen internationalen Hintergrund in der Informationstechnologie- und Dienstleistungsbranche, der sich über Deutschland, Griechenland und Palästina erstreckt. Er hat einen Bachelor-Abschluss in Informatik und eine Scrum-Master-Zertifizierung der Scrum Alliance mit Schwerpunkt Computer Software-Engineering. Jamils Leidenschaft gilt der Führung und dem Aufbau von Hochleistungsteams, die außergewöhnliche Erfahrungen liefern und wertvolle Möglichkeiten für Kunden schaffen. Zusätzlich zu seiner Hauptaufgabe ist er der Direktor der Axsos Academy GmbH. In dieser Funktion leitet er ein dynamisches deutsch-palästinensisches Bootcamp, das Jugendlichen den Einstieg in den IT-Markt und den Aufbau einer erfolgreichen Karriere ermöglichen soll.

Bernd Länge

Bernd Länge ist seit über 20 Jahren in der IT-Branche tätig und berät Kunden und Interessenten in Fragen der Cybersicherheit sowie bei der Entwicklung und Implementierung von Informationssicherheitsmanagement und Datenschutz. In dieser Funktion fungiert er als externer Datenschutz- und Informationssicherheitsbeauftragter für Kunden. Es ist ihm wichtig, einen pragmatischen Ansatz zu verfolgen und eng mit Kunden, Partnern und Herstellern zusammenzuarbeiten, um sicherzustellen, dass die Unternehmenssicherheit der Kunden auf dem neuesten Stand ist.

Martin Müller

Als Technik-Enthusiast und engagierte Führungspersönlichkeit unterstützt er seit über 20 Jahren Unternehmen in der IT-Branche dabei, den Weg in die Zukunft der Arbeit zu gestalten. Dank seiner schnellen Auffassungsgabe und seiner Fähigkeit, effektive Lösungen zu entwickeln, kann er eine klare Vision davon formulieren, wie unsere zukünftige Arbeitsweise aussehen wird. Schritt für Schritt meistert er Herausforderungen und treibt uns in die Zukunft voran. Diese Aufgaben bewältigt er jedoch nicht alleine. Er verfügt über ein kompetentes Team, dem er voll und ganz vertraut und auf das er sich verlassen kann. Gemeinsam überwinden sie jede Hürde! Durch positives, kritisches Denken führt oft die zweitbeste Lösung zu inkrementellem Erfolg – schließlich wurde auch ein Imperium nicht an einem Tag erbaut. Diese Herangehensweise macht ihn in seiner Rolle einzigartig, und er freut sich darauf, gemeinsam mit Ihnen den Weg in die Zukunft zu beschreiten.

Rolf Stephan

Seine Begeisterung für die Informationstechnologie führte Rolf zum Studium der Informatik und zum Abschluss an der Universität Karlsruhe, dem heutigen KIT / Karlsruher Institut für Technologie. Seitdem ist Rolf in der IT-Branche tätig und kennt die Branche aus dem Effeff – national und international. Seit mehr als 25 Jahren setzt er auf die internationale Zusammenarbeit von Experten über alle Kulturen hinweg. Diesen Ansatz verfolgte er auch in seinem ersten von ihm gegründeten Unternehmen, der AD Solutions AG, die sich schnell zu einem renommierten internationalen IT-Dienstleister mit mehreren Niederlassungen in Deutschland, der Schweiz, Österreich und den USA entwickelte. Seit 2010 ist Rolf Stephan General Manager und seit 2021 CEO der AXON IVY AG mit Hauptsitz in der Schweiz. Seit 2009 ist er für die Axsos AG als Investor, Aktionär und Aufsichtsratsvorsitzender tätig.

Frank Müller

Frank ist ein leidenschaftlicher IT-Experte und visionärer Unternehmer. Er liebt und glaubt an Frieden und Freiheit. Diese Werte sind für ihn mehr als nur Worte. Sie sind das Ergebnis von großem Bewusstsein, Verantwortung und einem soliden Fundament. Sein Fundament ist sein Glaube an Jesus und seine bedingungslose Liebe zu den Menschen. Auf diesem Fundament baut Frank seine großen Visionen auf, wie zum Beispiel den Einsatz für den Frieden im Heiligen Land. Er scheut sich nicht, kreative und unkonventionelle Ideen zu verwirklichen, wie die Gründung eines mittelständischen Unternehmens, das sich über vier Länder und Kulturen erstreckt und seinen Mitarbeitern viel Freiheit bietet. Die Gründung einer Bootcamp-Akademie mitten in der Coronavirus-Pandemie gehört sicherlich zu diesen Unternehmungen. Durch diese Bemühungen schafft Frank neue Innovationen und einen Mehrwert für seine Kunden und die Menschen, die mit ihm unterwegs sind. Mit mehr als 32 Jahren IT-Erfahrung und 15 Jahren als Unternehmer hilft Frank anderen Unternehmern, sich auf ihr Kerngeschäft zu konzentrieren und ihre Anforderungen in technologische Möglichkeiten und Implementierungen umzusetzen. Sein Team und er können diese Anforderungen in eine maßgeschneiderte IT-Strategie, Prozesse und Technologien umsetzen. Frank hat immer ein Herz für die Menschen, die er unterstützt, und möchte sie ermutigen, neue Wege zu gehen und ihr Potenzial zu entwickeln. Frank ist offen für den Gedankenaustausch mit Menschen, die Werte nicht als CSR oder Marketinggeschwätz sehen, sondern als Grundlage ihres Handelns. Er sucht den Kontakt zu Menschen, die die Welt zum Besseren verändern wollen. Darüber hinaus sind auch diejenigen willkommen, die auf dem Weg in die Cloud, die Digitalisierung oder den Einsatz von KI die Unterstützung von ihm oder seinem Team suchen.