Policy App Documentation

Everything you need to configure, create, review, translate, publish, and sign policies in the AXSOS Policy App, clearly organized by role.

User
Manual for the Policy App

1

Introduction

The AXSOS Policy App is a solution based on Microsoft Power Apps that enables organizations to centrally manage, structure, and monitor their internal policies. It simplifies every phase of the policy lifecycle: creation, review, translation, publication, and employee approval. 


This ensures that policies are reviewed consistently, are easy to find, and are formally signed by the individuals concerned. This manual is organized according to the tasks assigned to each user type. You can use the table of contents to go directly to the section for your role. Alternatively, you can read the entire manual to get a complete overview of how the app works.

1.1

The Policy Lifecycle

Every policy goes through the same phases, regardless of who creates it. The following diagram shows the complete lifecycle, including the optional branches for legal review, content review, translation, and periodic validation, which are described later in this guide.

Interactive Policy Life Cycle Map
70%
Phase
User type
Follow a path

Every policy goes through the same phases, regardless of who creates it. The following diagram shows the complete lifecycle, including the optional branches for legal review, content review, translation, and periodic validation, which are described later in this guide.

Interactive Policy Life Cycle Map
70%
Phase
User type
Follow a path

The app distinguishes between four types of users. A separate section later in this manual is dedicated to each of them.

03

Administrator

Configures the app for the organization and can take on the tasks of all other user types.

04

Creator

Creates policies, submits them for review, publishes and translates them, and keeps them up to date on an ongoing basis.

05

Reviewer

Approves or rejects guidelines. There are three specialized types of reviewers, as well as a lifecycle reviewer who periodically revalidates published guidelines:

06

End users (AXSOS employees)

Reviews the assigned guidelines and confirms them with a signature.

2

Structure of This Manual

Sections 3 through 9 are standalone guides for the individual user types: Administrator, Creator, Reviewer, Legal Reviewer, Language Reviewer, Lifecycle Reviewer, and End User. Each section guides you through the tasks of the respective role from start to finish, in the order in which you are likely to perform them. This allows you to read only the section that is relevant to you, without having to jump to other parts of the manual.

Note

Some of the fields and steps described in this guide are optional and depend on how your administrator has configured the app (see Section 3.2). If a step described below does not appear in your version of the app, it has likely not been enabled for your organization.

Table of Contents

3

Administrator's Guide

As an administrator, you can perform all the tasks available to other user types. In addition, you are responsible for configuring the app for your organization and assigning languages to language reviewers.

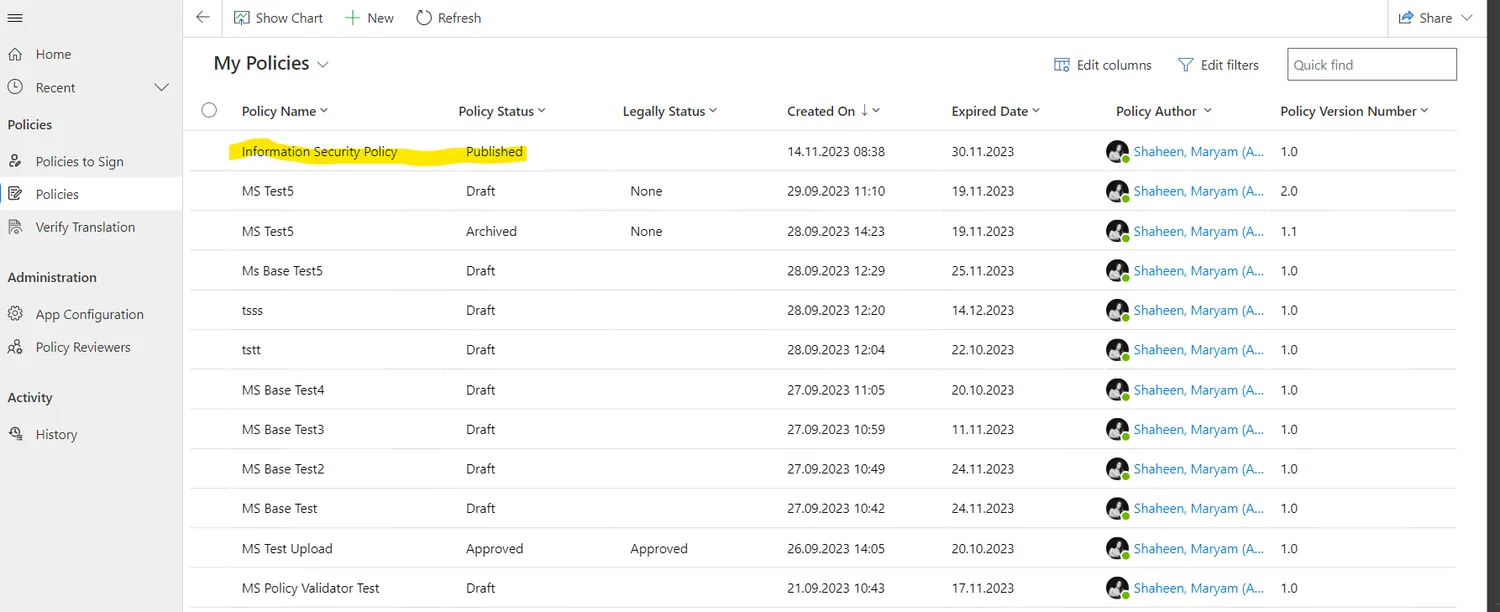
When adding the solution to an environment for the first time, run the following flow before opening the "App Configuration" page: (Create First Record in Configuration Table and Languages Table) This flow creates the first configuration record and populates the languages table so that the rest of the app works correctly.

On the App Configuration page, as an administrator, you can customize the policy lifecycle to meet your organization's requirements. These settings determine which sections appear in the policy creation form and which approval stages a policy must go through. There are four parameters available, each of which can be set to Required, Not Needed, or Optional.

2.2.1 Customization Parameters:

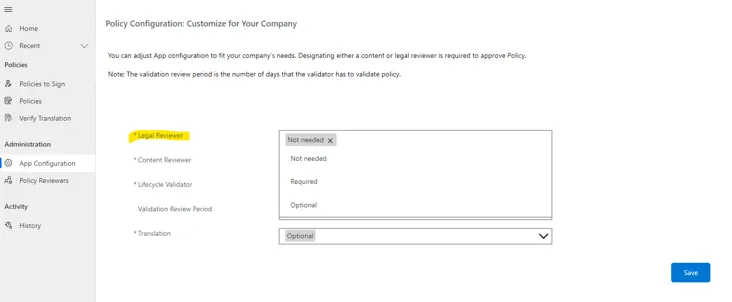
  1. Legal Reviewer: Administrators must configure whether a legal review is required for the policies or not; some organizations require their policies to undergo a legal review before sending them to employees for signature. This parameter must be set to one of the following options:
  1. Required: will result in the addition of a mandatory section to the policy creation form, where the creator must assign a legal reviewer for the policy. Additionally, it will introduce a new stage in the policy lifecycle, requiring legal approval before the policy can be published to users.
  1. "Not Needed": This will result in the removal of the legal reviewer section from the policy creation form. Additionally, it will remove the legal approval stage from the policy lifecycle, meaning that legal approval is not required for the policy to be published to users.
  1. Optional: This will result in the addition of an optional section to the policy creation form. Here, the creator has the flexibility to decide whether or not to assign a legal reviewer to the policy. If a legal reviewer is assigned to the policy, a new stage will be introduced in the policy life cycle, requiring legal approval before the policy can be published to users. On the other hand, if the creator did not assign a legal reviewer to the policy, the legal approval stage will be removed from the policy lifecycle, meaning that legal approval is not required for the policy to be published to users.
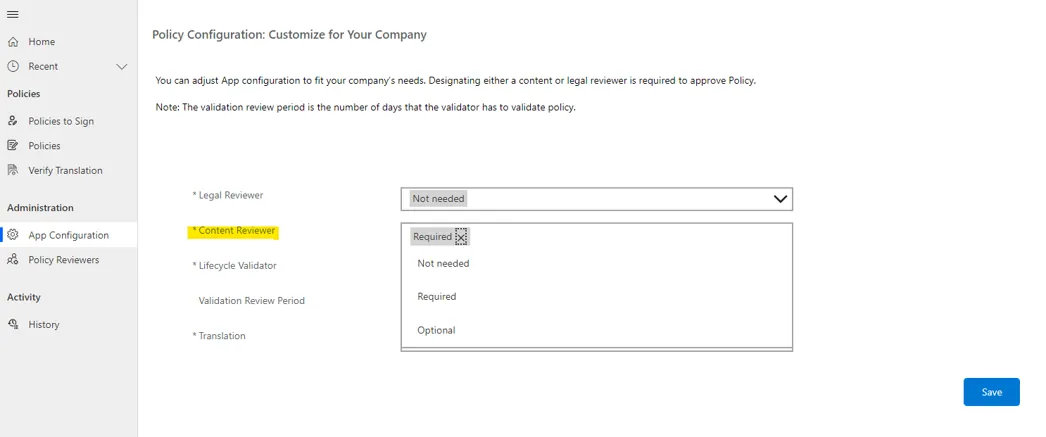
  1. Content Reviewer: Administrators must configure whether a content review is required for the policies or not; some organizations require that their policies be reviewed before sending them to employees for signature. This parameter must be set to one of the following options:
  1. Required: will result in the addition of a mandatory section to the policy creation form, where the creator must assign one or more content reviewers for the policy. Additionally, it will introduce a new stage in the policy lifecycle, requiring reviewer approval before the policy can be published to users.
  1. "Not Needed": This will result in the removal of the content reviewer section from the policy creation form. Additionally, it will remove the reviewer approval stage from the policy lifecycle, meaning that reviewer approval is not required for the policy to be published to users.
  1. Optional: This will result in the addition of an optional section to the policy creation form. Here, the creator has the flexibility to decide whether or not to assign a content reviewer to the policy. If a content reviewer is assigned to the policy, a new stage will be introduced in the policy lifecycle, requiring approval before the policy can be published to users. Conversely, if the creator does not assign a content reviewer to the policy, the approval stage will be removed from the policy lifecycle, and approval will not be required for the policy to be published to users.
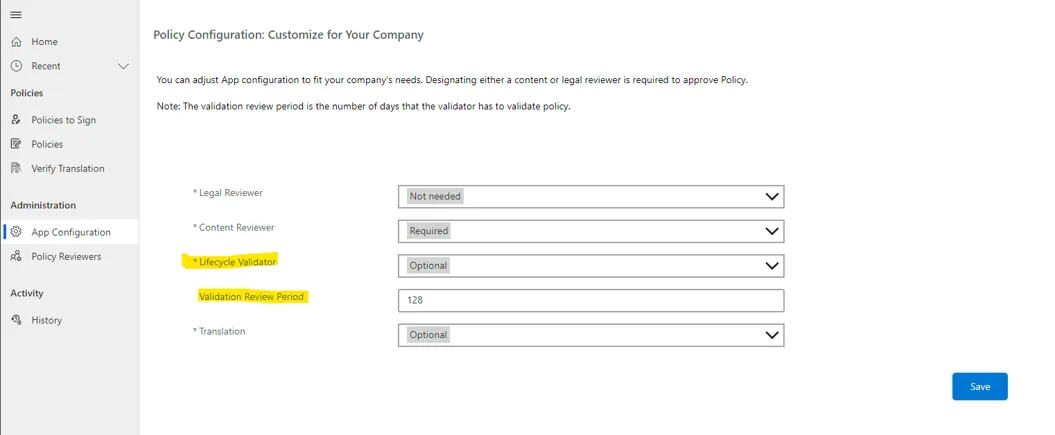
  1. Lifecycle Validator: Administrators must configure whether lifecycle validation is required for the policies. Some organizations may require their policies to undergo validation every 6 months or annually while the policy is still published, without requiring an update. This parameter must be set to one of the following options:
  1. Required: This will result in the addition of a mandatory section in the policy creation form. In this section, the creator must assign a lifecycle validator and specify the validation duration (6, 12, 18, 24, 30, 36, 42, 48, 54, 60 months) for the policy. Additionally, a new requirement has been introduced in the policy app configurations, called “Validation Review Period.” This is the duration specified by the administrator during which the lifecycle validator must take action. For example, if a policy requires annual validation and the “Validation Review Period” is set to 15 days, the next year’s validation will be postponed by 15 days. The lifecycle validator will then have 15 days to validate the policy; otherwise, the validation review period will be extended by another 15 days, and so on. This validation process occurs only after a policy is published and once the specified validation duration has elapsed.
  1. "Not Needed": This will result in the removal of the lifecycle validator section from the policy creation form. Furthermore, it will eliminate the policy validation requirement, making policy validation unnecessary for policies with this configuration.
  1. Optional: This will result in the addition of an optional section to the policy creation form. Here, the creator has the flexibility to decide whether or not to assign a lifecycle validator to the policy.
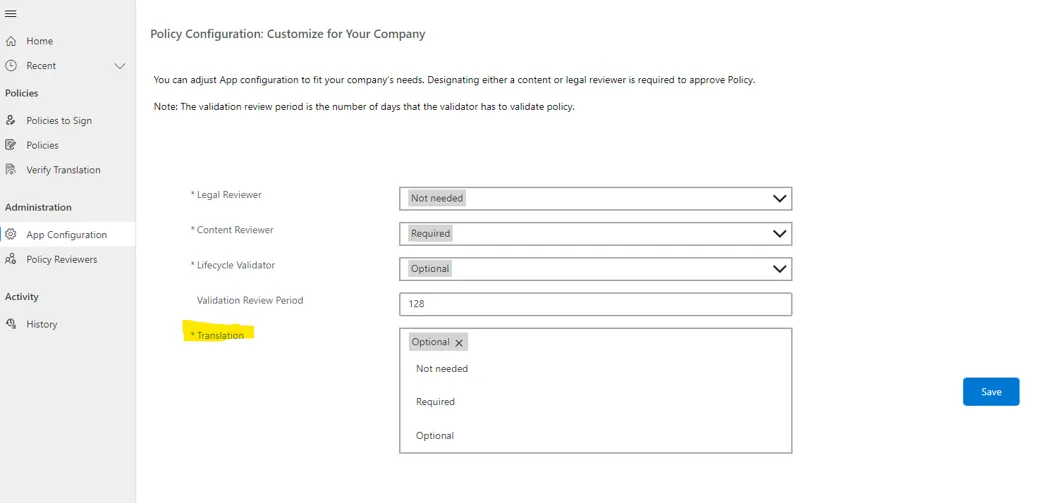
  1. Translation: Admins must configure whether a translation is required for the policies or not. Some organizations may require their policies to be translated into languages other than the base language; this parameter must be set to one of the following options:
  1. Required: will result in the addition of a mandatory section to the policy creation form. In this section, the creator must assign a language reviewer to the policy, which will result in the addition of a language translation corresponding to the language assigned to that reviewer. Additionally, a new requirement is introduced in the policy: the language reviewer must validate the automatic translation generated by the system.
  1. "Not Needed": This will result in the removal of the language reviewer section from the policy creation form. Furthermore, it will eliminate the translation validation requirement, making policy translation unnecessary for policies with this configuration.
  1. Optional: This will result in the addition of an optional section to the policy creation form. Here, the creator has the flexibility to decide whether or not to assign a language reviewer for the policy.

Let's break down app configurations for you:

ParametersConfiguration OptionEffect
Legal ReviewerRequired

Adds a required section to the policy creation form for assigning a legal reviewer.

Introduces a legal approval stage prior to publication.

Not Needed

Removes the "Legal Reviewer" section from the policy creation form.

Eliminates the legal approval process.

Optional

Adds an optional section to the policy creation form for assigning a legal reviewer.

The creator decides who will serve as the legal reviewer, which affects the approval stage.

Content ReviewerRequired

Adds a required section to the policy creation form for assigning content reviewers.

Introduces a reviewer approval stage prior to publication.

Not Needed

Removes the content reviewer section from the policy creation form.

Eliminates the reviewer approval step.

Optional

Adds an optional section to the policy creation form for assigning content reviewers.

The creator decides who will review the content, which affects the approval process.

Lifecycle ValidatorRequired

Adds a required section to the policy creation form for assigning a lifecycle validator and selecting the validation duration.

Adds a new configuration parameter, "Validation Review Period," which sets the designated time for the lifecycle validator to validate a policy.

Not Needed

Removes the lifecycle validator section from the policy creation form.

Eliminates the policy validation requirement.

Optional

Adds an optional lifecycle validator section to the policy creation form.

The creator determines the assignment of the lifecycle validator, which affects the valuation requirement.

TranslationRequired

Adds a required section to the policy creation form for assigning language reviewers.

Introduces a requirement for the language reviewer to validate automatic translations.

Not Needed

Removes the language reviewer section from the policy creation form.

Eliminates the requirement for translation validation.

Optional

Adds an optional section to the policy creation form for assigning language reviewers.

The creator decides which language reviewer to assign, which affects the translation validation requirement.

Important

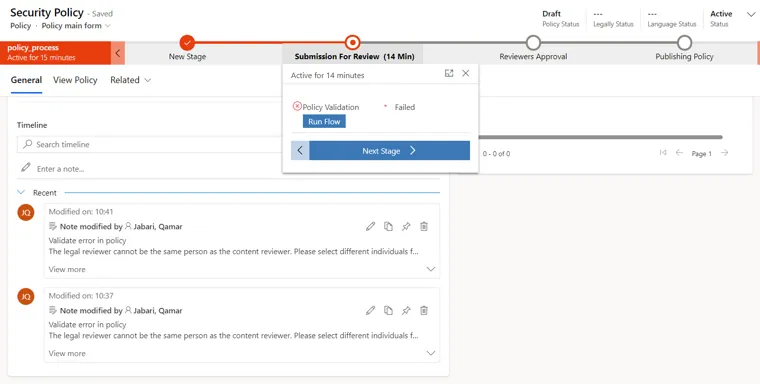
The Legal Reviewer and Content Reviewer assigned to the same policy can never be the same person. The policy validation process will fail if they match, so be sure to assign different individuals.

Show all reviewers

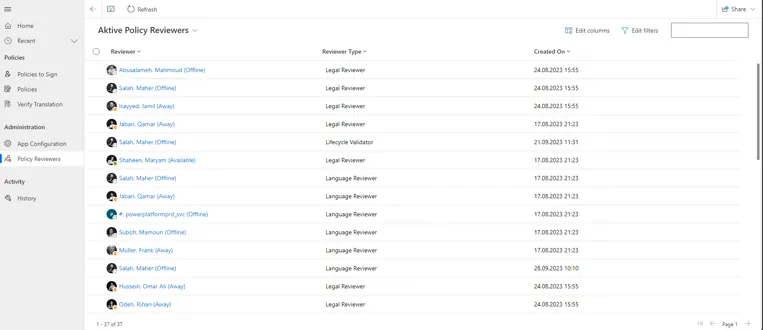
The " Policy Reviewers " page lists all reviewers in the system. As an administrator, you can customize the view or filter by reviewer type.

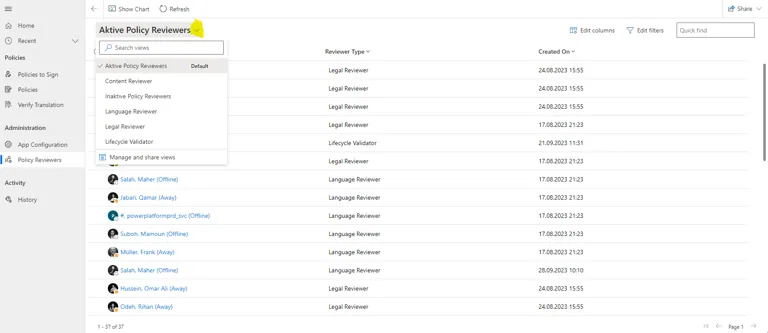
You can switch between reviewer types (content reviewer, legal reviewer, language reviewer, lifecycle reviewer, and others) using various views:

Note

For users to appear in the Policy Reviewers list, they must be assigned one of the reviewer roles. An automated flow adds or removes reviewers daily based on role changes.

If you want a role change to take effect immediately, run the flow (Add / Remove Reviewers) manually or contact Support.

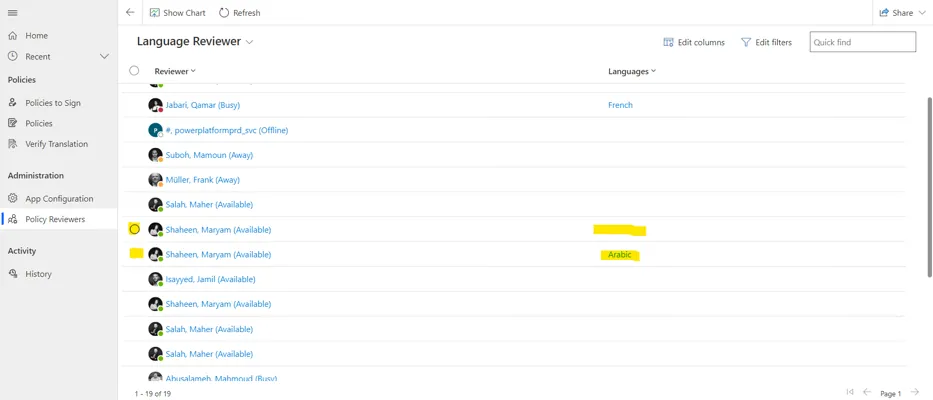
Assign Languages to Language Examiners

As an administrator, you can assign languages to language reviewers. To do so, follow these steps:

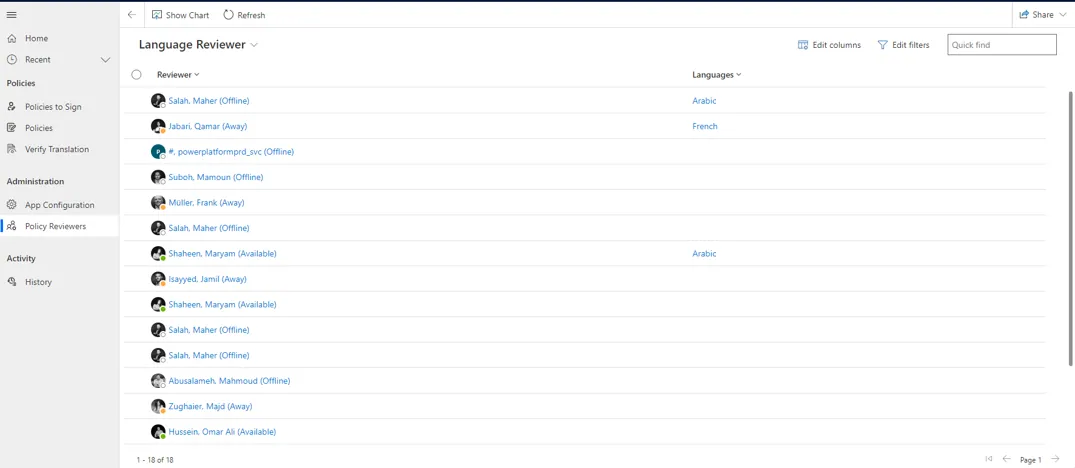
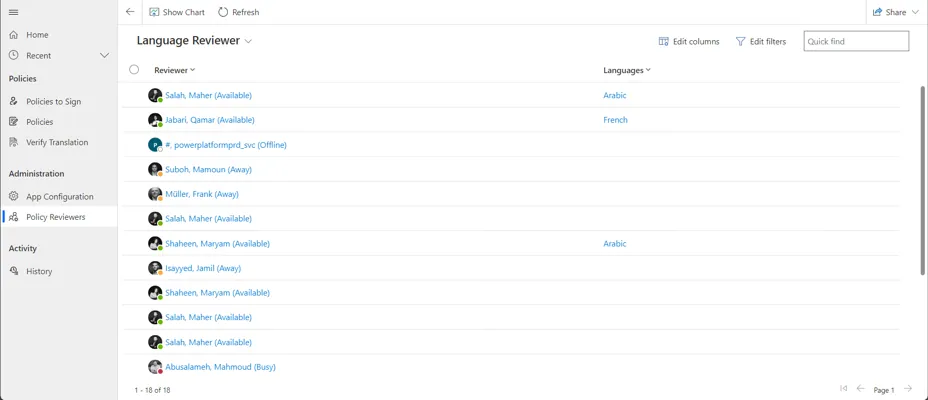
1. Open the Language Checker view to see all language checkers and the languages assigned to each:

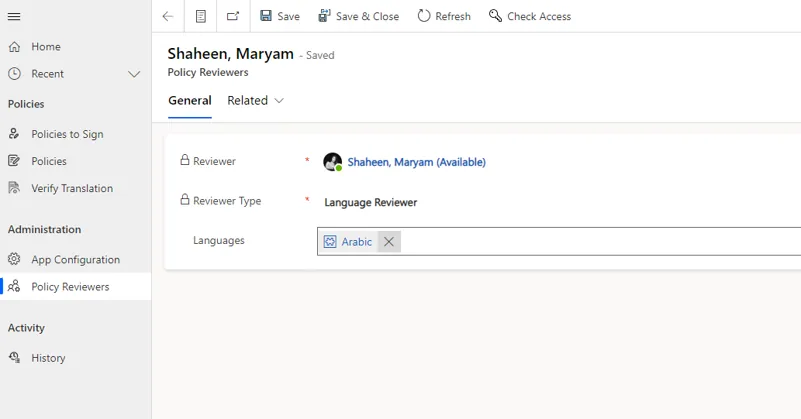
2. Select an examiner record to edit it:

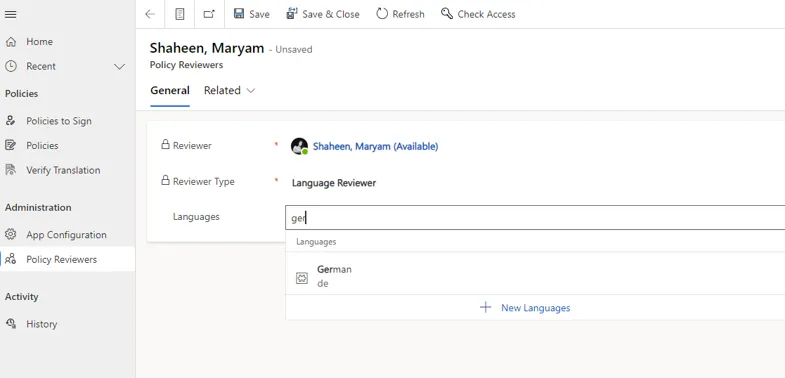
3. Search for the language you want to assign to the language checker:

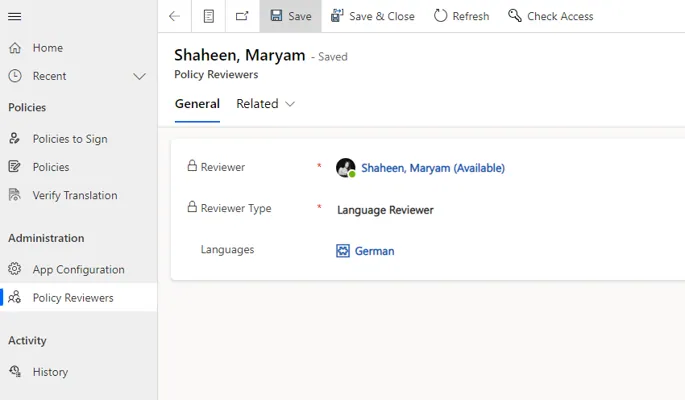
4. Click "Save" to confirm the assignment:

Assign multiple languages to language reviewers

As an administrator, you can assign multiple languages to a language reviewer. To do so, follow these steps:

  1.  Open the "Language Reviewers" view to see all language reviewers and the languages assigned to them:
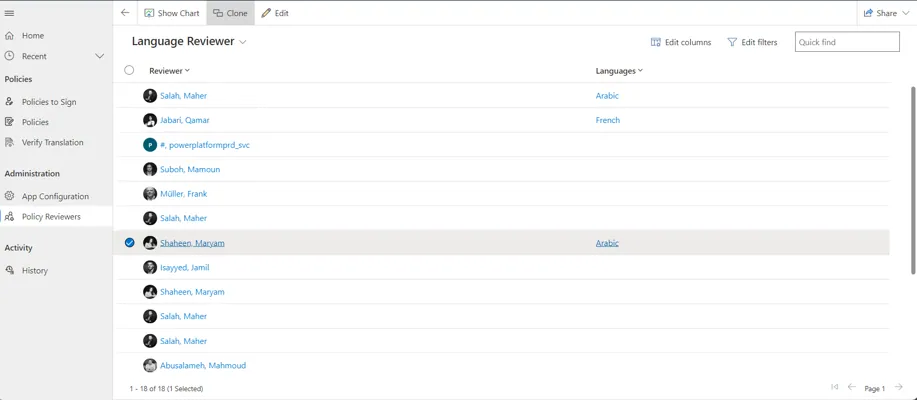
  1. Select an examiner record, and then click “Clone”:
  1. Assign a language to the new clone. Follow the same procedure described in the section “Assigning Languages to Language Checkers”:

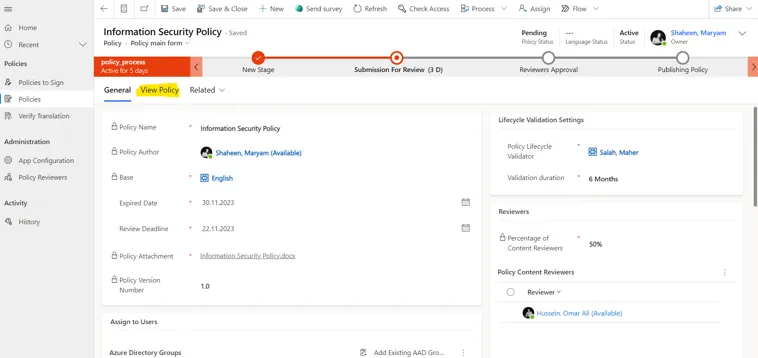
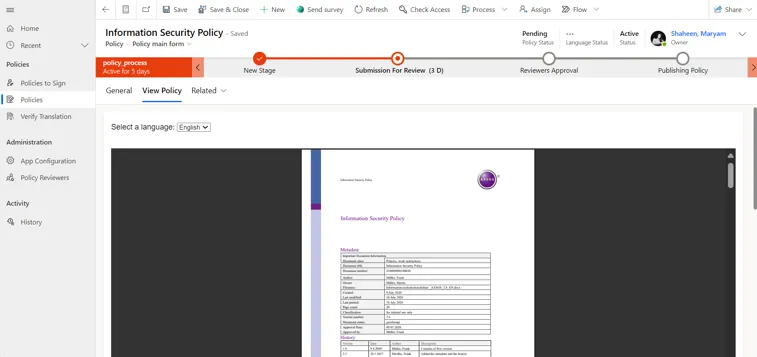
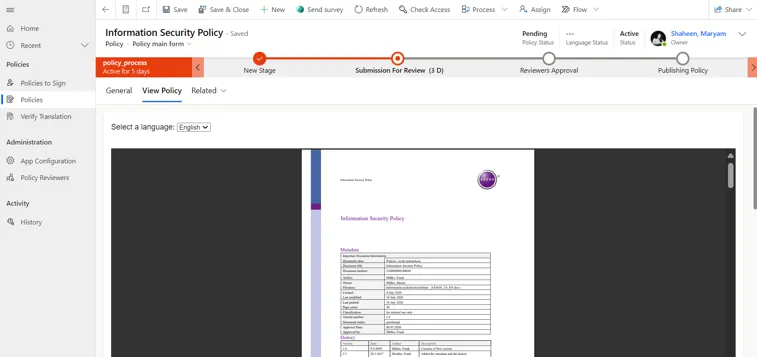
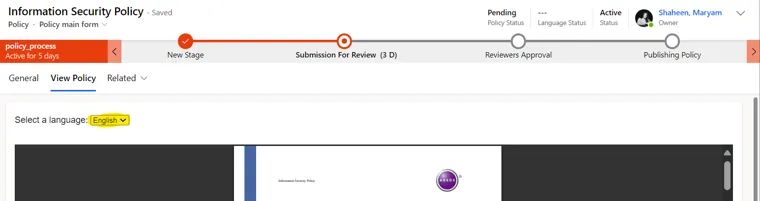
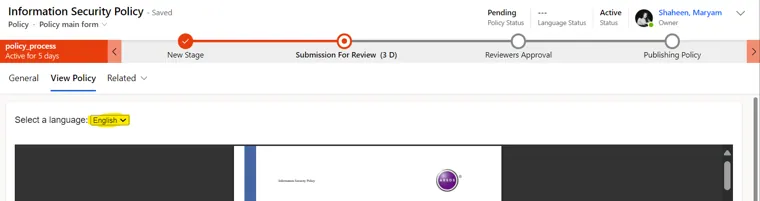
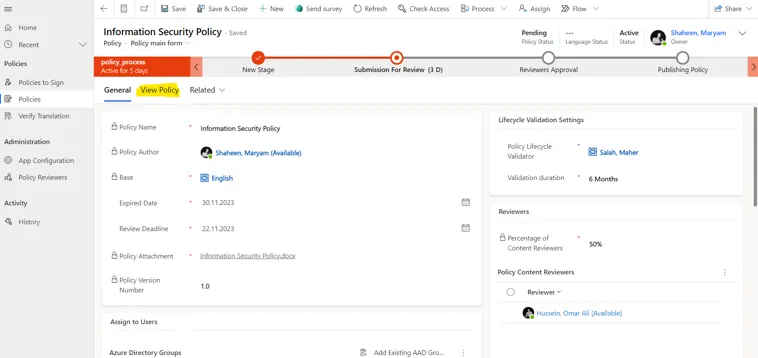
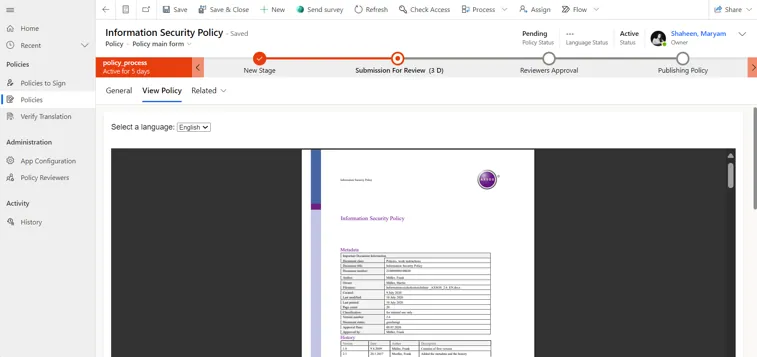
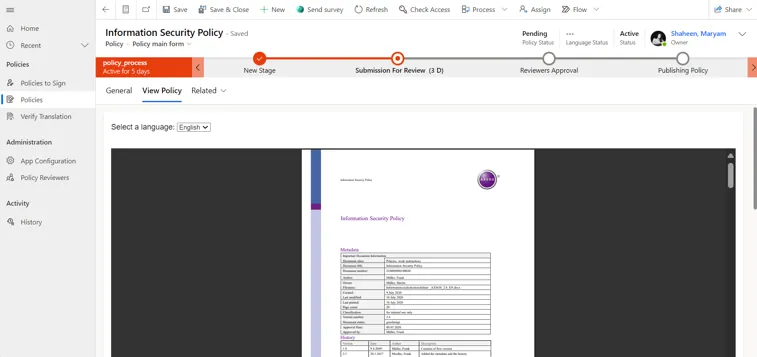
As an administrator, you can open the policy document using the "View Policy" tab. The policy will open from the folder containing its source language.

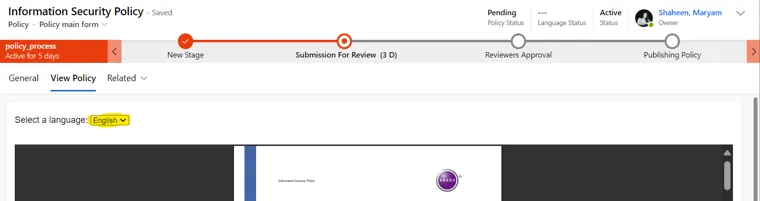
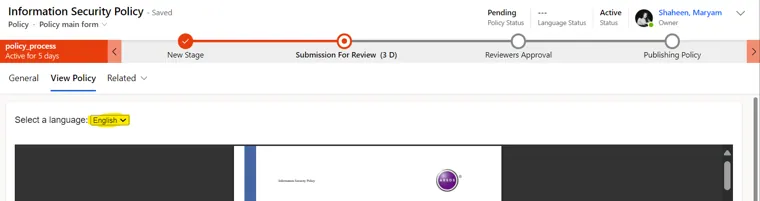
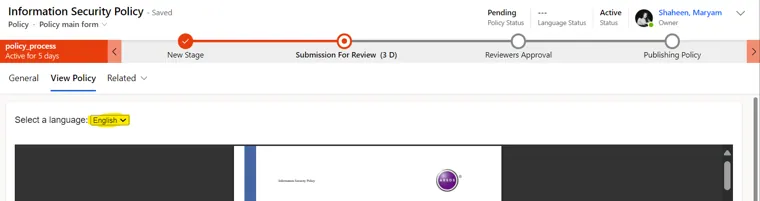
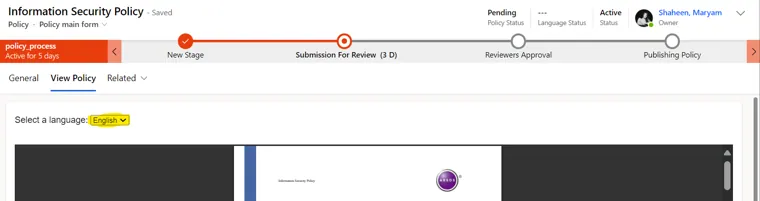
Once a policy has been published and translated, you, as an administrator, can select the desired language from a drop-down list to access the translated versions.

This access becomes available once the policy has been assigned to language reviewers for validation, has gone through the approval process, has been published, and its translation has been validated.

Display Options for Policy Documents

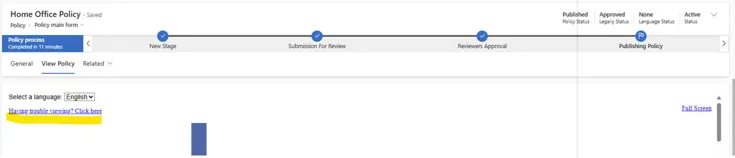
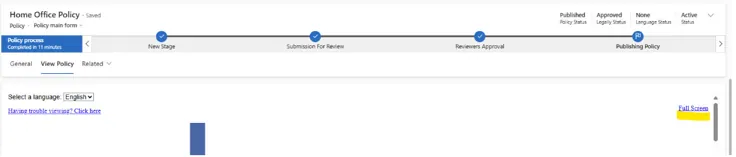
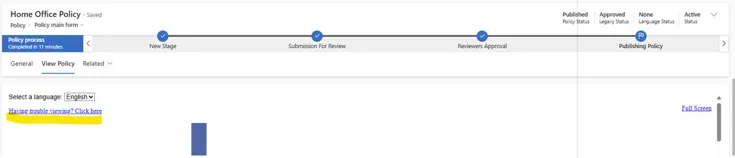
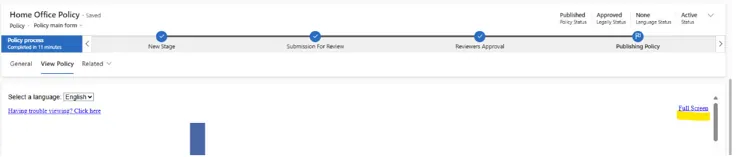
The Policy App offers two ways to view policy documents in full-screen mode. This allows you to read documents more flexibly and conveniently.

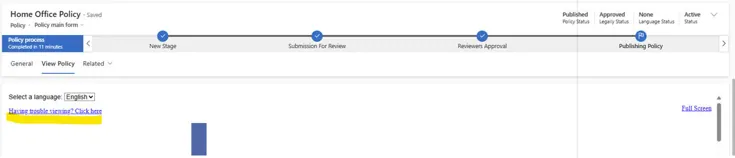
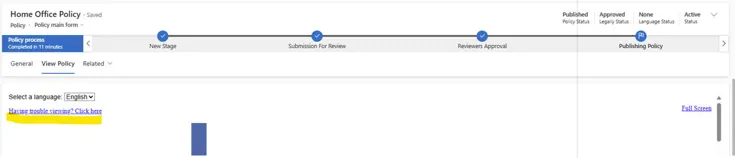
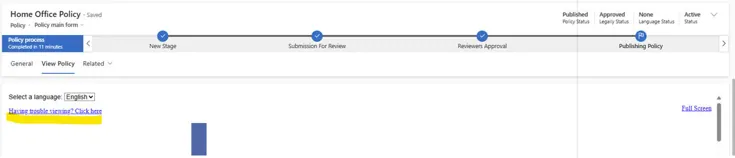
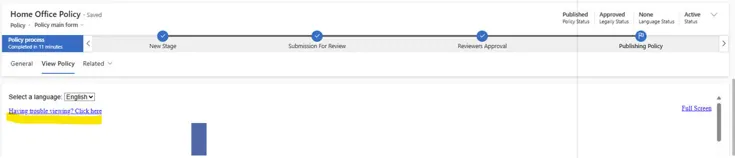
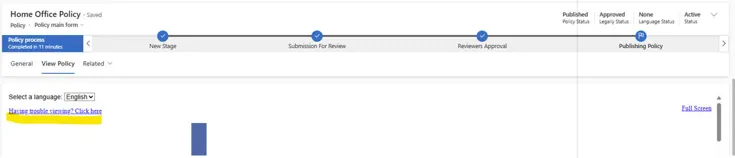
  1. Open in a new tab: You can open the policy document in a new browser tab. This makes it easier to navigate and allows you to use the document while using other features of the app. To do this, click “Having trouble viewing this page? Click here,” as shown in the screenshot below.
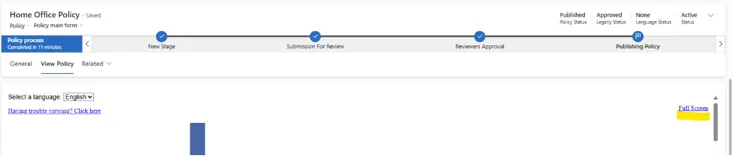
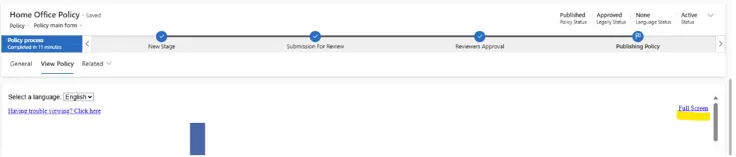
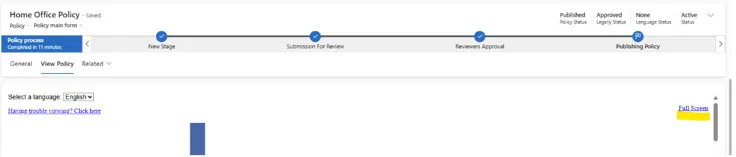
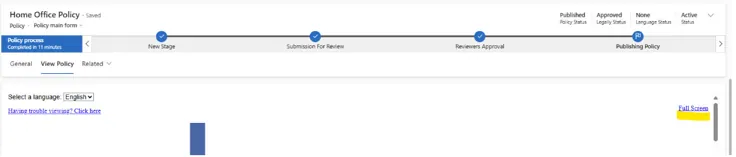
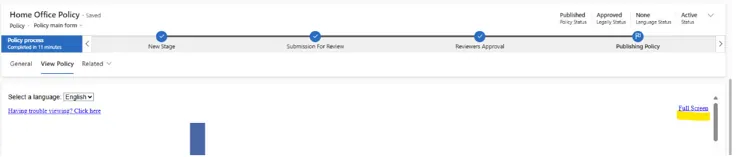
  1. Open in a new window: Alternatively , you can open the policy document in a separate window. This option is especially useful if you want to focus entirely on the document without distractions. To do this, click “Full Screen, ”as shown in the screenshot below.

With both options, you have access to the usual PDF features, such as zooming in and out, scrolling, and searching. This makes it easier for you to read the guidelines according to your own preferences.

As an administrator, you can view, filter, and respond to user comments directly through a user-friendly interface. This feature simplifies communication and ensures that user questions and feedback are addressed in a timely manner.

View and reply to comments

  1. Open the Policy app.
  1. In the menu, go to the "Comments" section.
  1. Use the "Filter by Policy Name" option to find the comments for a specific policy.
  1. Click on a comment to reply to it.
  1. Type your answer in the text box and submit it.

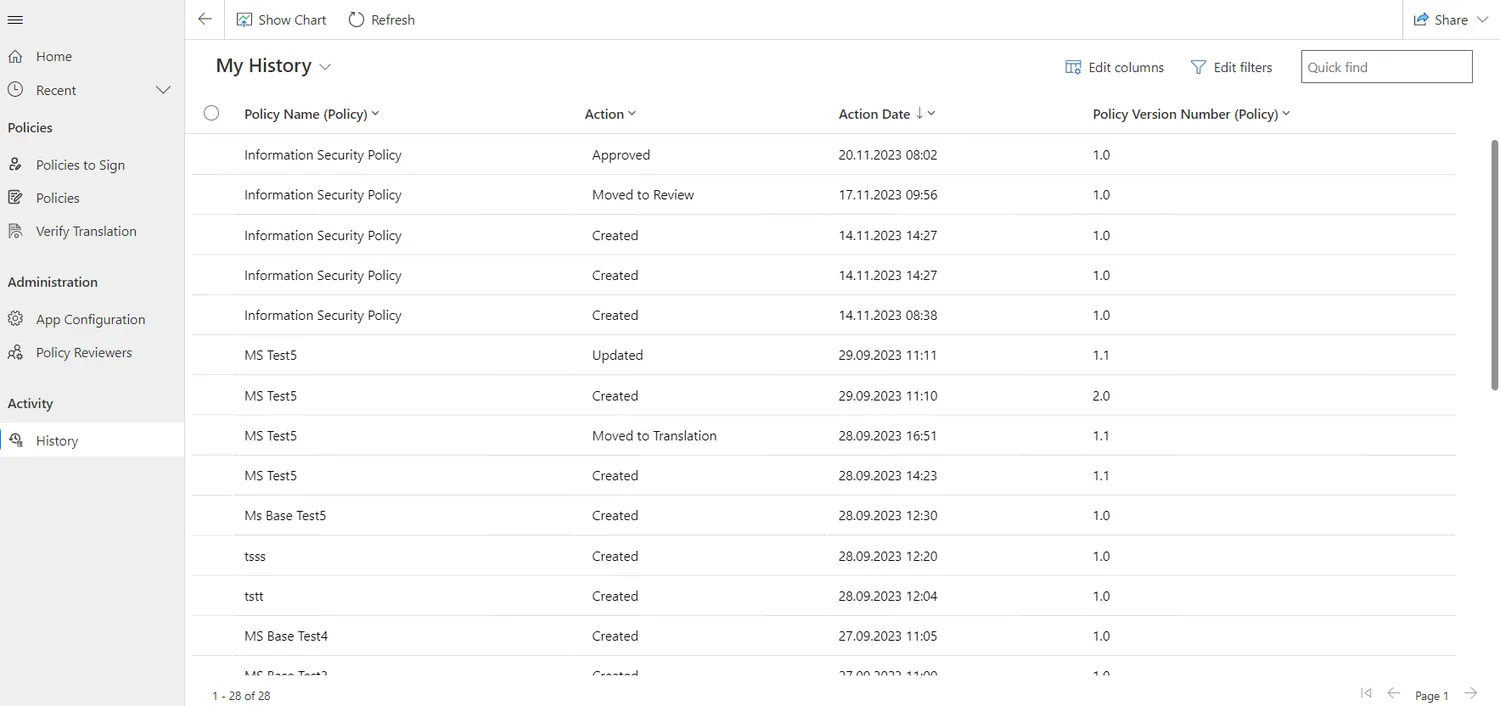
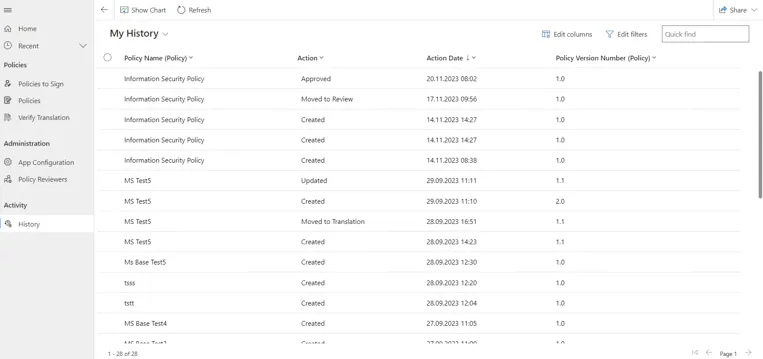
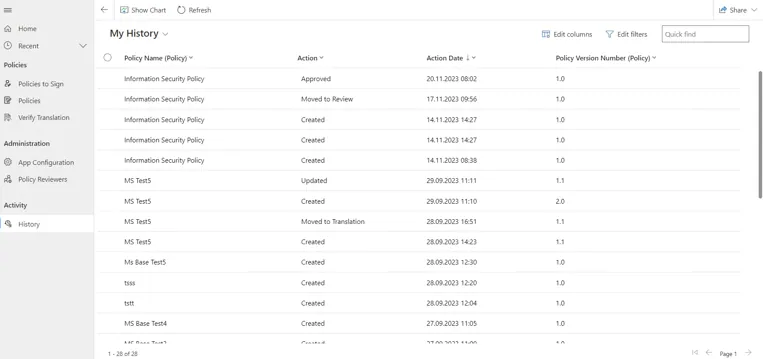
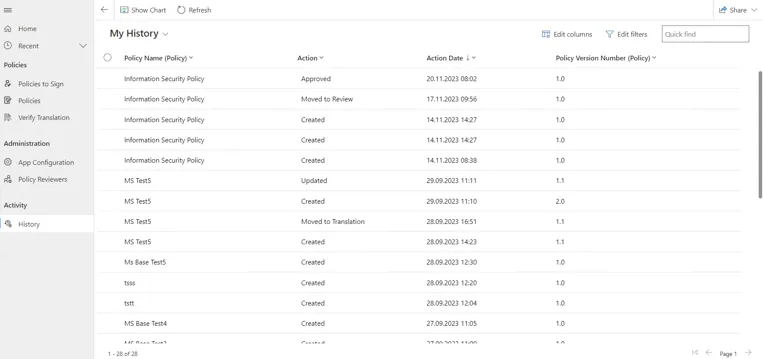
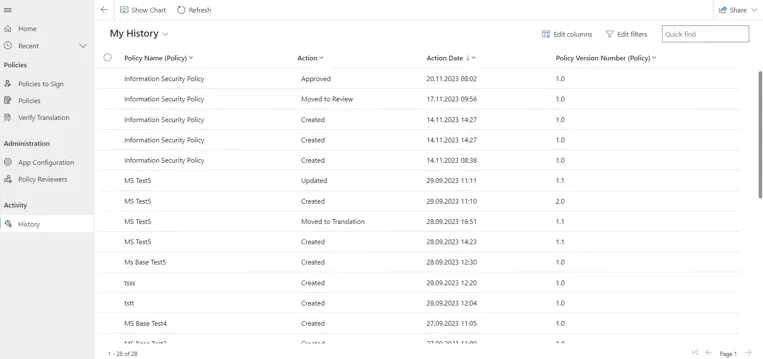
As an administrator, you can view your activity history. To do so, follow these steps:


  1. In the menu, go to the "History" tab:
  1. Take a look at the list of actions you've taken:
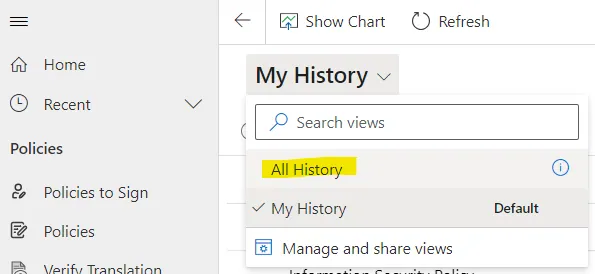
  1. View the list of all actions performed in the system by selecting the "All History" view from the drop-down list:

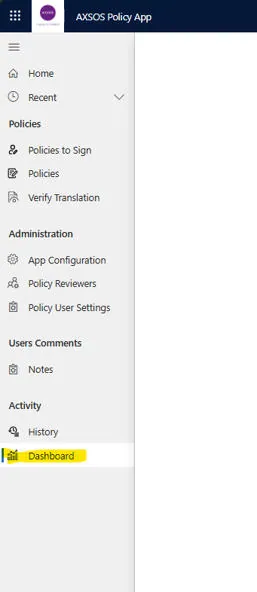
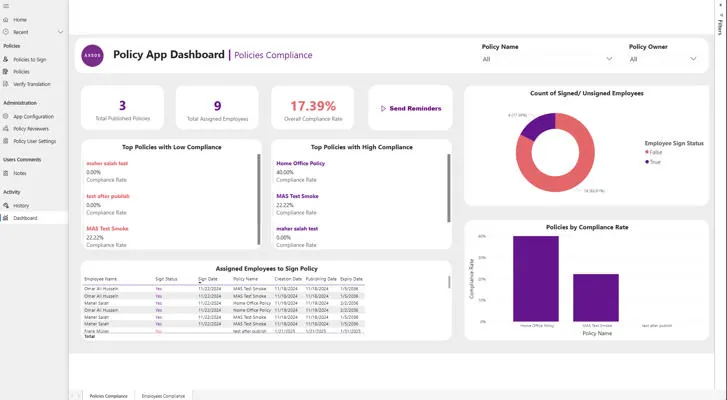
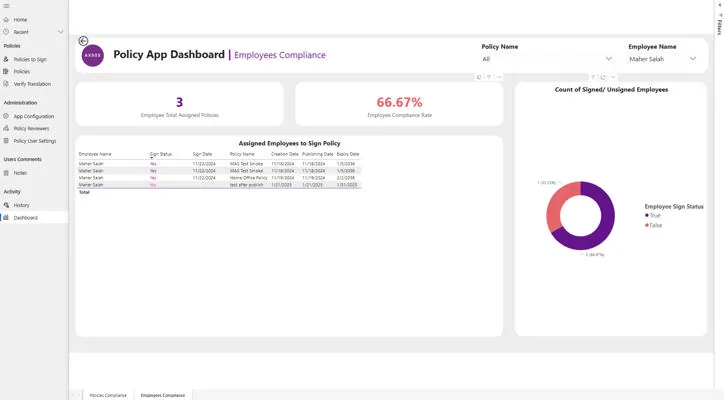
The Power BI-based dashboard provides you, as an administrator, with an overview of policy compliance across the entire organization. You can also use it to trigger reminders for pending signatures.

To access the dashboard:

  1. In the menu, go to the "Dashboard" tab
  1. Sign in to Power BI.
  1. Take a look at the tabs on the dashboard.
  1. Click "Send Reminders" to notify all users who have not yet signed the policy. This will remind them to complete the signing process.

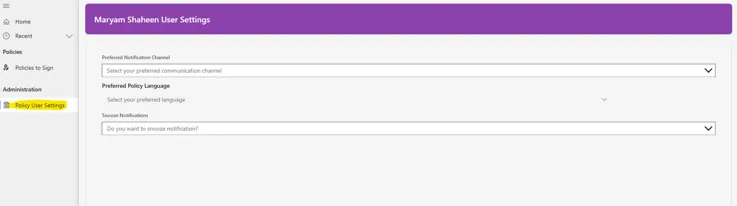
As an administrator, you can customize how and when you receive notifications. You can also send urgent reminders that override users' individual settings, as described in Section 3.7.


Customize Notifications

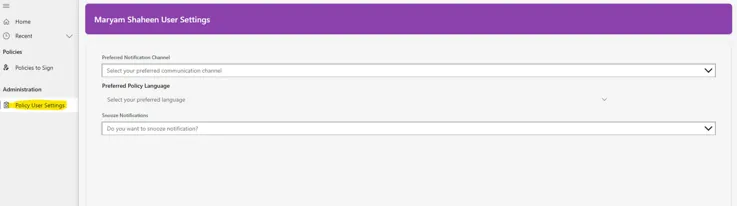
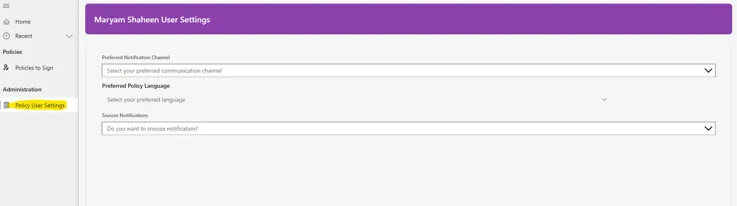
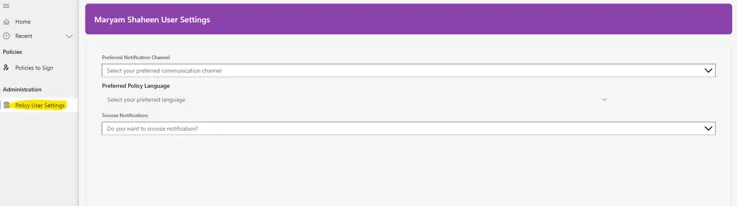
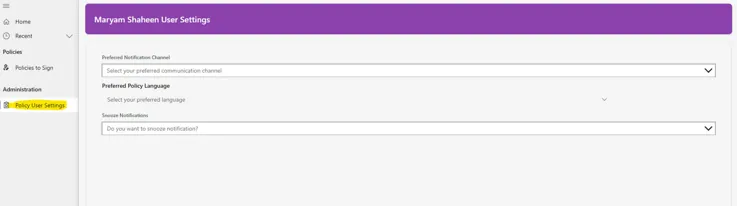
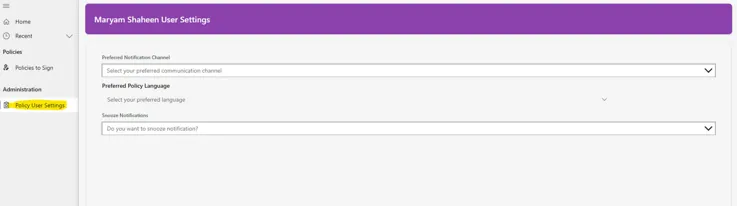
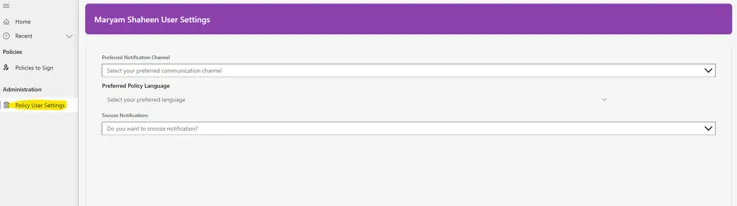
  1. Open the Policy app and go to the "User Settings" tab (in the main menu or in the profile dropdown)
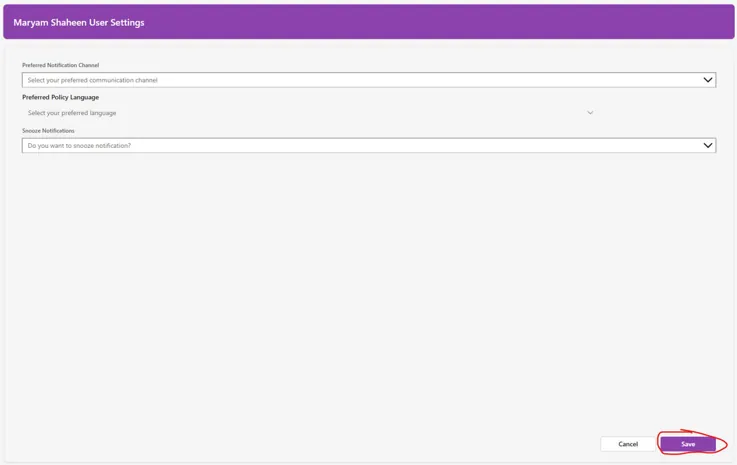
  1. Select "Notification Preferences."
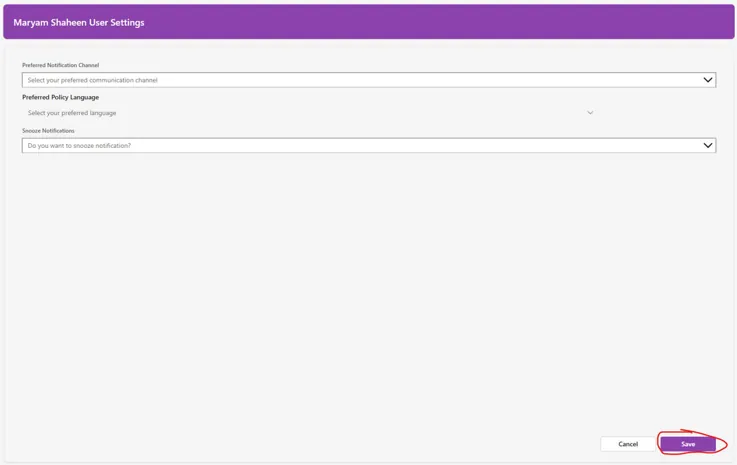
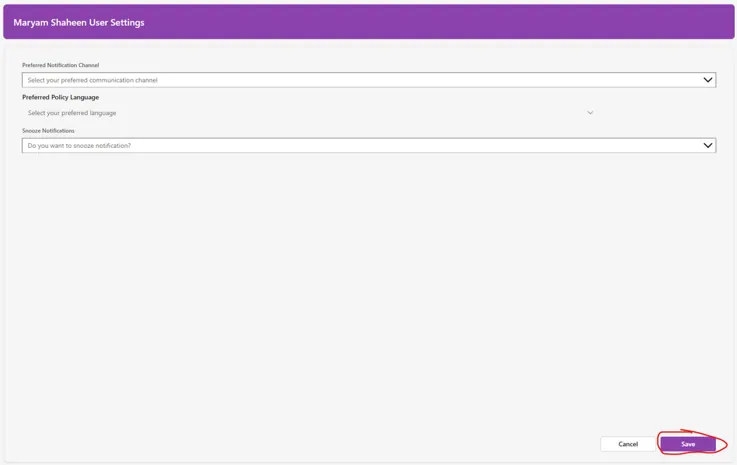
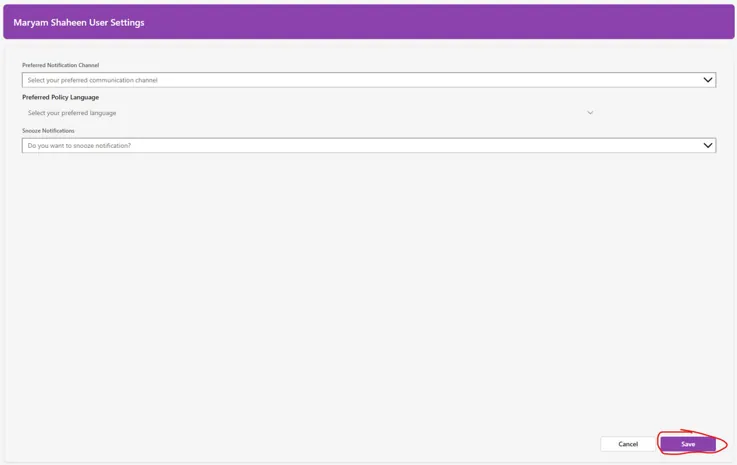
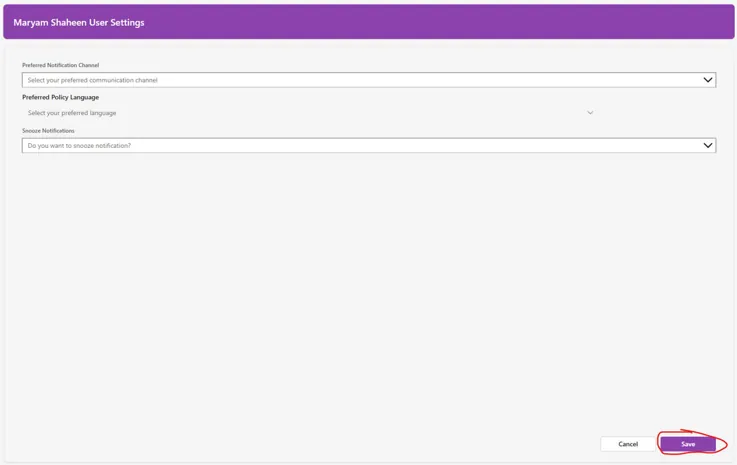
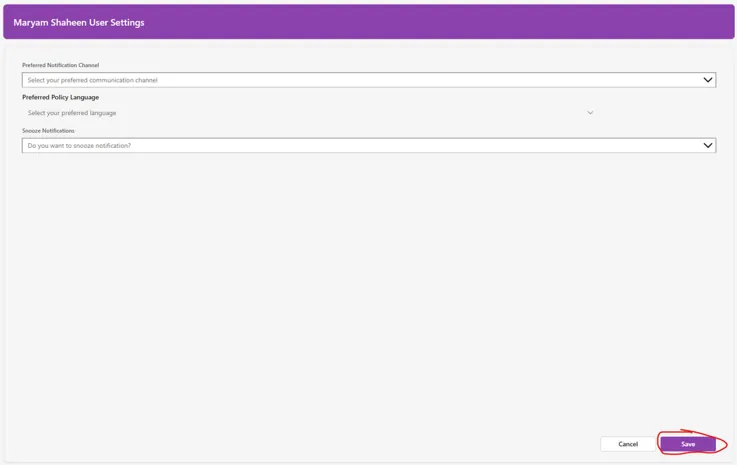
  1. Save your changes.

This section describes all the additional features available to you as an administrator. In addition, you can assume any role in the system and perform the corresponding actions.

4

Creator Guide

As a Creator, you are responsible for creating guidelines, submitting them for review, and publishing them; keeping translations up to date; and archiving or updating guidelines as needed.

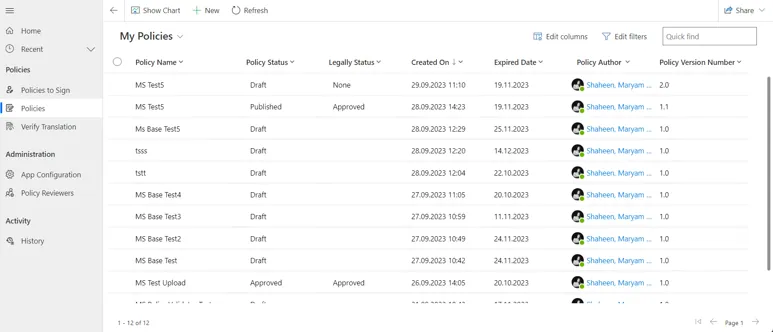
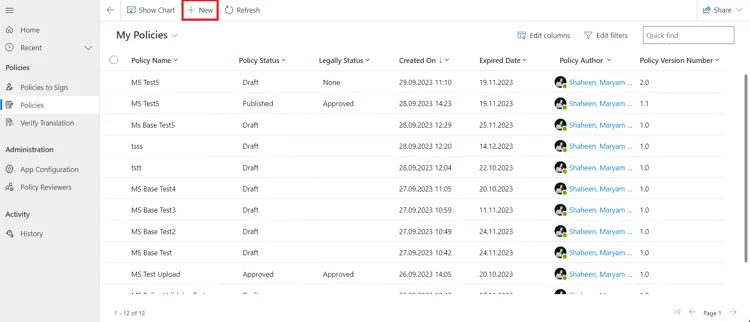
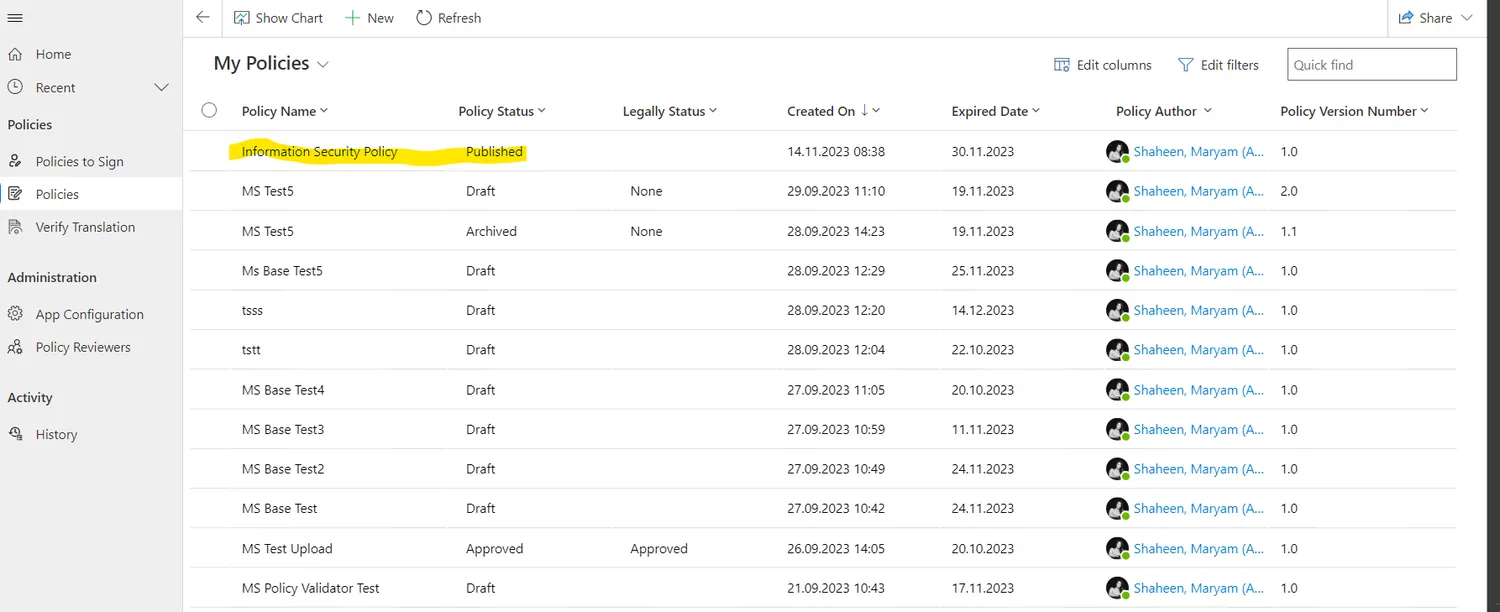
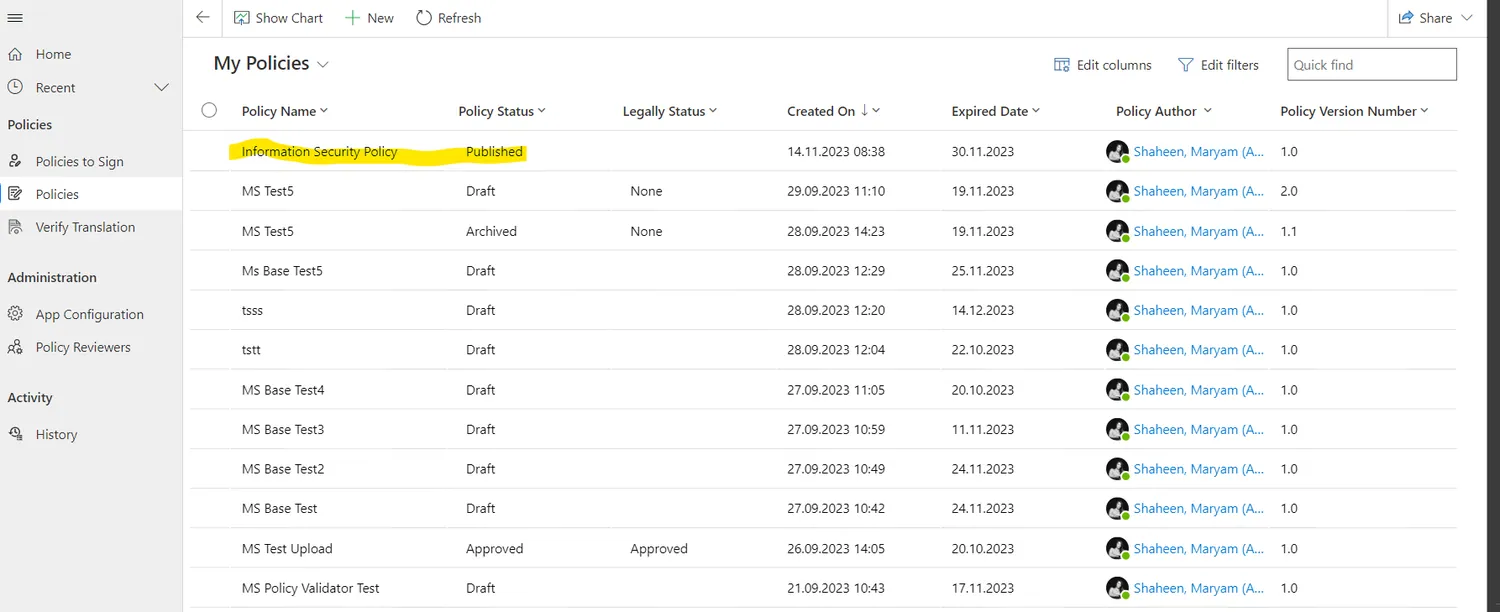
On the home page, as a Creator, you'll see a complete overview of all the guidelines you've created.

You can use the drop-down menu to filter policies by their status. Alternatively, you can use the search function to search for a specific policy by name. You can also sort the policies alphabetically by name or chronologically by creation or expiration date.


On the Creator’s Home Page, the Creator can begin the policy creation process by selecting the "New" button located in the upper-left corner of the page.

Grade

The form displays only the sections that your administrator has enabled (see Section 3.2). You may not see all of the fields described below—that is to be expected.

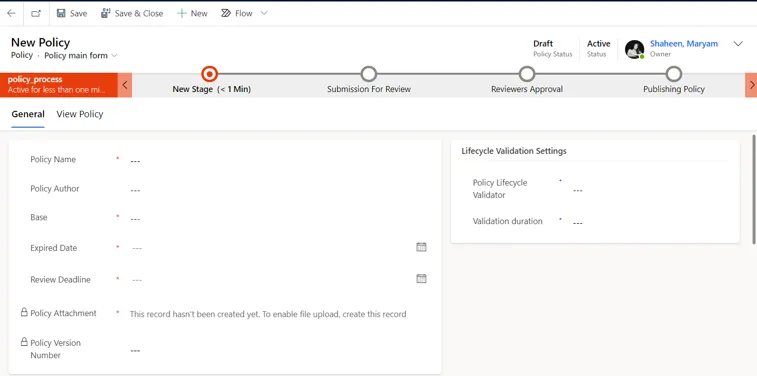
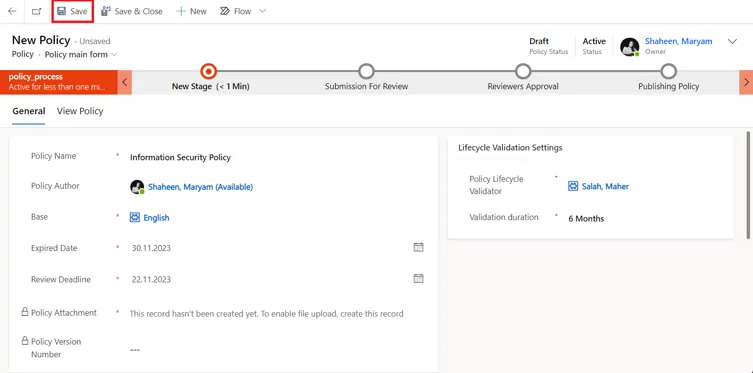
This creation form is where the Creator enters the required policy information.

In this form, creators are required to provide the following information:

Step 1 — Core Details

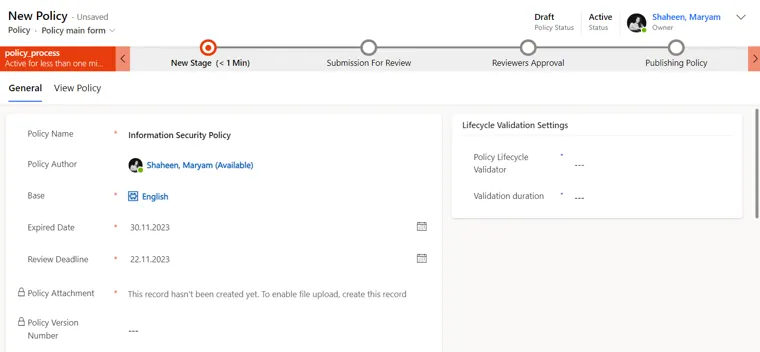
In "First Steps," the creator must provide the following information in the appropriate section of the form:

  1. Policy Name: Creators should follow the naming convention of capitalizing the first letter of each word.
  1. Policy Author: Creators must specify the primary author who wrote the policy document; if no name is provided, the author field will automatically be filled with the creator’s name.
  1. Base Language: Creators should select the base language of the policy folder being uploaded.
  1. Expiration Date: Creators must enter the policy's expiration date. This applies to both annual renewal policies and those with specific expiration dates, such as policies that expire after 10 years or within one month. If the expiration date is exceeded, the policy will be archived; the creator can then update it later with an incremented version number (e.g., 1, 2, 3, and so on).
  1. Reviewer Deadline: Creators should specify the deadline by which reviewers must complete their policy review.

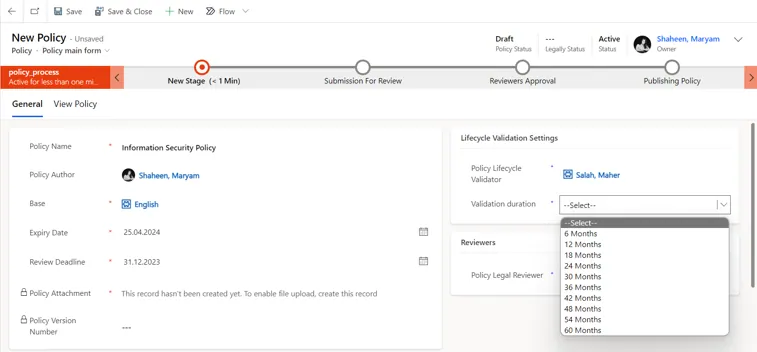
Step 2 — Lifecycle Validation (if enabled)

  1. Life-Cycle Validator: Creators must select one life-cycle validator from the provided list.
  1. Validation Duration: Creators must select a duration that determines the next validation date. For example, some policies may require validation every three months, while others may require annual validation. This is the parameter that the creator sets to determine the validation frequency. Successful validation results in the extension of the current version, with the version number increasing incrementally (e.g., 1.2, 1.3, 1.4, and so on).

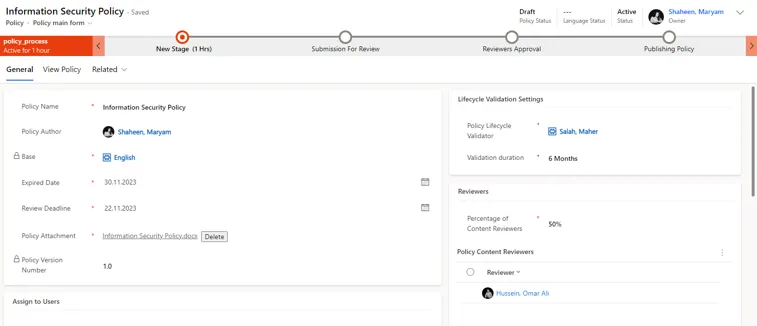
After entering these details, the creator must click the "Save" button to be taken to the second part of the creation form:

Step 3 — Attachment and Audience

in the left section:

  1. Policy Attachment: Creators must attach the policy document in either Word or PDF format, and it should be saved within the specified policy template.
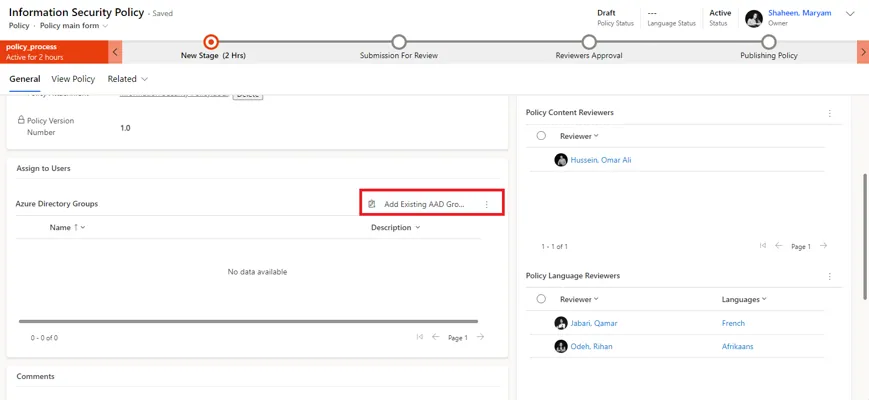
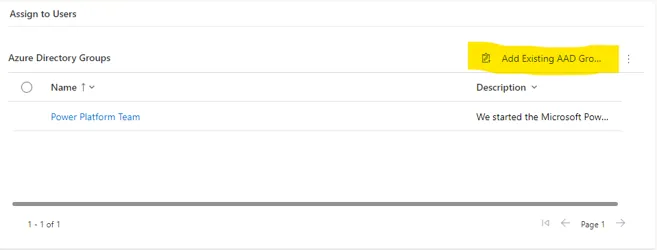
  1. Assign to Users: Creators are required to assign the policy to multiple Azure Active Directory groups. Users designated within these Azure groups will be required to view and sign the policy.

    Here's how to select an Azure Active Directory group and add it to the list:

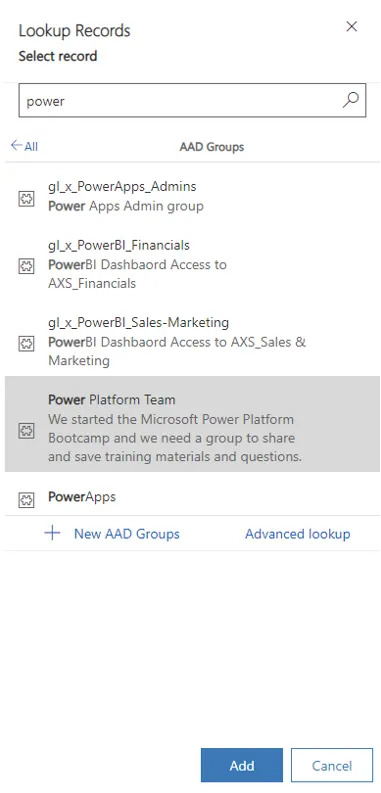
To add an Azure Active Directory group to the list, start by searching for the group. Type its name or at least one keyword to begin the selection process.

and then click the "Add" button.

Step 4 — Reviewers

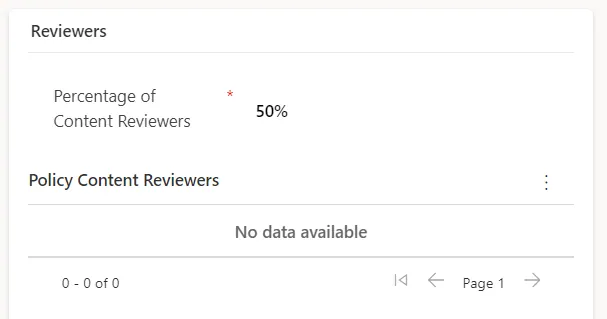
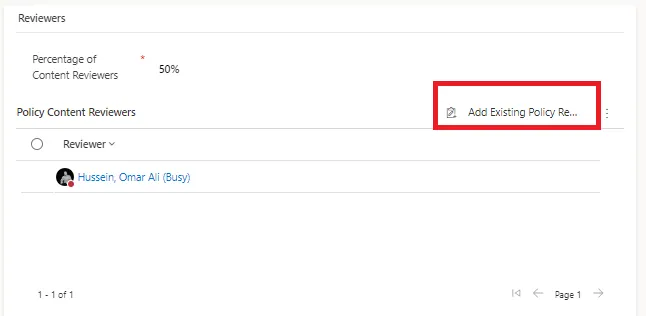
  1. Policy Content Reviewers: Creators can add multiple content reviewers to review the policy.
  1. Percentage of Content Reviewers: Creators must select the percentage of approvals required for this policy based on the number of reviewers selected. For example, if a creator selects 4 reviewers and then sets the approval threshold to 50% of reviewers’ approvals, we will require only 2 approvals from those 4 reviewers.

Here's how to select a reviewer to add to the list:

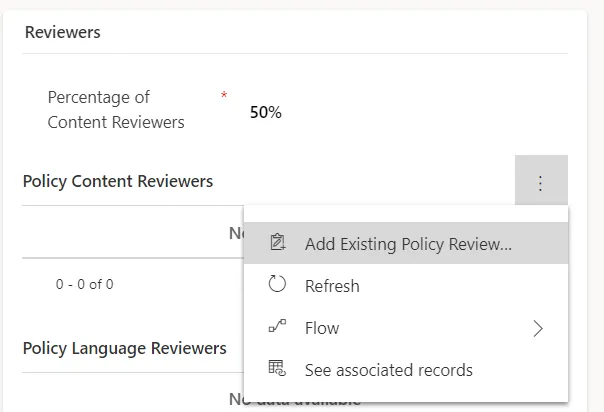
On smaller screens, such as tablets or iPads, you can access the options from the three-dot menu:

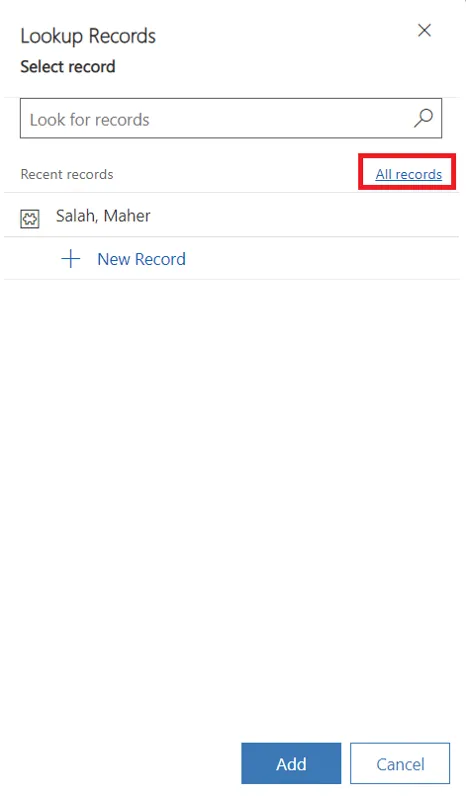
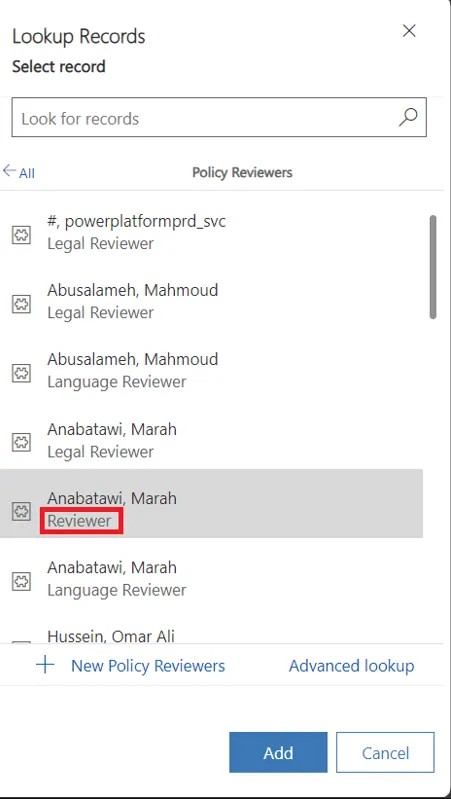
To view all reviewers, please select “All Records.” If this option is not selected, only recently added reviewers will be visible.

Be sure to select only the names of reviewers who have the "Reviewer" label below their name.

and then click the "Add" button.

Grade

Select reviewers only from the full list, not from "Recent Records"—recent entries may display the wrong reviewer type for someone who holds more than one role. Make sure the label under the reviewer's name ("Content Reviewer," "Legal Reviewer," or "Language Reviewer") matches the role you intend to assign.

Approval Threshold Quick Reference:

CaseReviewers SelectedApproval PercentageRequired Approvals
a225%1
50%1
75%2
100%2
b325%1
50%2
75%3
100%3
c425%1
50%2
75%3
100%4
  1. Legal Reviewer: Creators must select one legal reviewer for the policy.

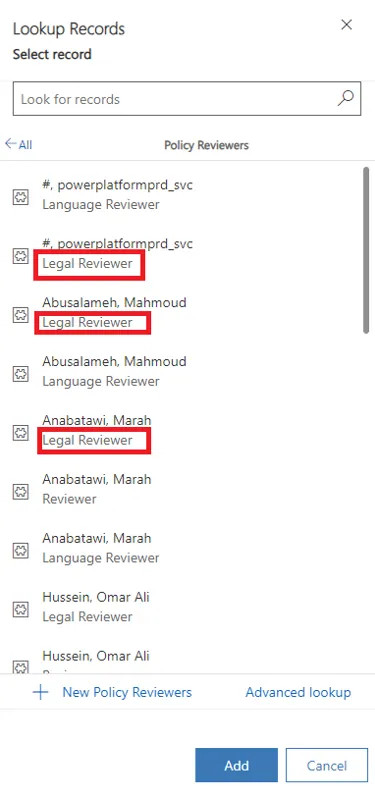
    For the legal reviewer, the selection process is similar to choosing a reviewer from the list described above in the content reviewer section. However, please be sure to select only the names of reviewers who have the label “Legal Reviewer” listed below their name.

Grade

Select reviewers only from the full list, not from "Recent Records"—recent entries may display the wrong reviewer type for someone who holds more than one role. Make sure the label under the reviewer's name ("Content Reviewer," "Legal Reviewer," or "Language Reviewer") matches the role you intend to assign.

and then click the "Add" button.

  1. Language Reviewers: Creators can choose a language reviewer, which allows the policy to be translated into a specific language.

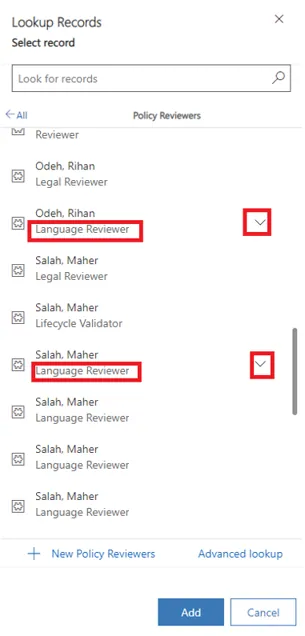
    For the language reviewer, the selection process is similar to choosing a reviewer from the list described above in the content reviewer section. However, please be sure to select only reviewers whose names are labeled “Language Reviewer.”

Grade

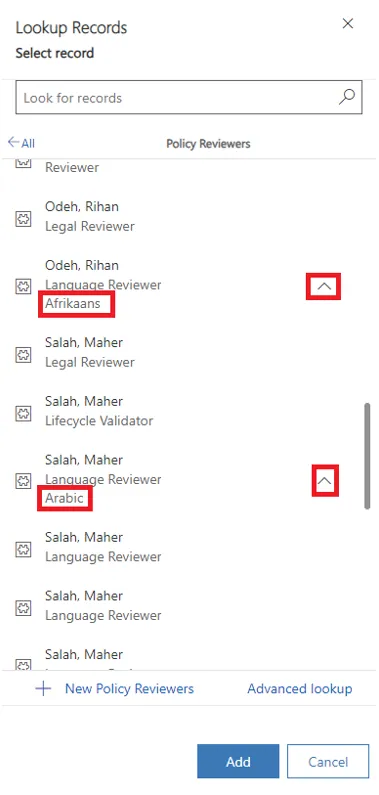
Additionally, when selecting a language reviewer, please make sure to choose only those reviewers who have an arrow next to their name. Clicking this arrow will show the language assigned to that reviewer for the review. Language reviewers without an arrow next to their name are not assigned to any language. Selecting them will not result in the translation of your policy into any language.

Grade

Select reviewers only from the full list, not from "Recent Records"—recent entries may display the wrong reviewer type for someone who holds more than one role. Make sure the label under the reviewer's name ("Content Reviewer," "Legal Reviewer," or "Language Reviewer") matches the role you intend to assign.

and then click the "Add" button.

Although it is not mandatory to include reviewers for multiple languages when creating a policy, in cases where a policy requires translation into multiple languages, the creator must specify those languages by selecting reviewers for each language, either during the policy creation phase or at a later stage, such as when editing a draft policy or updating a new version. Once multiple languages have been specified,

Once all details have been added, the policy is now finalized and ready for approval.

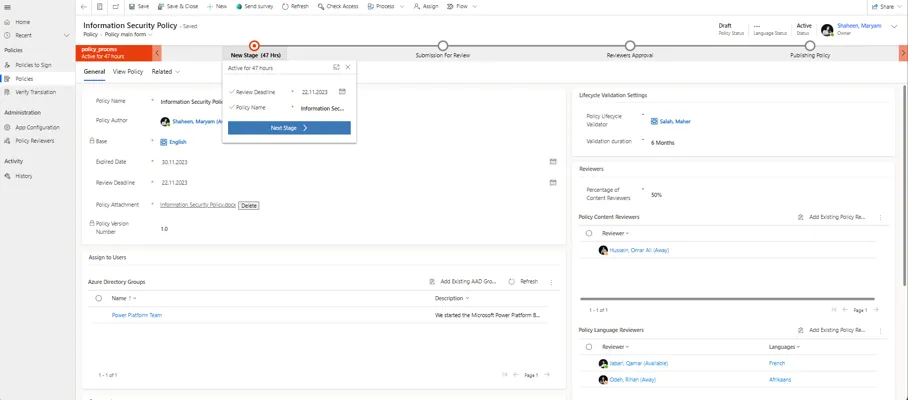
The creator is primarily responsible for the creation phase and initiates the approval process by following these steps:

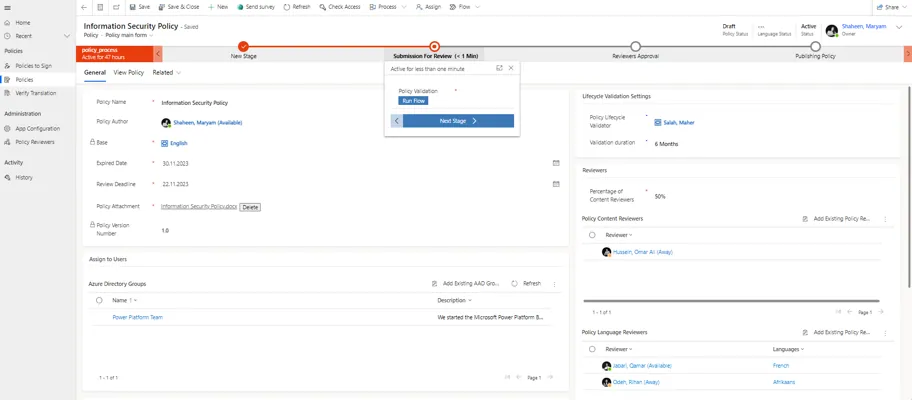
  1. Within the policy business process flow, the creator moves on to the next stage by clicking the “Next Stage” button.
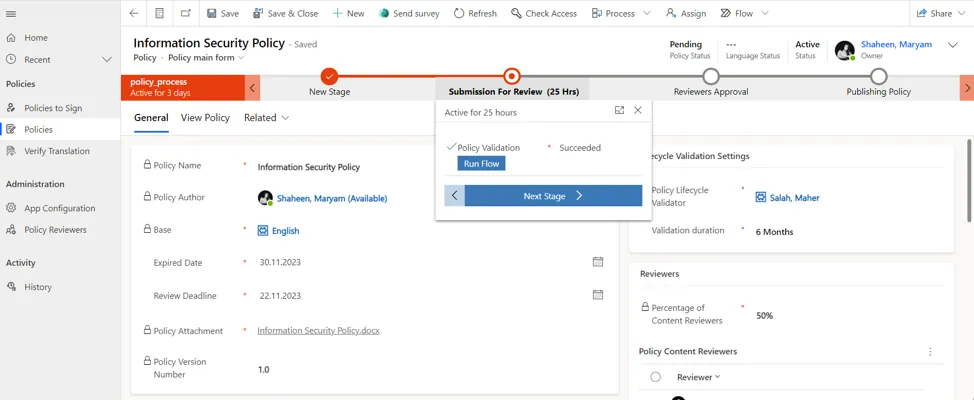
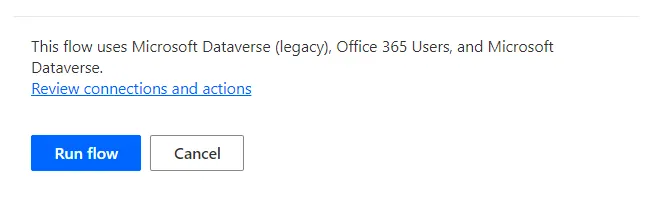
  1. The creator can then proceed to send the policy to reviewers by clicking the "Run Flow" button.

After clicking it, a notification will be sent to the reviewers so they can approve it.

Important

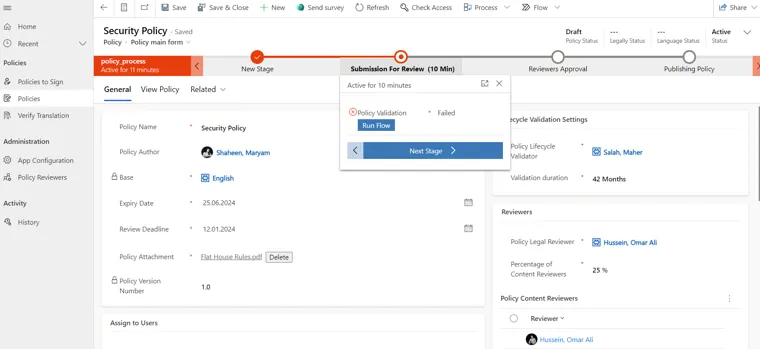
The Legal Reviewer and Content Reviewer assigned to the same policy can never be the same person—the policy validation process will fail if they match.

Always check the comments for a clearer update on what has happened:

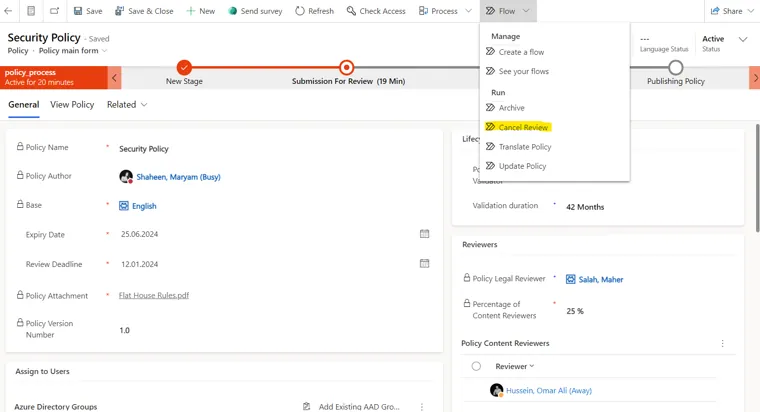
If creators identify any necessary changes after submitting the policy for review, they have the option to cancel the review process, make their edits, and resubmit it for review. To cancel the review process, creators can follow these steps:

  1. Go to the desired policy

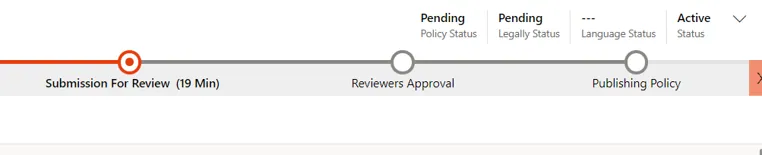
It is important to note that the policy status must be “pending” in order to cancel the review process.

  1. Click on the "Flow" dropdown list, select the "Cancel Review" flow, and run it:

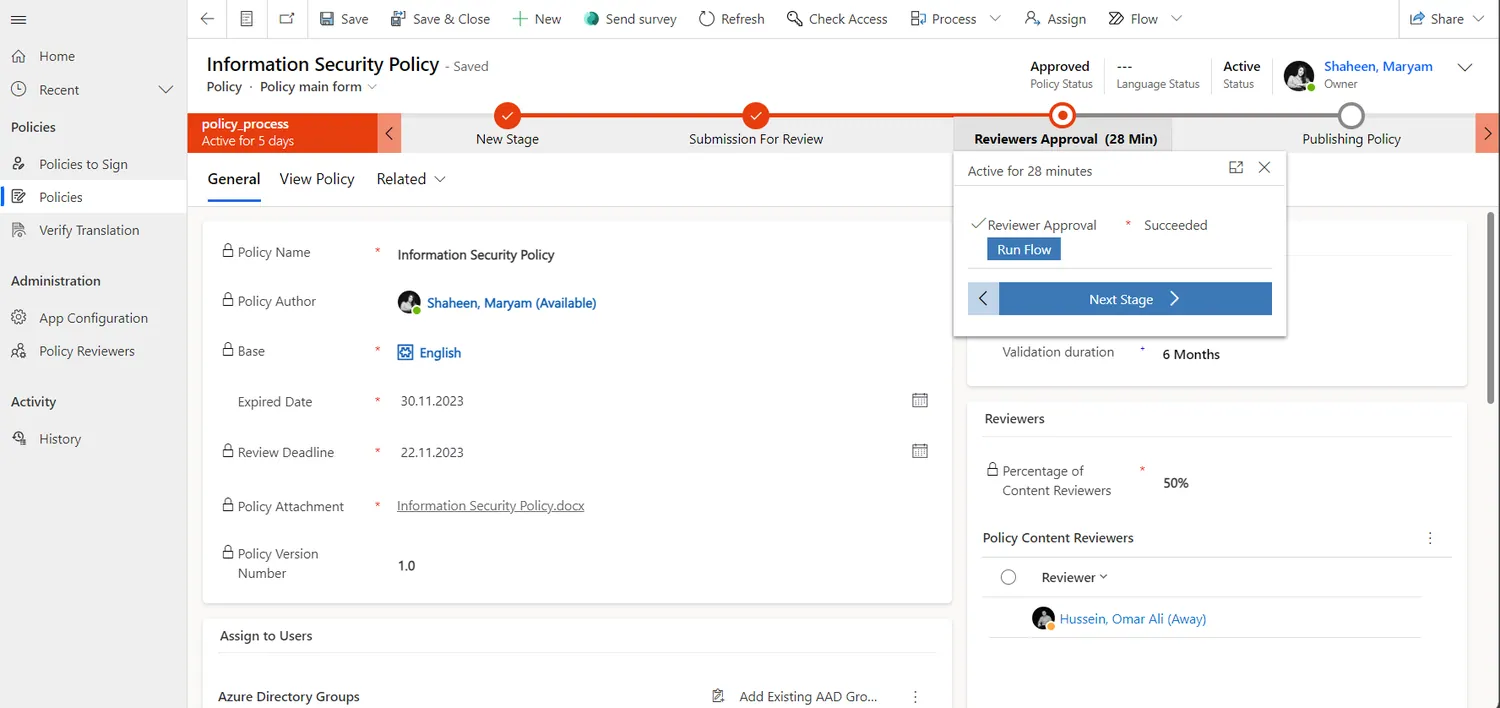
Creators can publish a policy after it has been approved by content reviewers and legal reviewers, depending on the app's settings and the specific requirements. Creators can proceed with publication by following these steps:

  1. Navigate to the approved policy record:
  1. Click the "Next Stage" button in the approval stage:
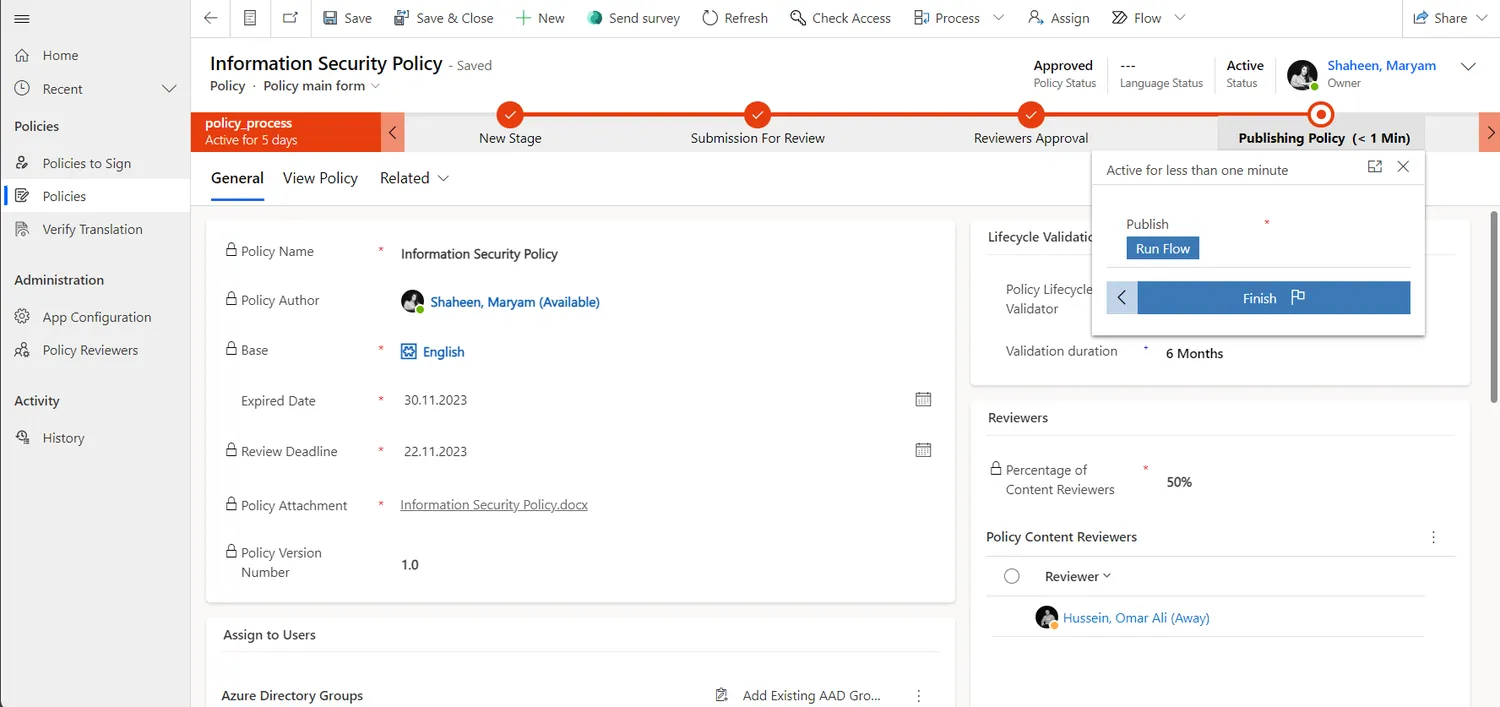
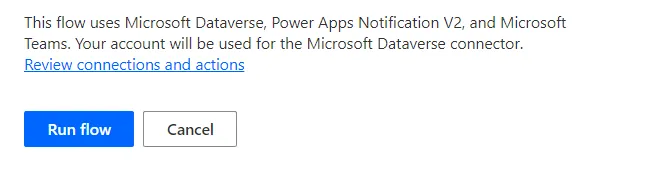
  1. Run the publication flow by clicking "Run Flow" in the publishing policy stage:
  1. Click "Run"

Creators or administrators can select an additional Active Directory (AD) group for user population after publishing a policy. Creators can proceed with the publication by following these steps:

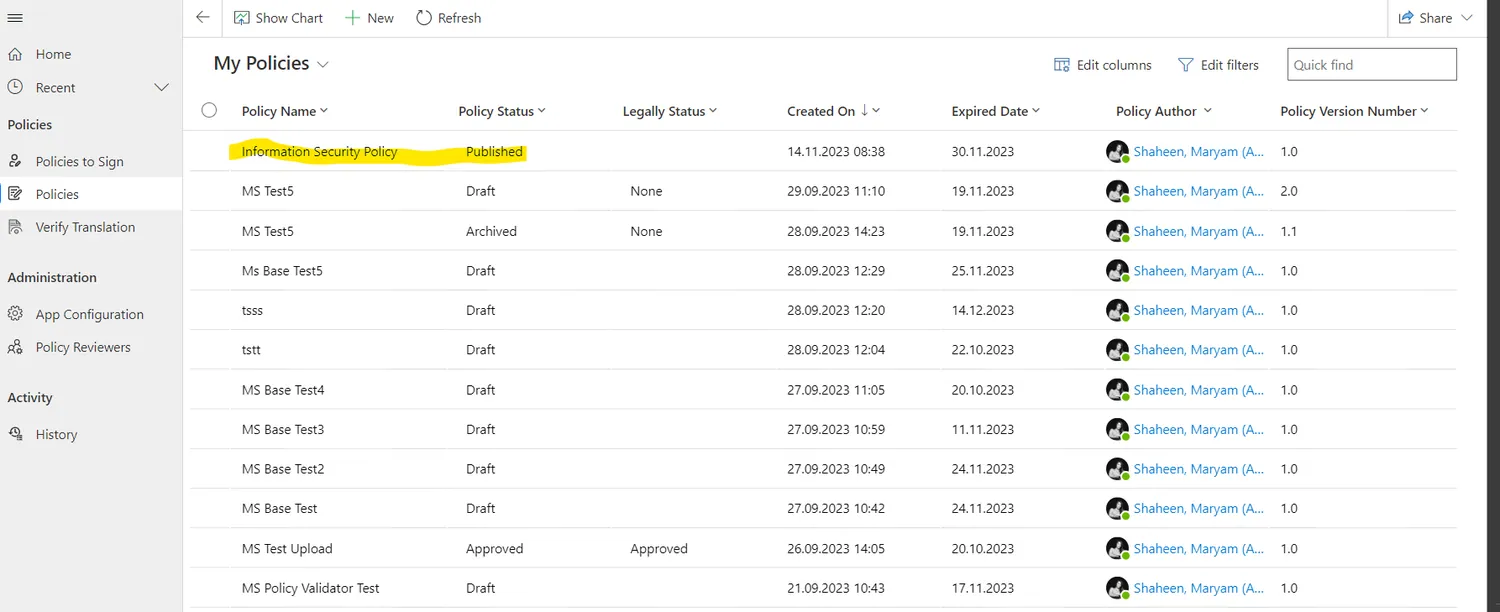
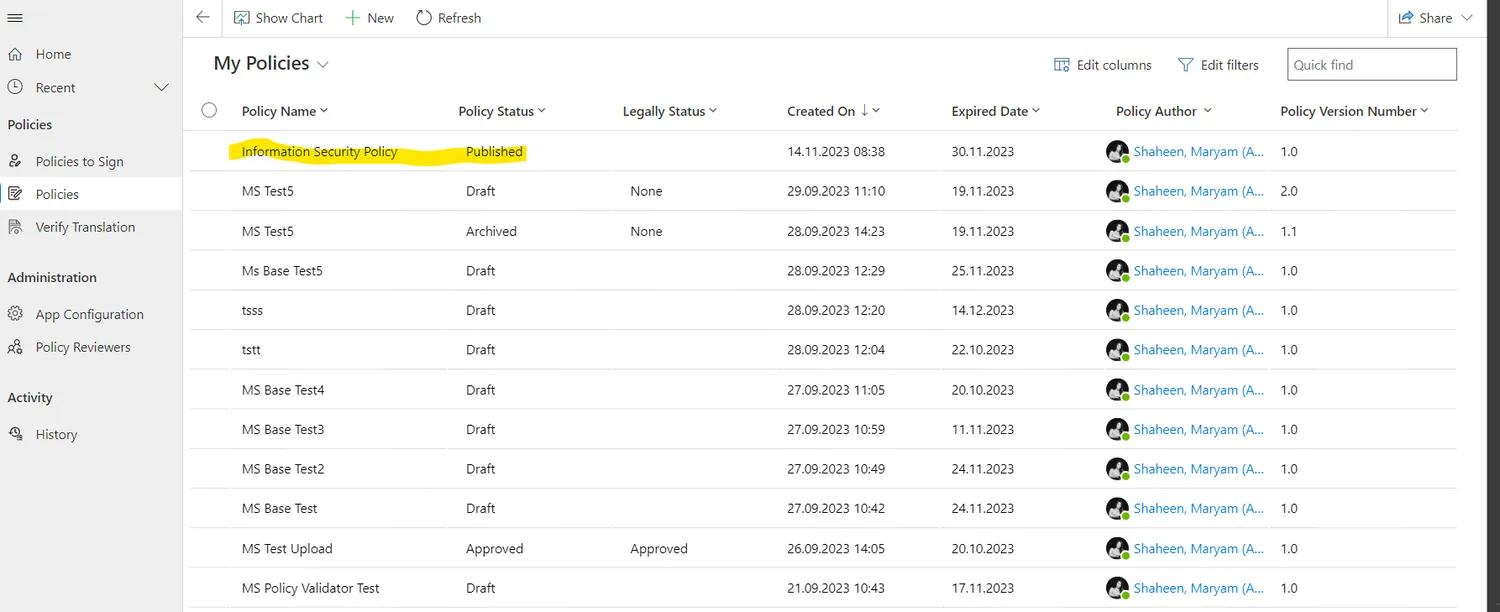
  1. Navigate to the "Published" policy record:
  1. Add AD Group:
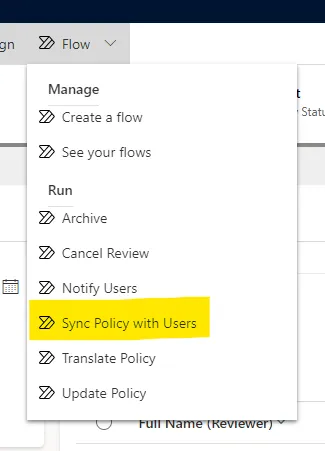
  1. Click on the "Flow" drop-down list, select the "Sync Policy with User" flow, and run it:

Creators must submit policies for translation after the policy has been published or approved, and they can do so by following these steps:

  1. Navigate to the published policy record:
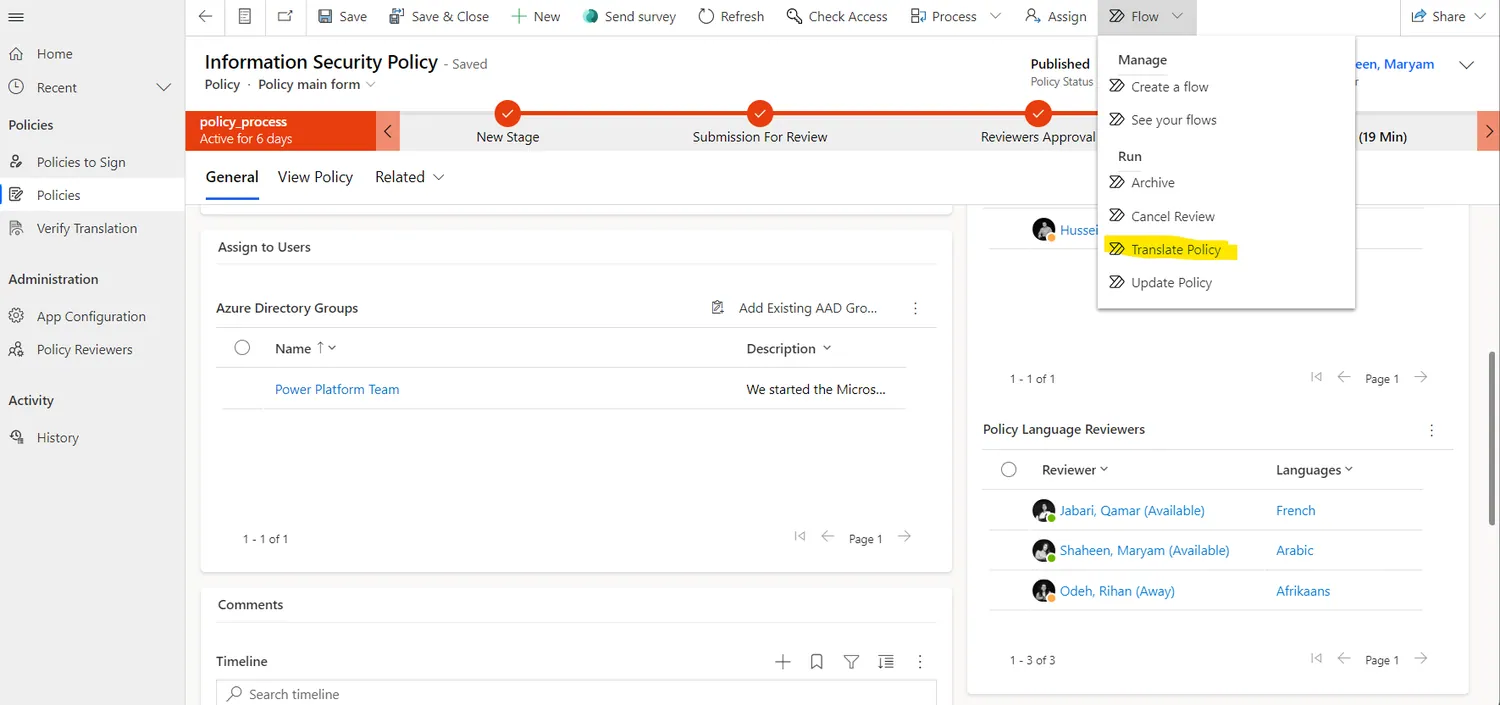
  1. Click on the "Flow" drop-down list, select the "Translate Policy" flow, and run it:

Grade

Publish the policy before translating it, so that all required languages are included. If a new language is added after publication, rerun the translation process to include it.

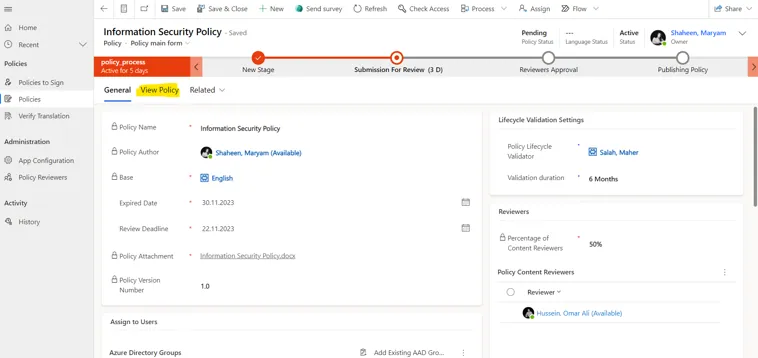
Creators can access the policy document from the "View Policy" tab, which opens the policy stored in its base language folder.

After a policy is published and translated, admins can access the translated versions by navigating through a drop-down list and selecting the desired language.

This access is granted once the policy has been assigned to language reviewers for validation, has gone through the approval process, has been published, and its translation has been validated.

Policy Document Viewing Options

The Policy app offers two ways to view policy documents in full-screen mode, providing users with a more flexible and enhanced reading experience.

  1. Open in a New Tab: Users can now open the policy document in a new browser tab, making it easier to navigate and access the document while using other application features. To use this option, click on “Having trouble viewing? Click here” as shown in the screenshot below.
  1. Open in a New Window: Alternatively, users can open the policy document in a separate window. This option is ideal for those who prefer to focus solely on the document without distractions. To use this option, click “Full Screen” as shown in the screenshot below.

Both options allow users to take advantage of standard PDF viewing features, such as zooming in and out, scrolling, and searching, ensuring a more comfortable and customizable experience when reading policies.

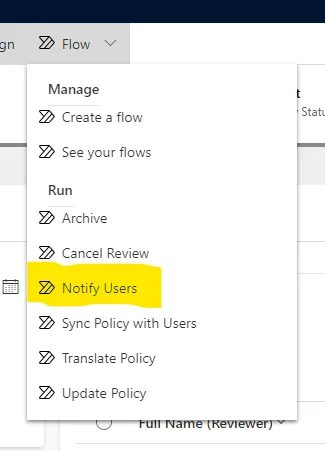
Creators can send a manual reminder to sign to all assigned users at any time.

Creators can proceed with publication by following these steps:

  1. Navigate to the published policy record:
  1. Click on the "Flow" dropdown list, select the "Notify Users" flow, and run it:

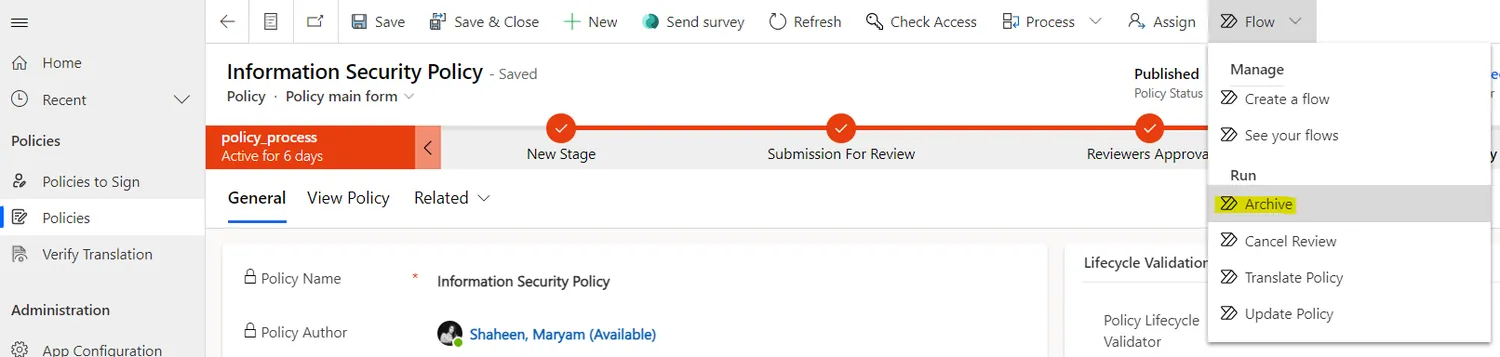
Creators can manually archive a policy if it is no longer needed to be published to users. They can do so by following these steps:

  1. Navigate to the published policy record:
  1. Click on the "Flow" drop-down list, select the "Archive" flow, and run it:

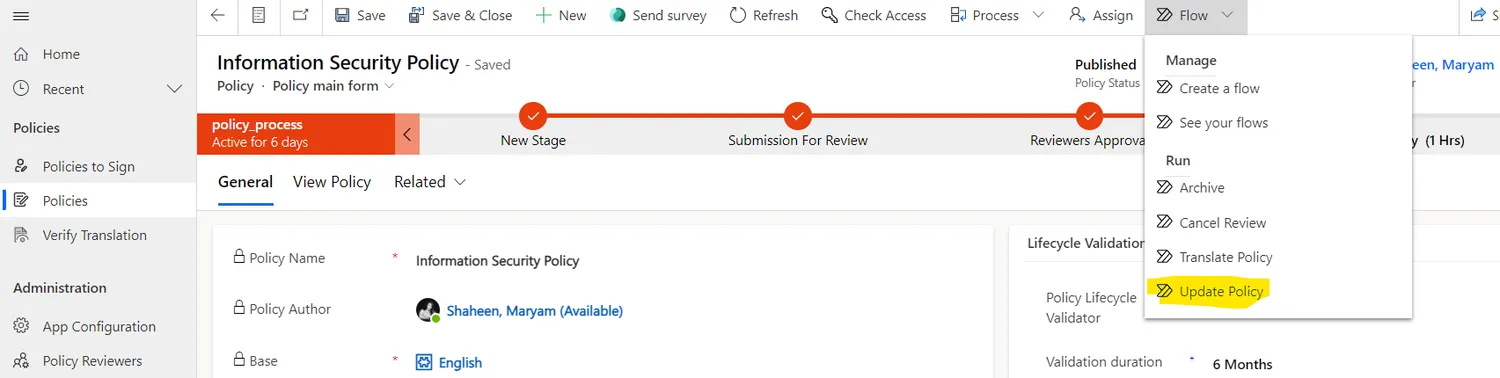
Creators can update a policy manually if the policy document needs to be replaced with a newer version or if the policy details need to be edited. Creators can update a policy by following these steps:

  1. Navigate to the published policy record:
  1. Click on the "Flow" drop-down list, select the "Update Policy" flow, and run it:
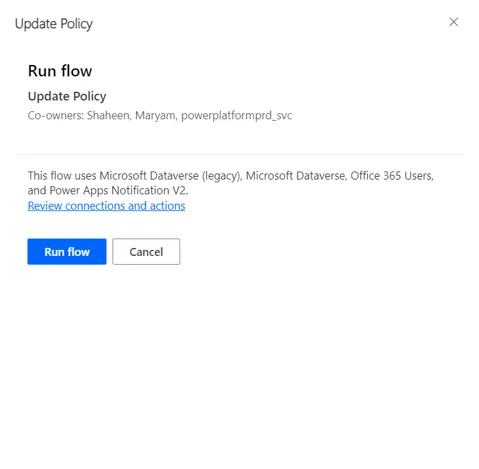
  1. Run the update policy flow by clicking "Run Flow"
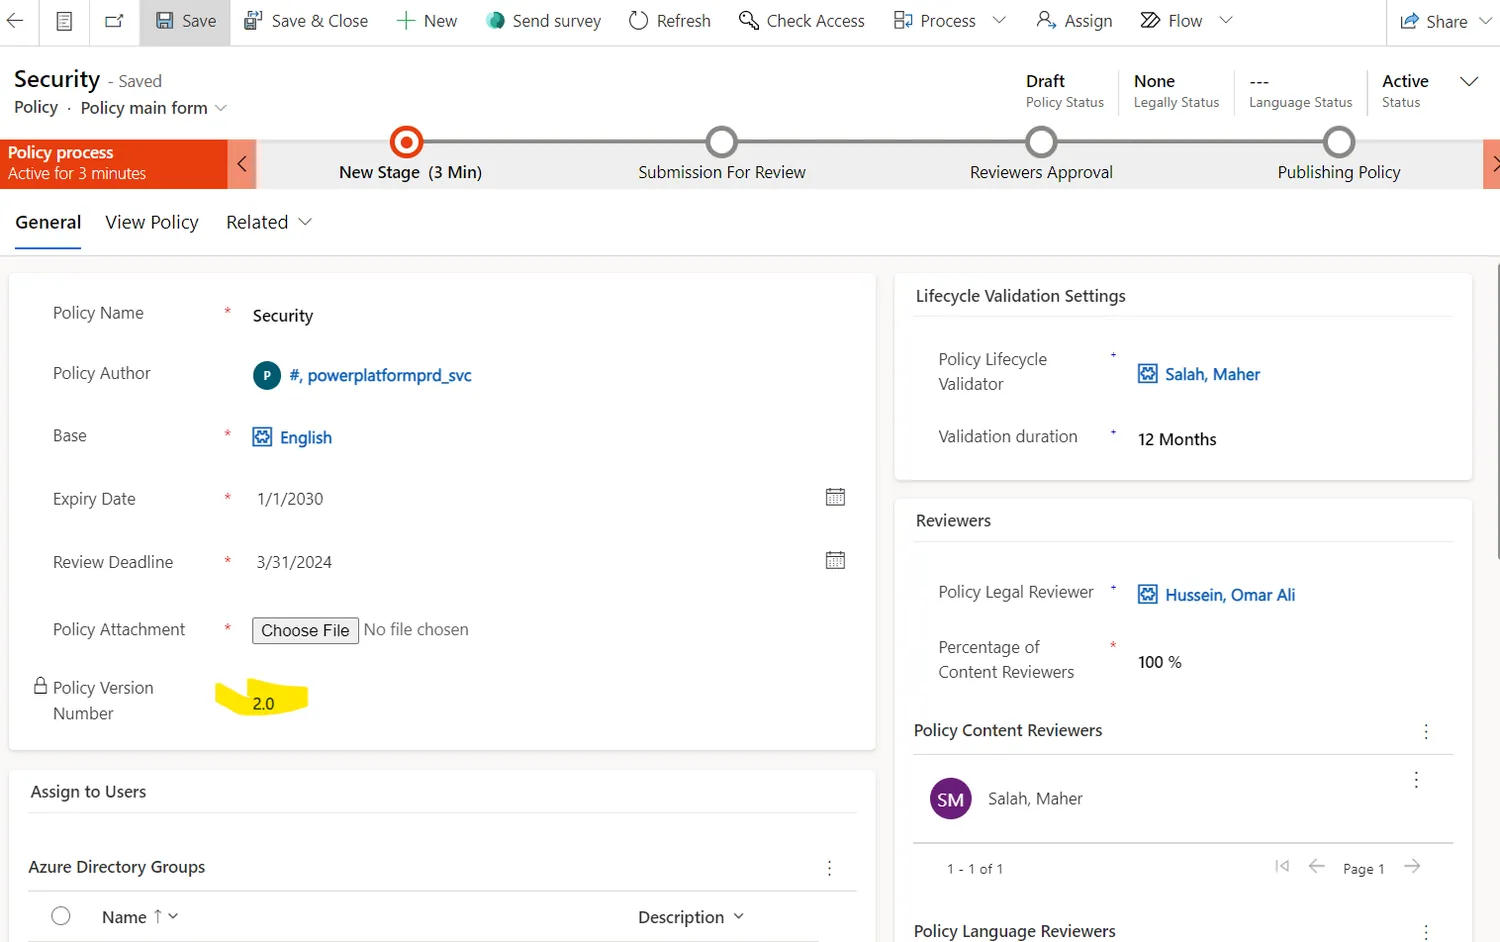
  1. After running the update policy flow, you will have a new version of the policy as a draft that you can edit and upload to the new version folder:
  1. Open the newly created version of the policy and edit any changes you'd like to make. Don't forget to upload the new version of this policy and make sure the document name includes the correct version number.

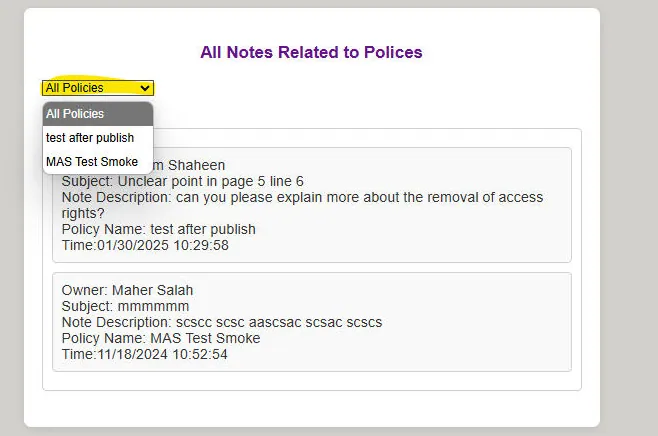
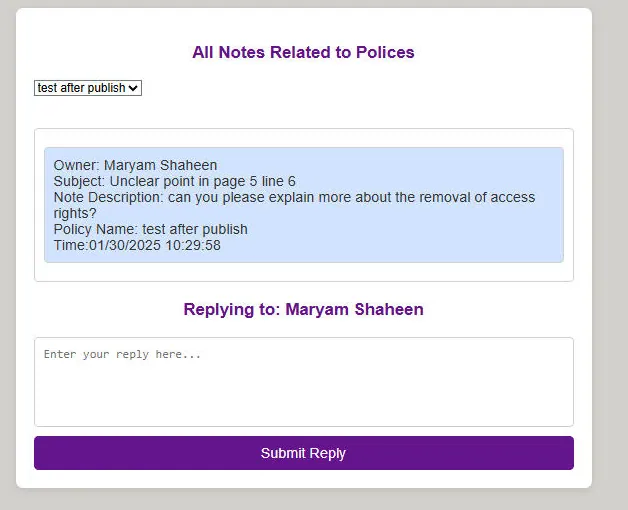
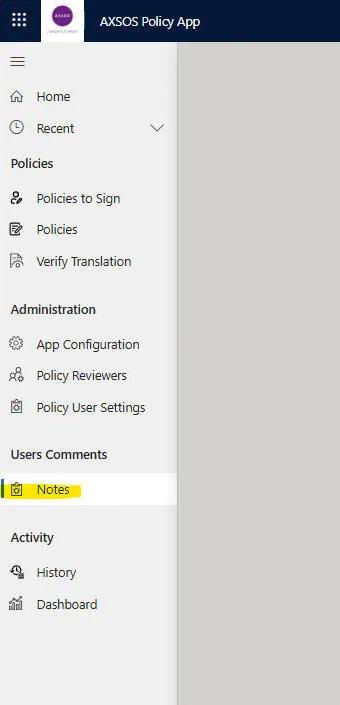
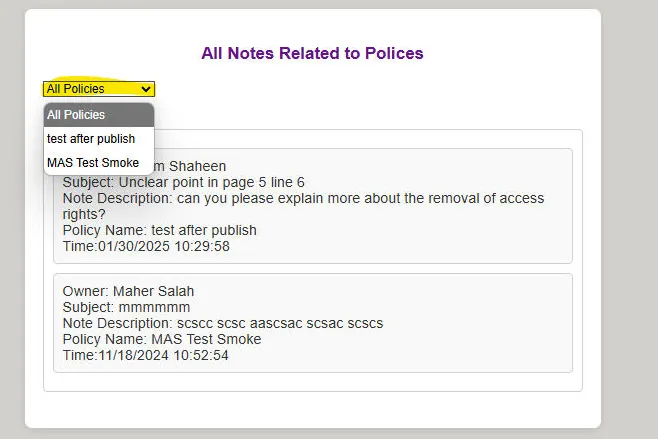
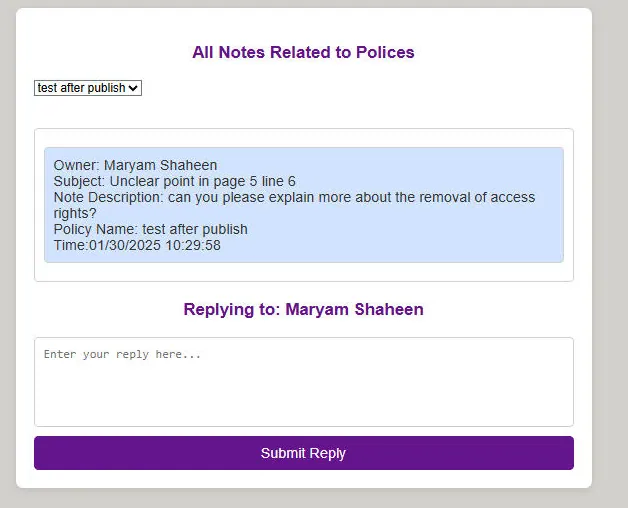
Policy creators can now view, filter, and reply to user notes directly through a user-friendly interface. This feature streamlines communication and ensures timely responses to user queries or feedback.

How to View and Reply to Notes:

  1. Open the Policy app.
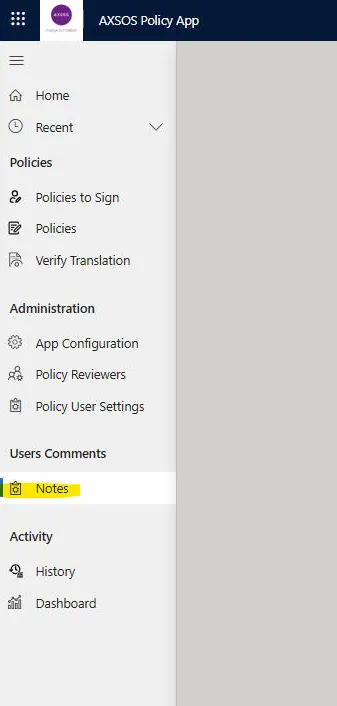
  1. Go to the " Notes" section in the menu.
  1. Use the " Filter by Policy Name " option to find notes for a specific policy.
  1. Click on a note to reply.
  1. Type your reply in the text box provided and submit it.

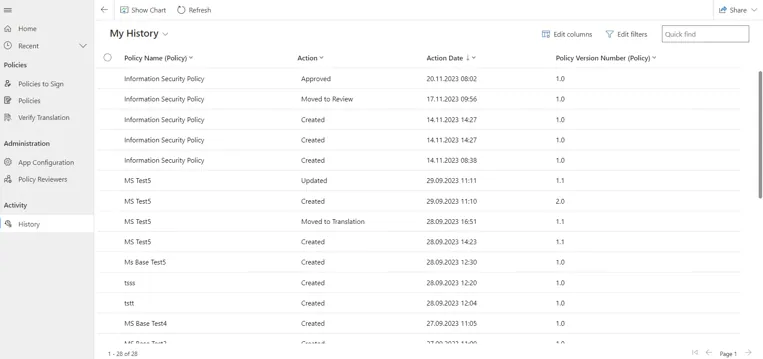
Creators can access their activity history by following these steps:

  1. Go to the "History" tab in the menu:
  1. View the list of actions they took:

Creators can customize how and when they receive notifications, while admins can send critical reminders that override user preferences.

Customizing Notifications

  1. Open the Policy app and go to the User Settings tab (located in the main menu or profile dropdown).
  1. Select Notification Preferences.
  1. Save your changes.
5

Guide for Content Reviewers

As a content reviewer, you review the guidelines assigned to you and either approve or reject them.

Content reviewers can access their list of policies that need to be reviewed and review them by following these steps:

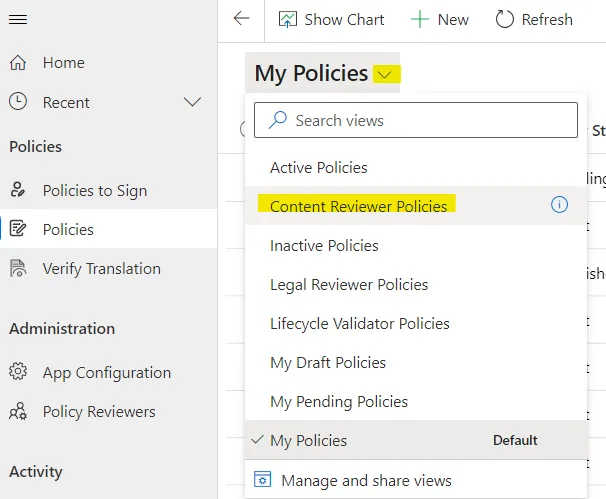
  1. Go to the "Policies" tab in the menu:
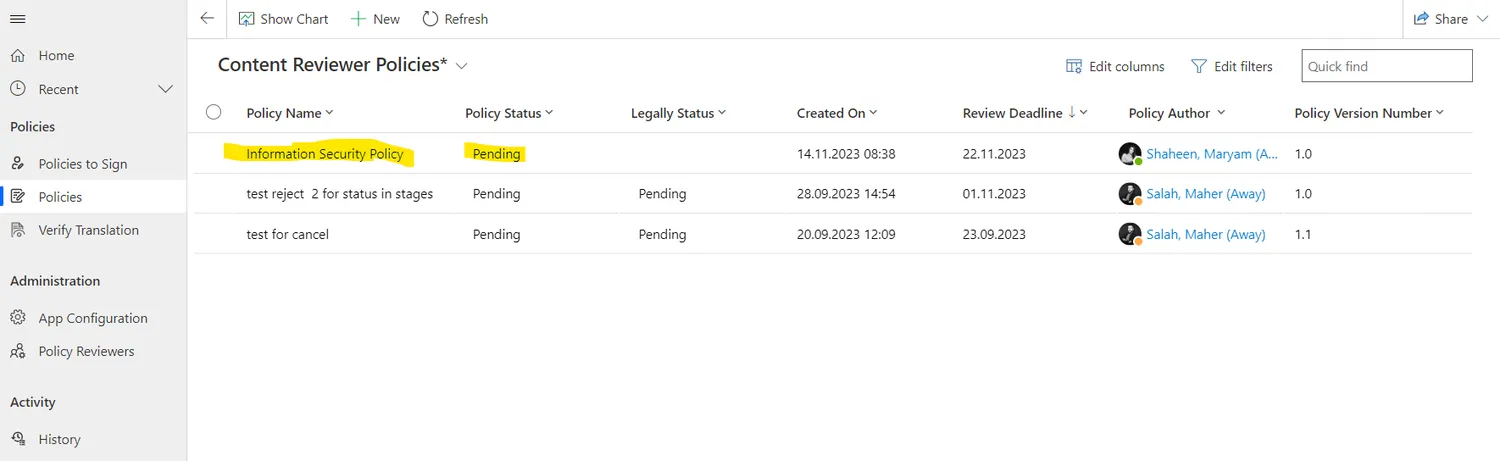
  1. Navigate to the “Content Reviewer Policies” view in the drop-down list:
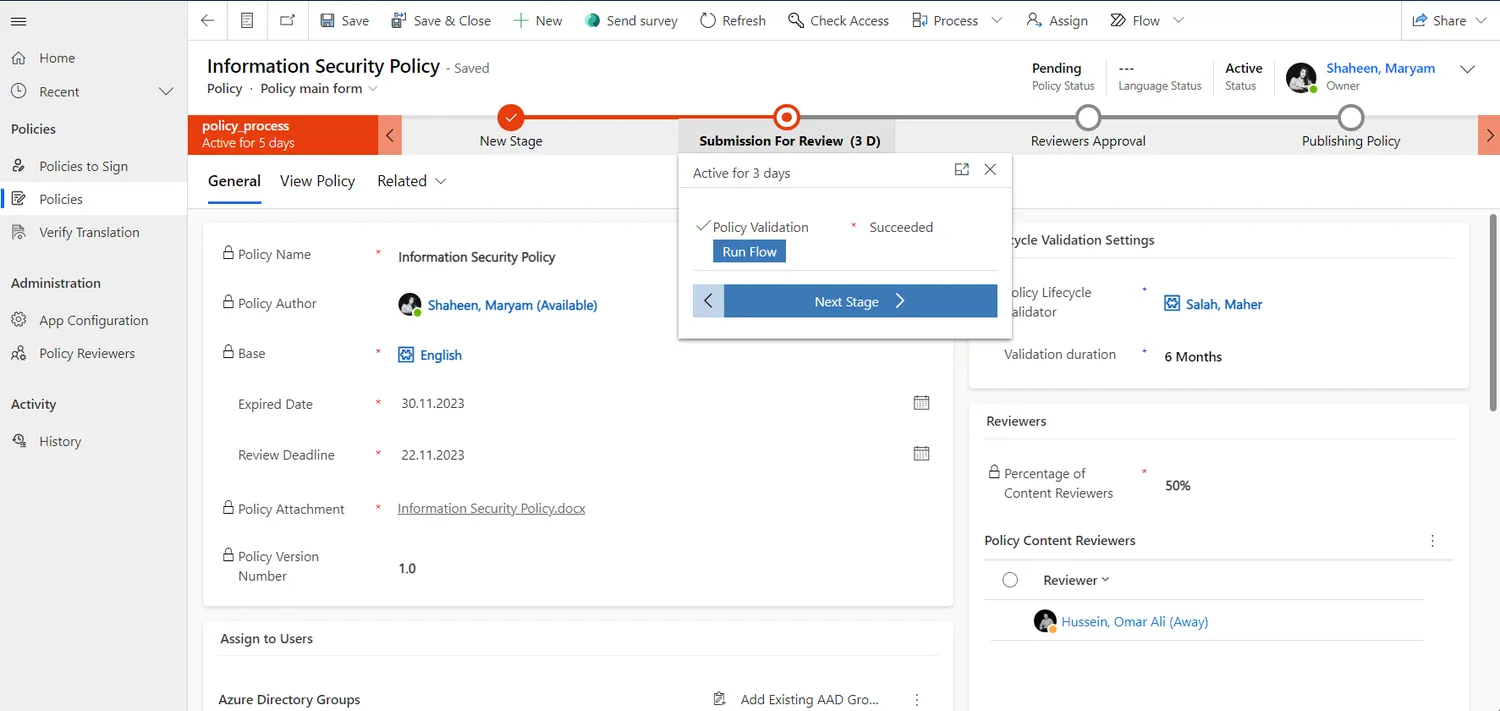
  1. Click on the policy record you want to review:
  1. Click "Next Stage" in the business process flow to proceed to the approval stage:
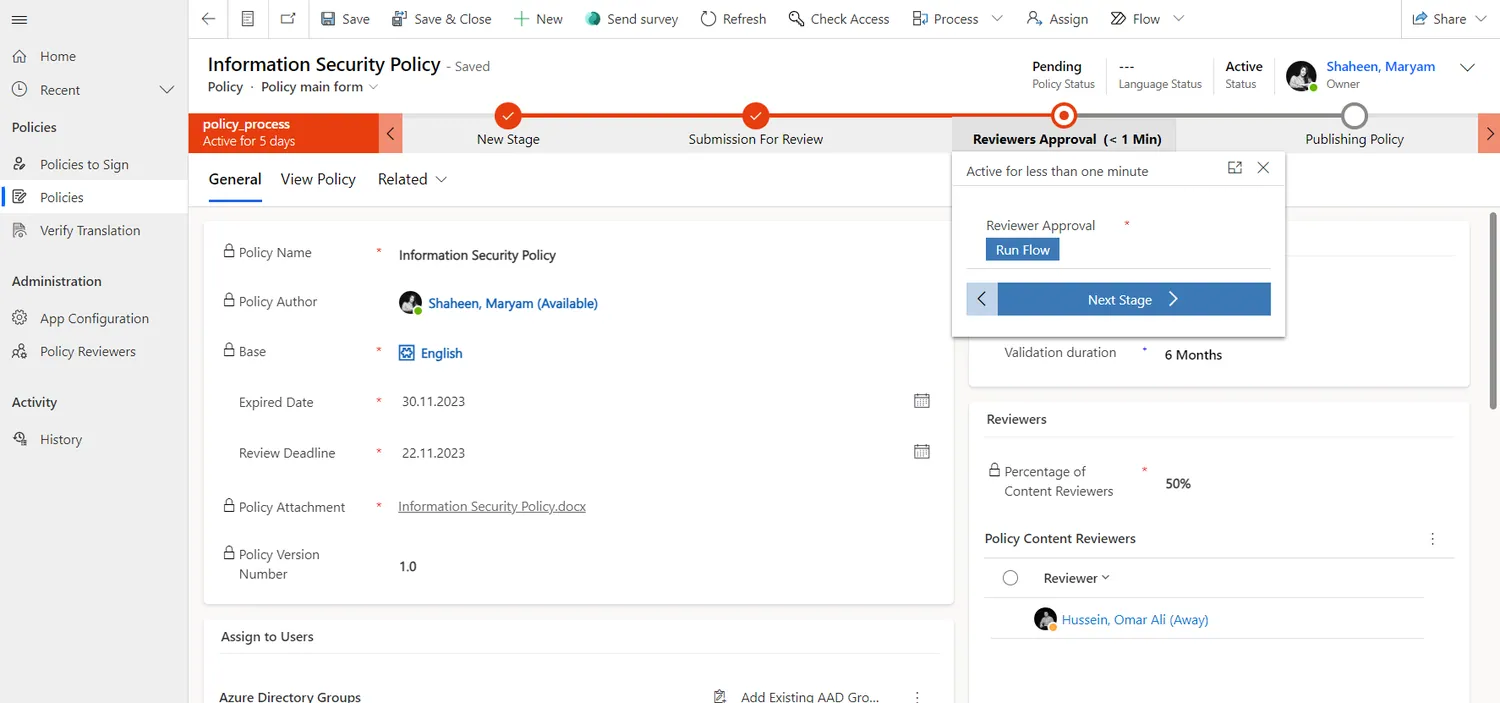
  1. Run the approval flow by clicking the "Run Flow" button:
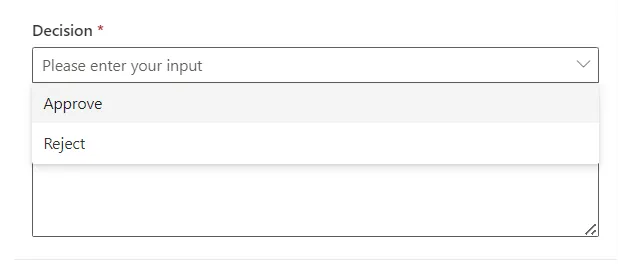
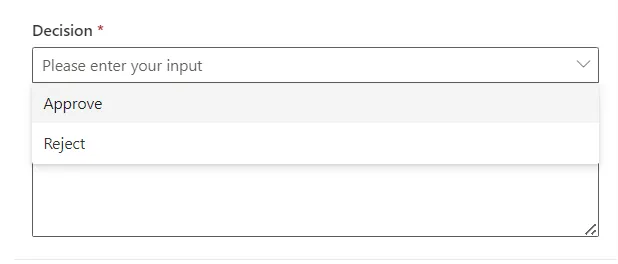
  1. Select whether to approve or reject the policy (Required):
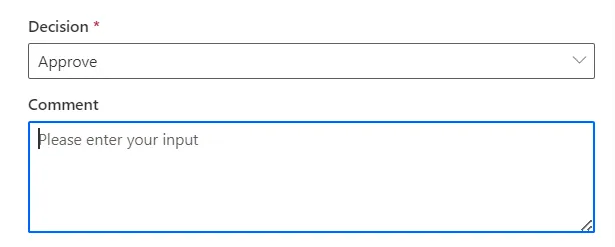
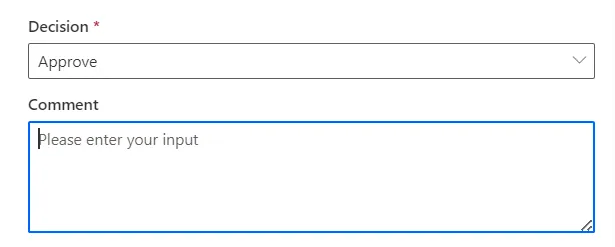
  1. Please add a comment if you have any comments regarding the reason for rejection or approval (optional):

Reviewers can access the policy document by clicking the "View Policy" tab. This will take them to the policy stored in its source language folder.

After a policy is published and translated, admins can access the translated versions by navigating through a drop-down list and selecting the desired language.

This access is granted once the policy has been assigned to language reviewers for validation, has gone through the approval process, has been published, and its translation has been validated.

Policy Document Viewing Options

The Policy app offers two ways to view policy documents in full-screen mode, providing users with a more flexible and enhanced reading experience.

  1. Open in a New Tab: Users can now open the policy document in a new browser tab, making it easier to navigate and access the document while using other application features. To use this option, click on “Having trouble viewing? Click here” as shown in the screenshot below.
  1. Open in a New Window: Alternatively, users can open the policy document in a separate window. This option is ideal for those who prefer to focus solely on the document without distractions. To use this option, click “Full Screen” as shown in the screenshot below.

Both options allow users to take advantage of standard PDF viewing features, such as zooming in and out, scrolling, and searching, ensuring a more comfortable and customizable experience when reading policies.

Reviewers can access their action history by following these steps:

  1. Go to the "History" tab in the menu:
  1. View the list of actions they took:

Reviewers can customize their notification settings, while admins can send critical reminders that override user preferences.

Customizing Notifications

  1. Open the Policy app and go to the User Settings tab (located in the main menu or profile dropdown).
  1. Select Notification Preferences.
  1. Save your changes.
6

Legal Reviewer Guide

The Legal Reviewer legally approves or rejects policies that require a legal review.

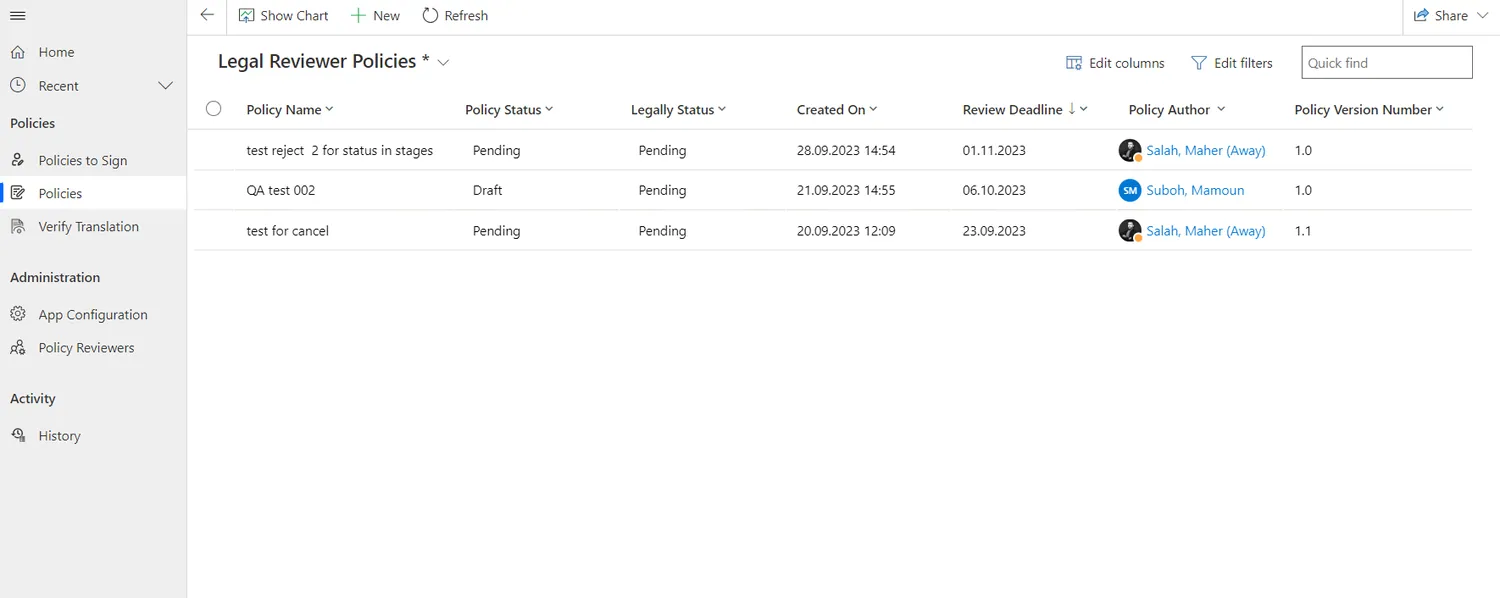
Legal reviewers can access their list of policies that need to be reviewed and review them by following these steps:

  1. Go to the "Policies" tab in the menu:
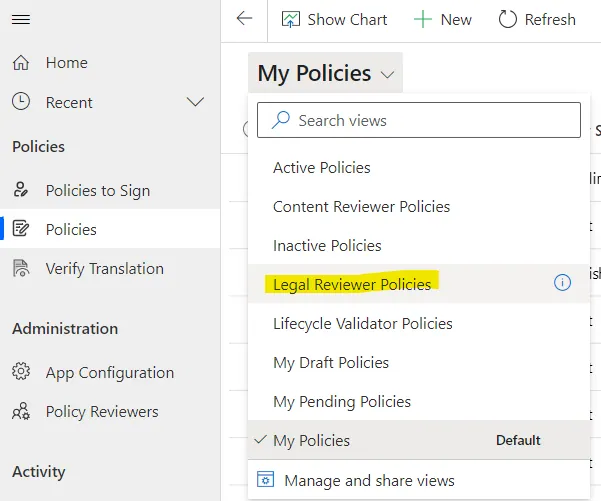
  1. Navigate to the “Legal Reviewer Policies” view in the drop-down list:
  1. Click on the policy record you want to review:
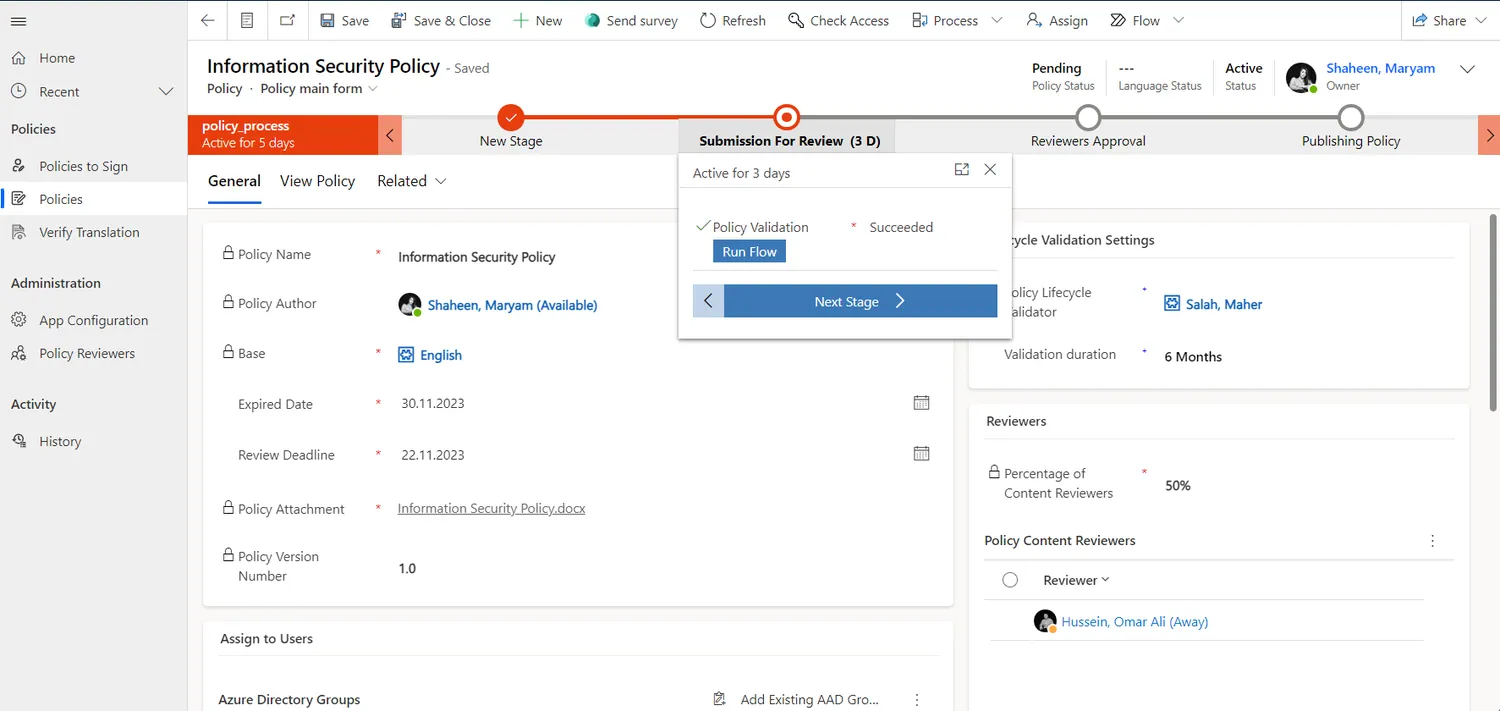
  1. Click "Next Stage" in the business process flow to proceed to the approval stage:
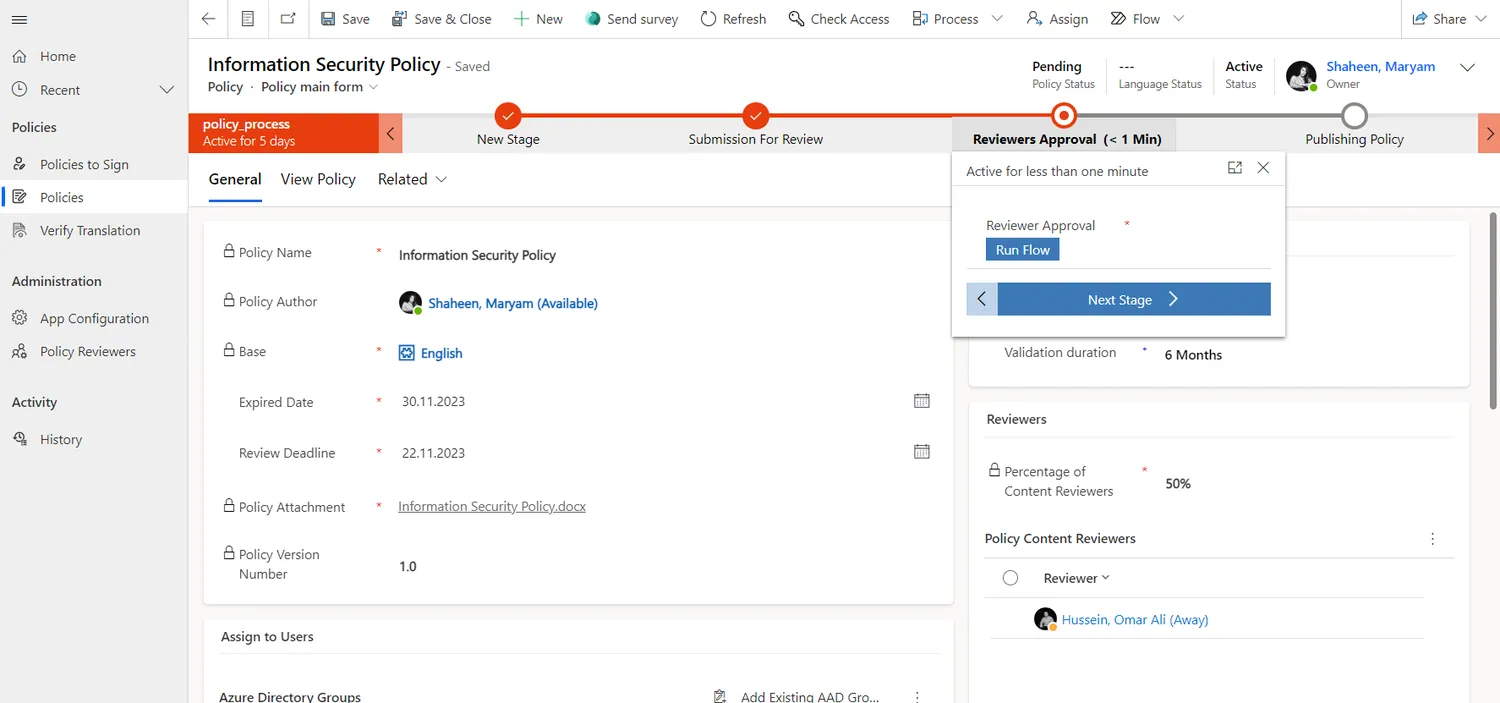
  1. Run the approval flow by clicking the "Run Flow" button:
  1. Select whether to approve or reject the policy (Required):
  1. Please add a comment if you have any comments regarding the reason for rejection or approval (optional):

Reviewers can access the policy document by clicking the "View Policy" tab. This will take them to the policy stored in its source language folder.

After a policy is published and translated, admins can access the translated versions by navigating through a drop-down list and selecting the desired language.

This access is granted once the policy has been assigned to language reviewers for validation, has gone through the approval process, has been published, and its translation has been validated.

Policy Document Viewing Options

The Policy app offers two ways to view policy documents in full-screen mode, providing users with a more flexible and enhanced reading experience.

  1. Open in a New Tab: Users can now open the policy document in a new browser tab, making it easier to navigate and access the document while using other application features. To use this option, click on “Having trouble viewing? Click here” as shown in the screenshot below.
  1. Open in a New Window: Alternatively, users can open the policy document in a separate window. This option is ideal for those who prefer to focus solely on the document without distractions. To use this option, click “Full Screen” as shown in the screenshot below.

Both options allow users to take advantage of standard PDF viewing features, such as zooming in and out, scrolling, and searching, ensuring a more comfortable and customizable experience when reading policies.

Reviewers can access their action history by following these steps:

  1. Go to the "History" tab in the menu:
  1. View the list of actions they took:

Reviewers can customize their notification settings, while admins can send critical reminders that override user preferences.

Customizing Notifications

  1. Open the Policy app and go to the User Settings tab (located in the main menu or profile dropdown).
  1. Select Notification Preferences.
  1. Save your changes.
7

Language Reviewer Guide

The Language Reviewer verifies the accuracy of machine translations in their assigned language.

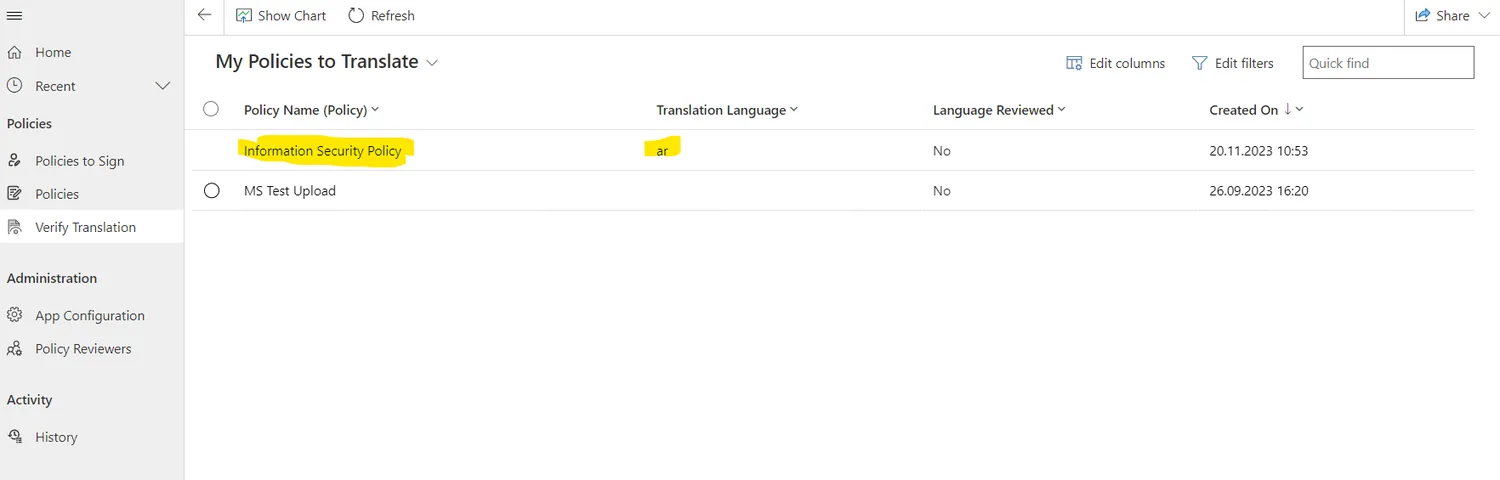
Language Reviewers can access their list of policies that require translation validation and validate them by following these steps:

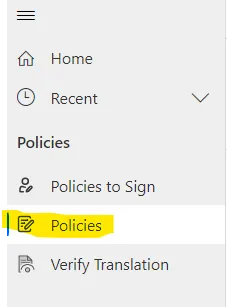
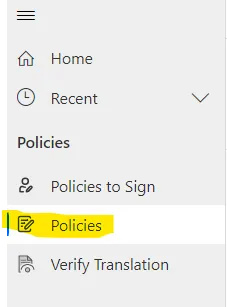
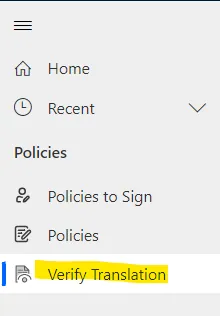
  1. Go to the "Verify Translation" tab in the menu:
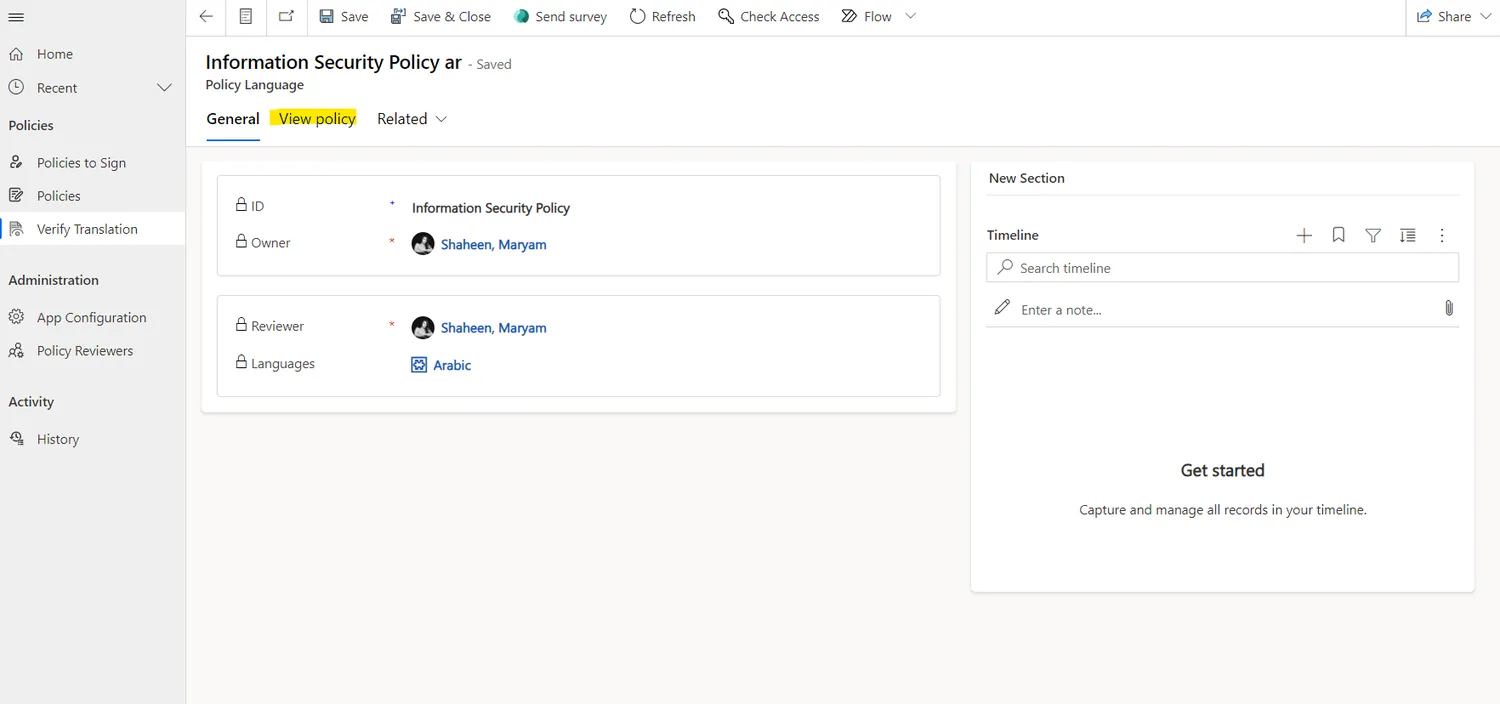
  1. Click on the desired policy record to verify the translation:
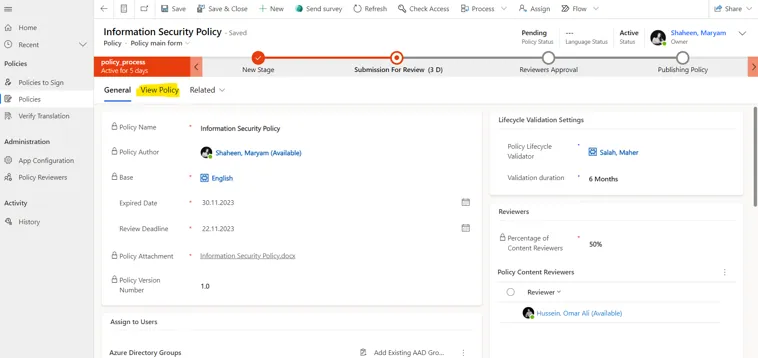
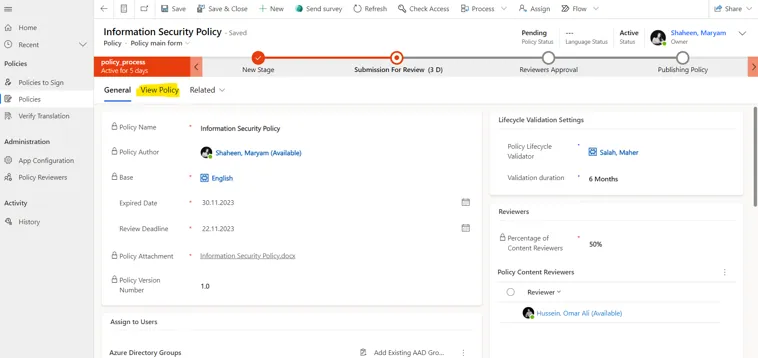
  1. Go to the "View Policy" tab:
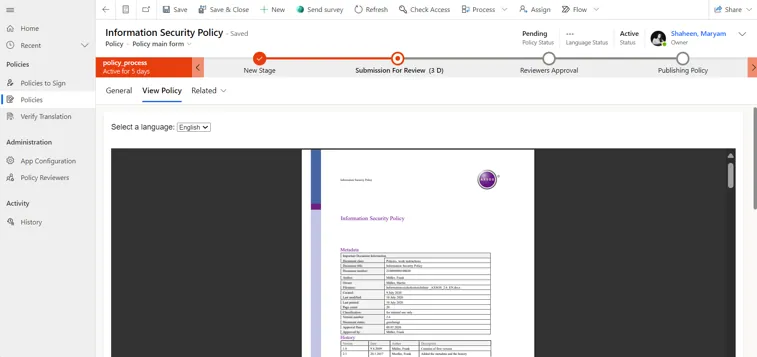
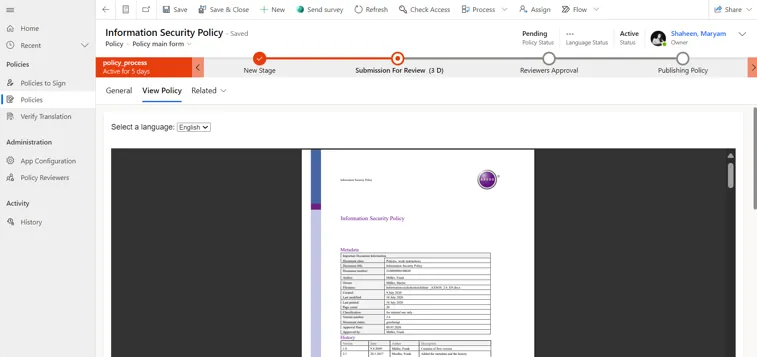
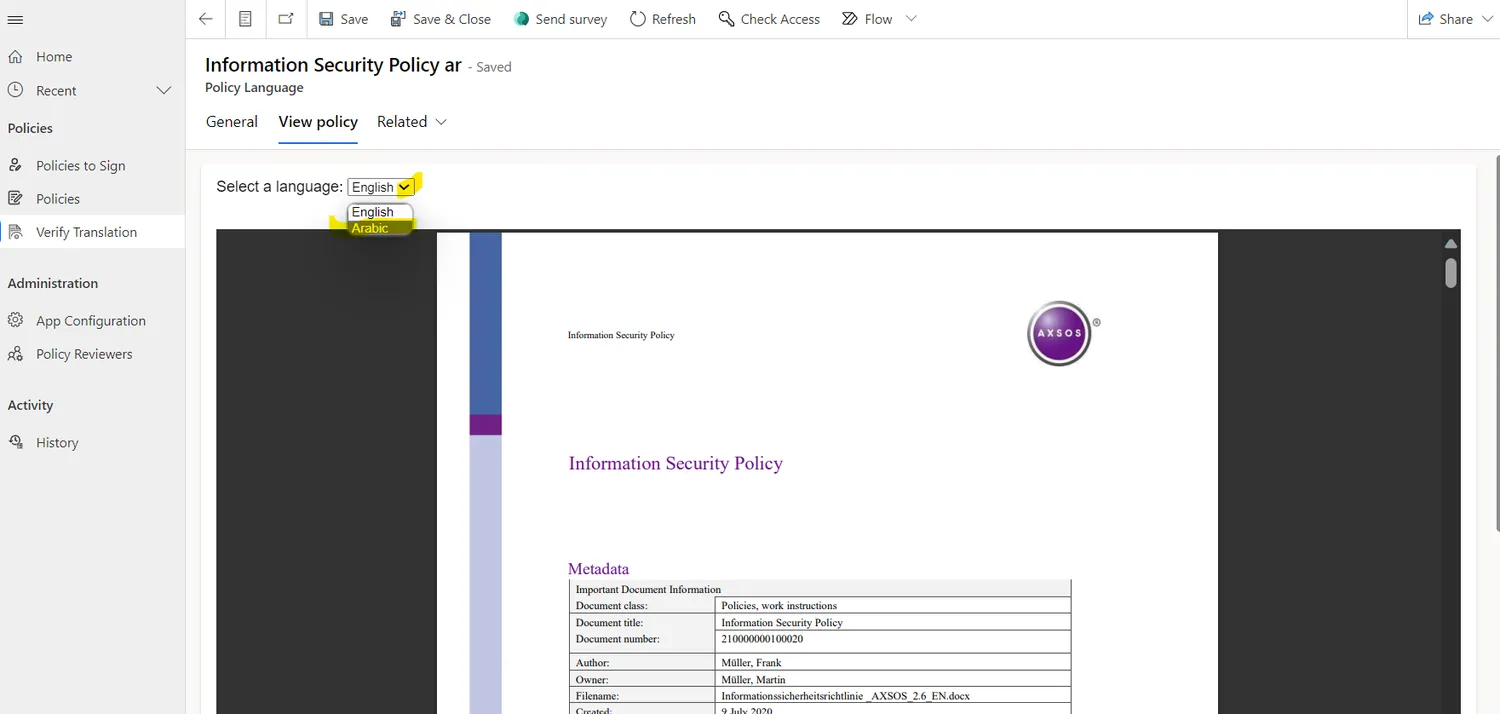
  1. Select the language that the language reviewer is verifying from the drop-down list:
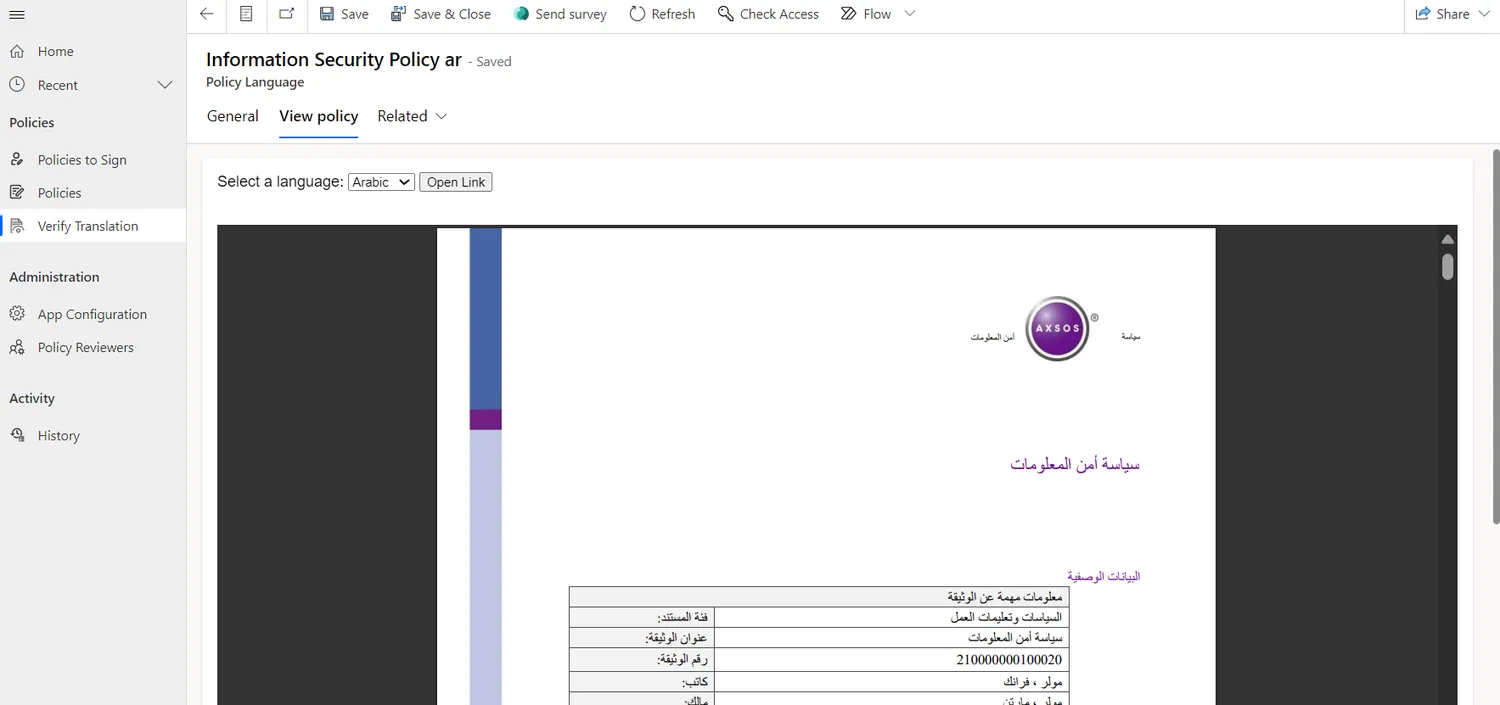
  1. Read the translated document in the selected language and see if it needs any edits:
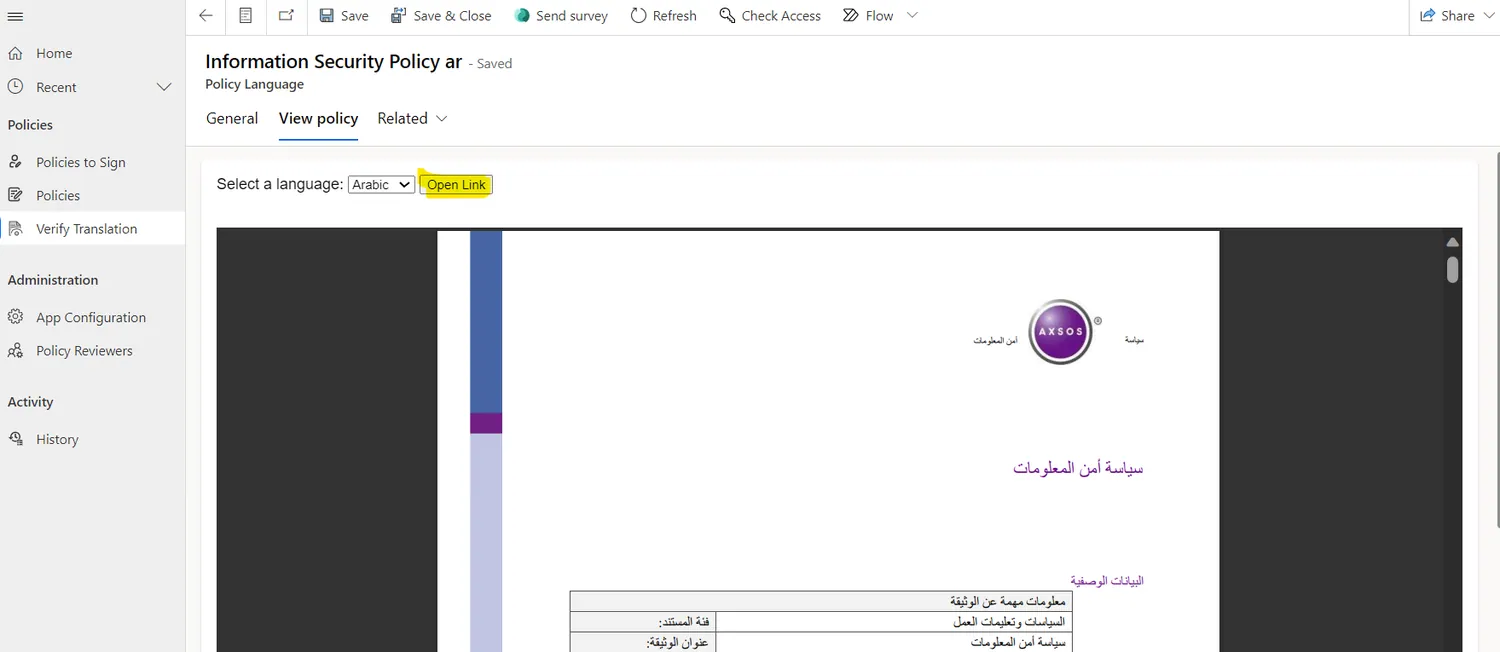
  1. If language reviewers find any necessary edits, they can click the "Open Link" button to open the current translation in a Word file that they can edit:
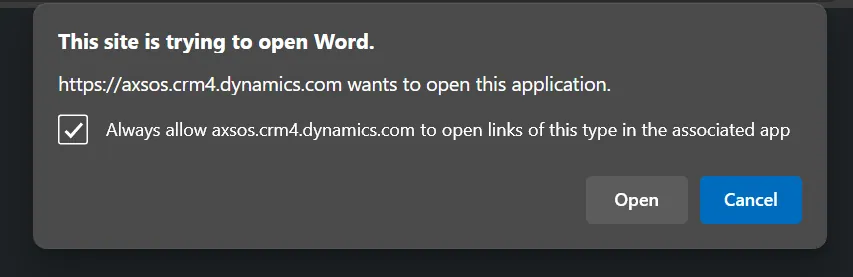
  1. Language reviewers must allow the browser to open Word on their desktop by checking the checkbox and clicking "Open":
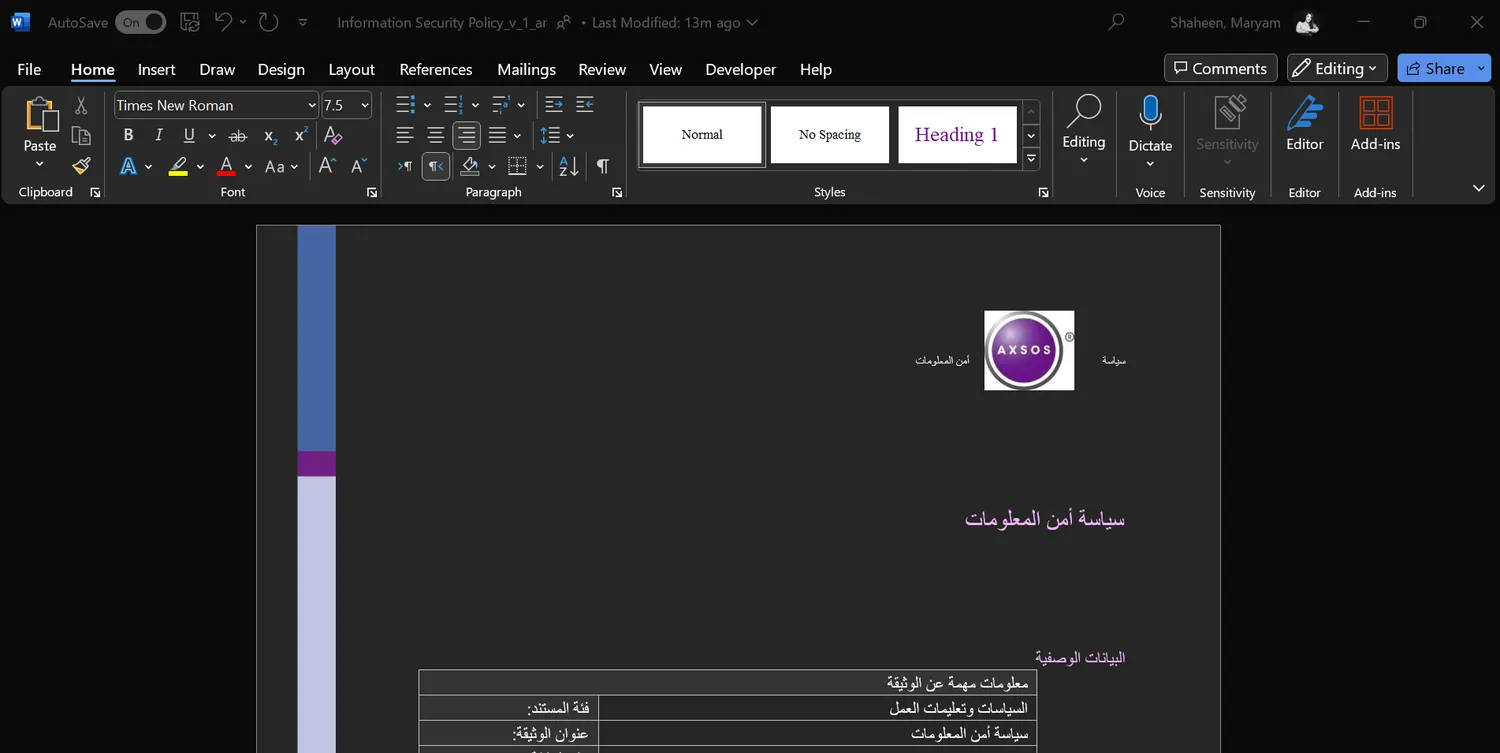
  1. The policy in the assigned language will open in Microsoft Word on the language reviewer's desktop. The language reviewer will then be asked to make the necessary edits and save the file; all changes will be reflected directly in the file:
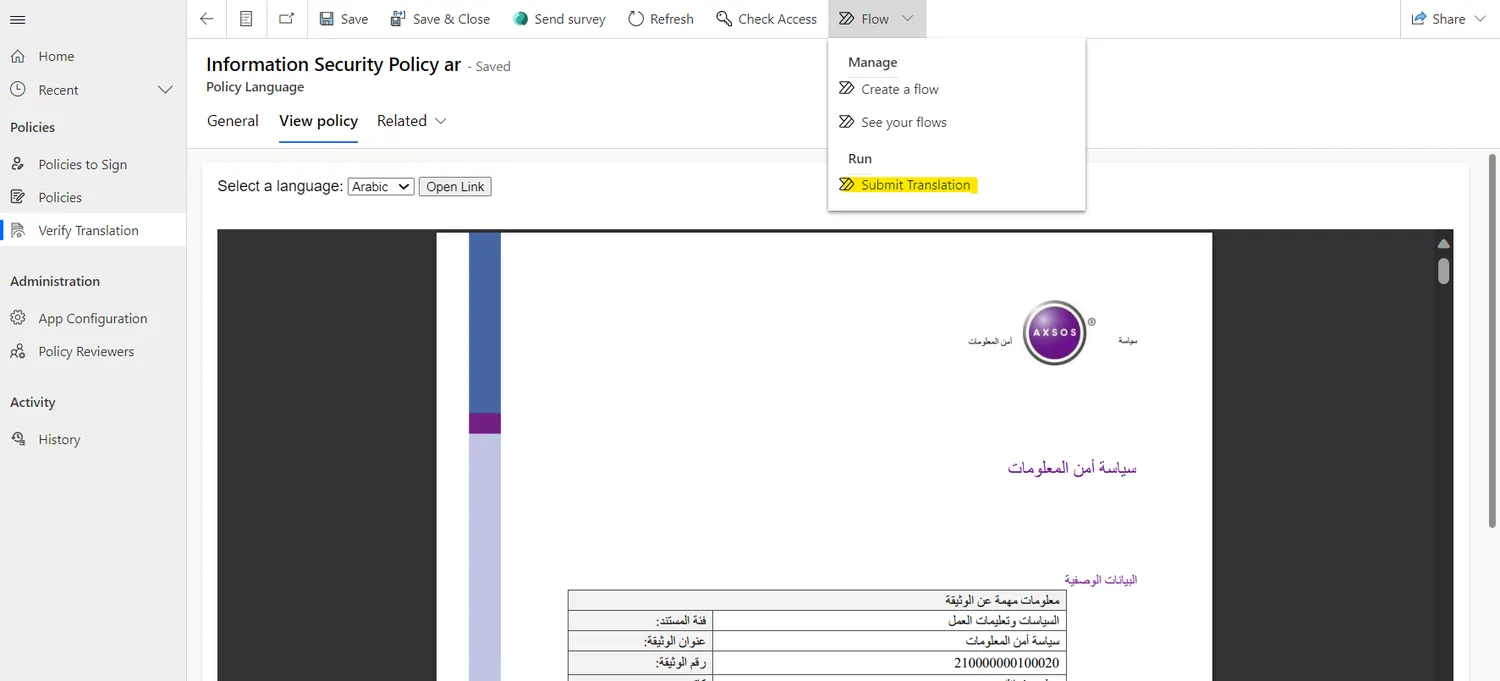
  1. Once the edit is complete, or if the translation does not need to be edited, the language reviewer can click the “Flow” button and then run the flow by clicking “Submit Translation.”
  1. And finally, click "Run Flow":

Reviewers can access the policy document by clicking the "View Policy" tab. This will take them to the policy stored in its source language folder.

After a policy is published and translated, admins can access the translated versions by navigating through a drop-down list and selecting the desired language.

This access is granted once the policy has been assigned to language reviewers for validation, has gone through the approval process, has been published, and its translation has been validated.

Policy Document Viewing Options

The Policy app offers two ways to view policy documents in full-screen mode, providing users with a more flexible and enhanced reading experience.

  1. Open in a New Tab: Users can now open the policy document in a new browser tab, making it easier to navigate and access the document while using other application features. To use this option, click on “Having trouble viewing? Click here” as shown in the screenshot below.
  1. Open in a New Window: Alternatively, users can open the policy document in a separate window. This option is ideal for those who prefer to focus solely on the document without distractions. To use this option, click “Full Screen” as shown in the screenshot below.

Both options allow users to take advantage of standard PDF viewing features, such as zooming in and out, scrolling, and searching, ensuring a more comfortable and customizable experience when reading policies.

Reviewers can access their action history by following these steps:

  1. Go to the "History" tab in the menu:
  1. View the list of actions they took:

Reviewers can customize their notification settings, while admins can send critical reminders that override user preferences.

Customizing Notifications

  1. Open the Policy app and go to the User Settings tab (located in the main menu or profile dropdown).
  1. Select Notification Preferences.
  1. Save your changes.
8

Life-Cycle Validator Guide

The Life-Cycle Validator periodically revalidates published policies at the interval specified by the Creator.

Life-Cycle Validators can validate a policy only after the validation period has expired, and they must perform this validation only during the Validation Review Period. Life-Cycle Validators can validate a policy by following these steps:

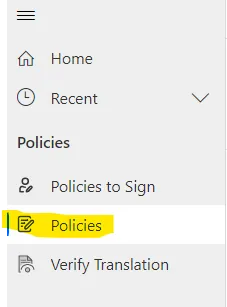
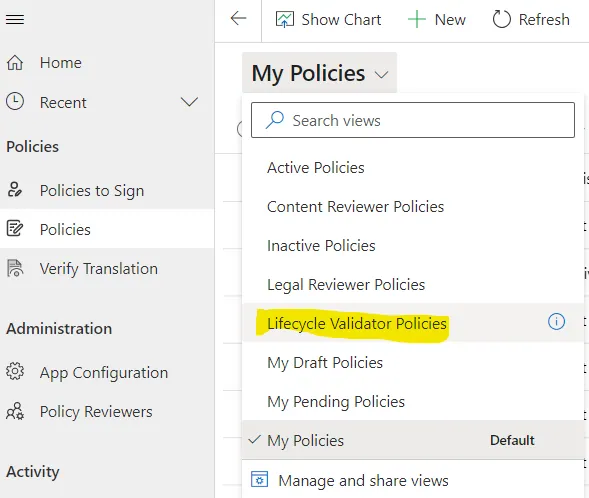
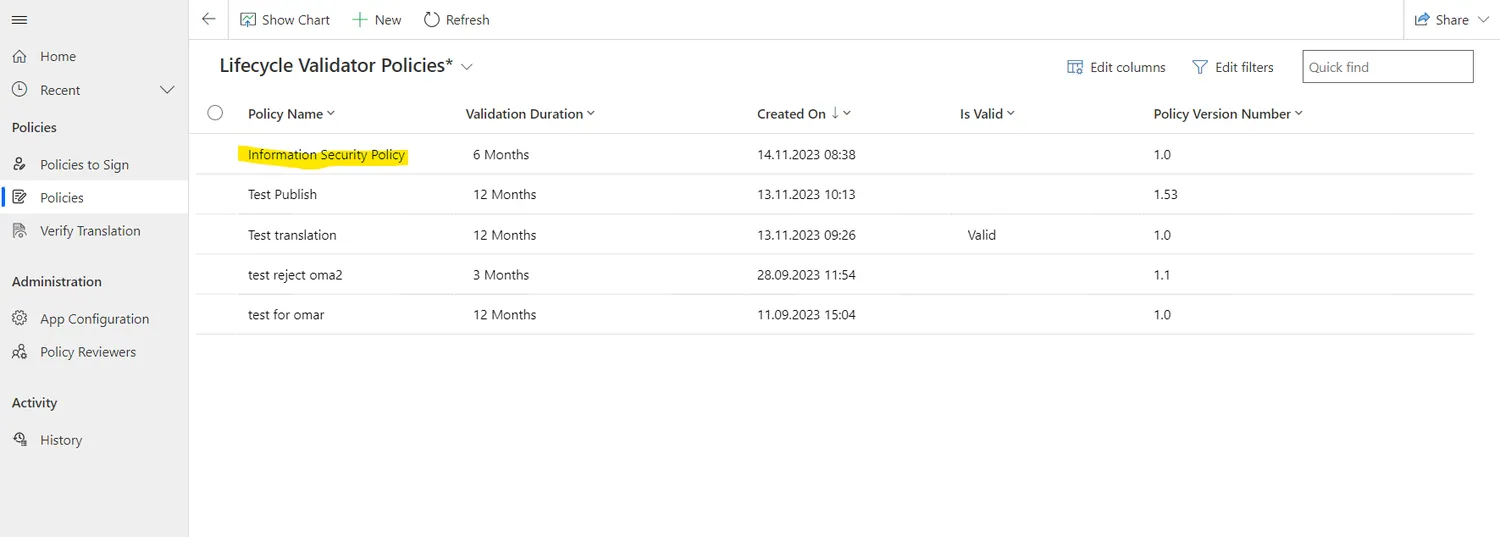
  1. Go to the "Policies" tab in the menu:
  1. Navigate to the "Lifecycle Validator Policies" view in the drop-down list:
  1. Click on the policy record you want to review:
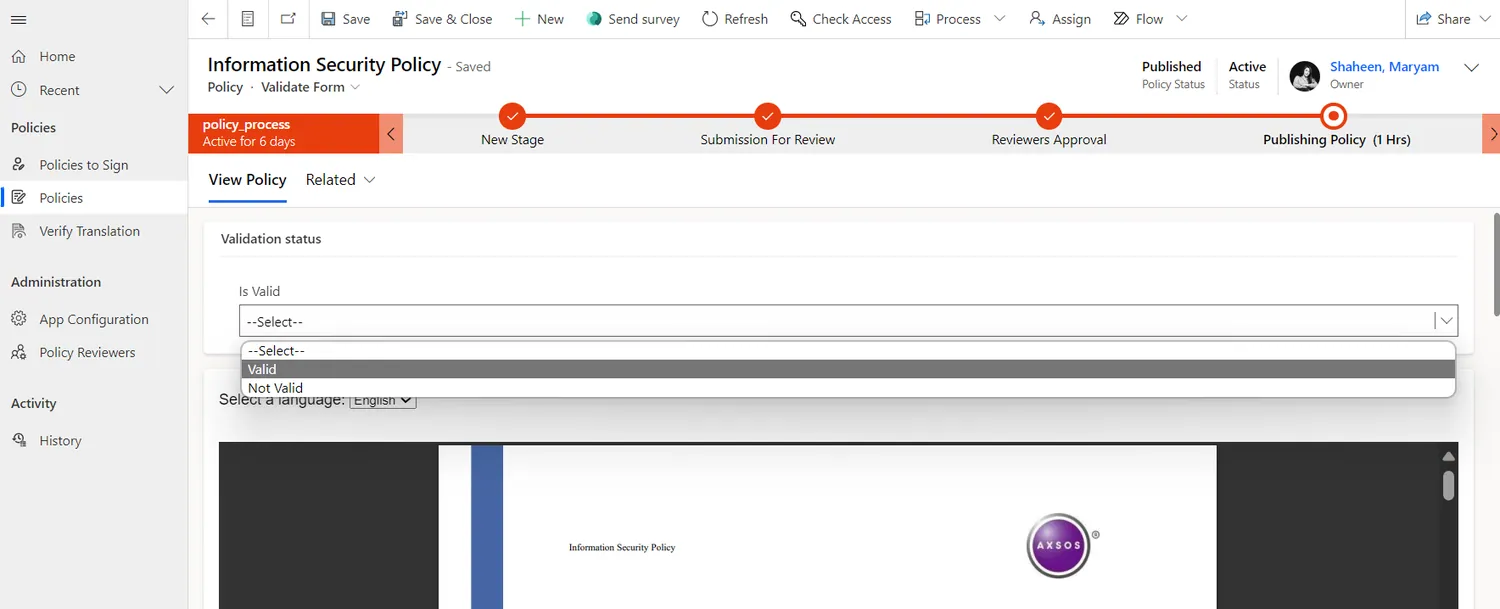
  1. Navigate to the “Validator Form” from the policy dropdown list under the policy name:
  1. Choose your validation decision by clicking "Valid" or "Not Valid":
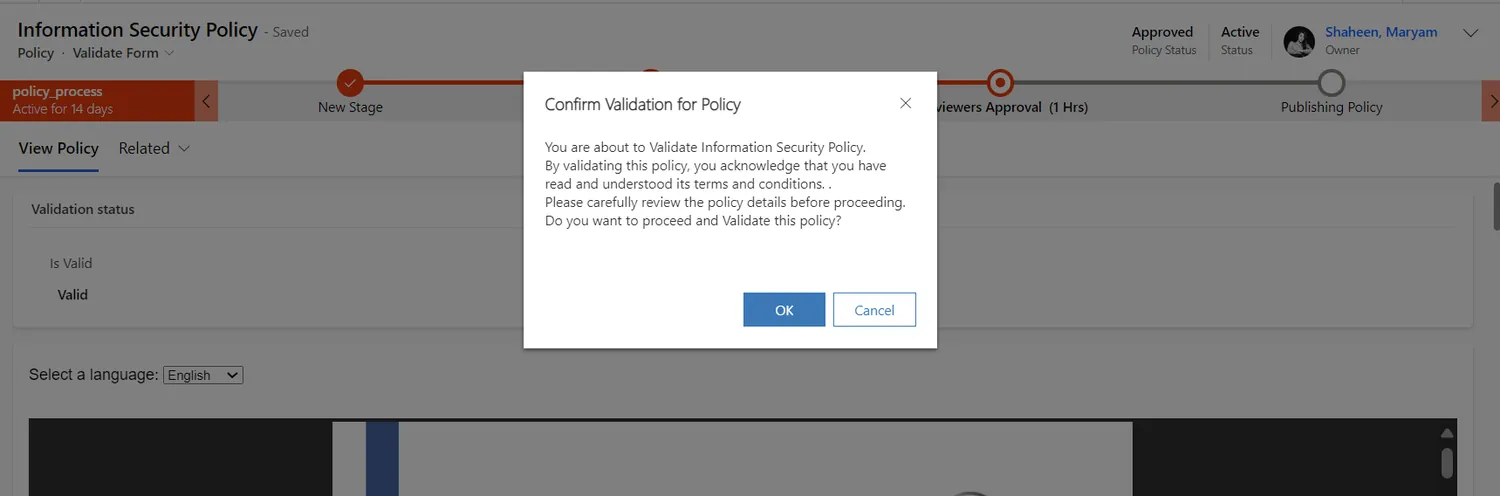
  1. Click "OK" in the confirmation pop-up:

Grade

Selecting "Valid" as a life-cycle validator increments the current version (e.g., 1.2, 1.3, 1.4, and so on). Choosing “Not Valid” triggers a notification to the creator, prompting a manual update to the policy. This update involves replacing the document with a newer version, resulting in an incremented version number (e.g., 1, 2, 3, and so on).

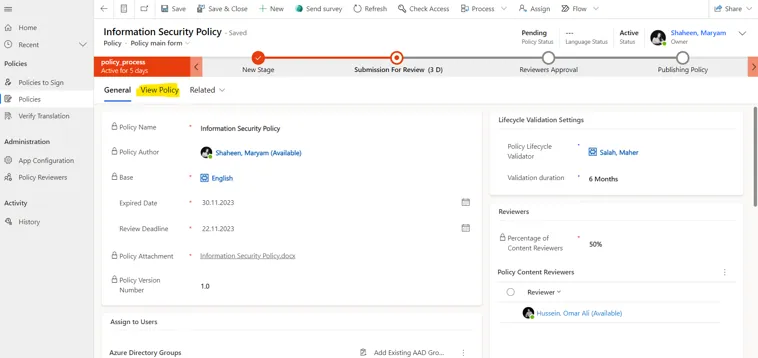
Reviewers can access the policy document by clicking the "View Policy" tab. This will take them to the policy stored in its source language folder.

After a policy is published and translated, admins can access the translated versions by navigating through a drop-down list and selecting the desired language.

This access is granted once the policy has been assigned to language reviewers for validation, has gone through the approval process, has been published, and its translation has been validated.

Policy Document Viewing Options

The Policy app offers two ways to view policy documents in full-screen mode, providing users with a more flexible and enhanced reading experience.

  1. Open in a New Tab: Users can now open the policy document in a new browser tab, making it easier to navigate and access the document while using other application features. To use this option, click on “Having trouble viewing? Click here” as shown in the screenshot below.
  1. Open in a New Window: Alternatively, users can open the policy document in a separate window. This option is ideal for those who prefer to focus solely on the document without distractions. To use this option, click “Full Screen” as shown in the screenshot below.

Both options allow users to take advantage of standard PDF viewing features, such as zooming in and out, scrolling, and searching, ensuring a more comfortable and customizable experience when reading policies.

Life-Cycle Validators can access a list of their past actions by following these steps:

  1. Go to the "History" tab in the menu:
  1. View the list of actions they took:

Life-Cycle Validators can customize their notification settings, while administrators can send critical reminders that override user preferences.

Customizing Notifications

  1. Open the Policy app and go to the User Settings tab (located in the main menu or profile dropdown).
  1. Select Notification Preferences.
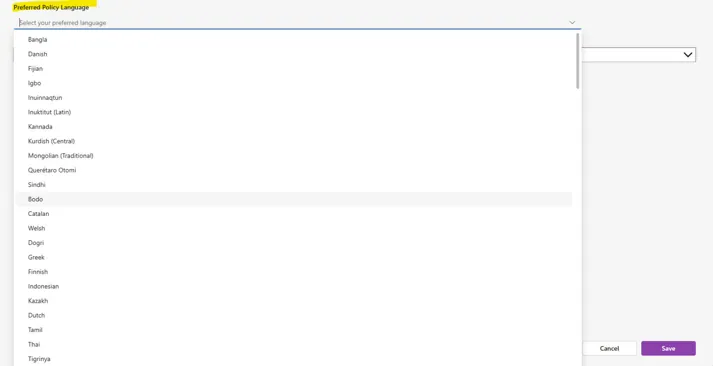
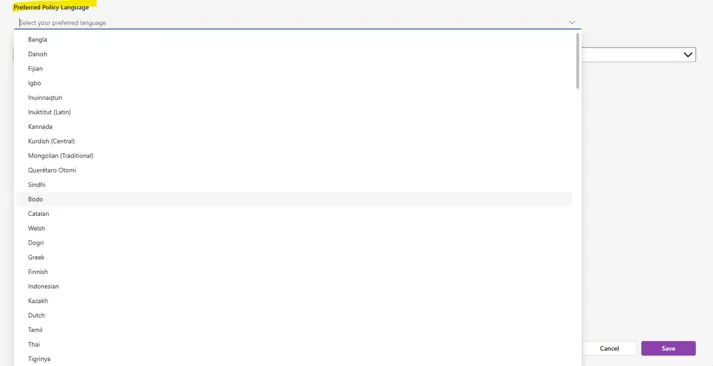
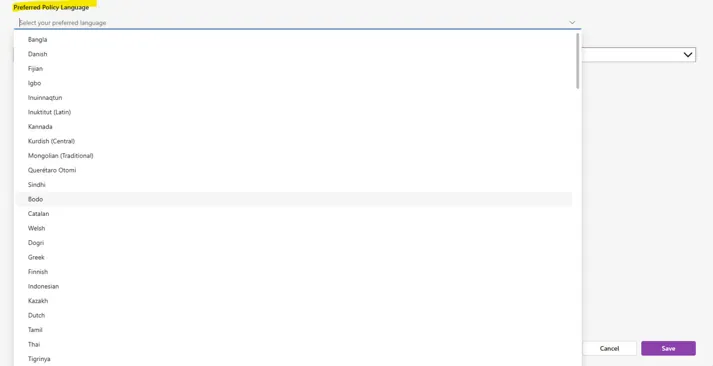
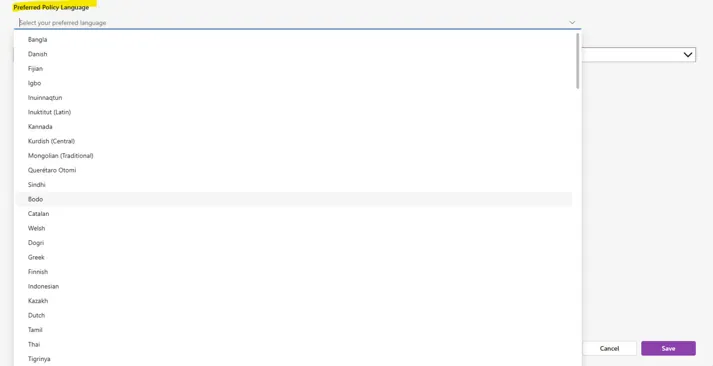
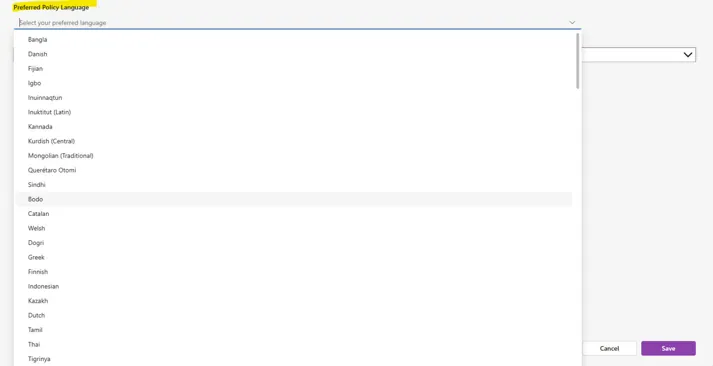
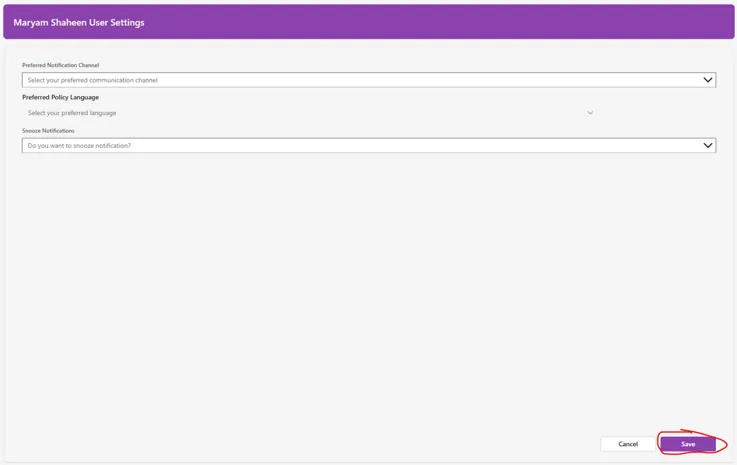
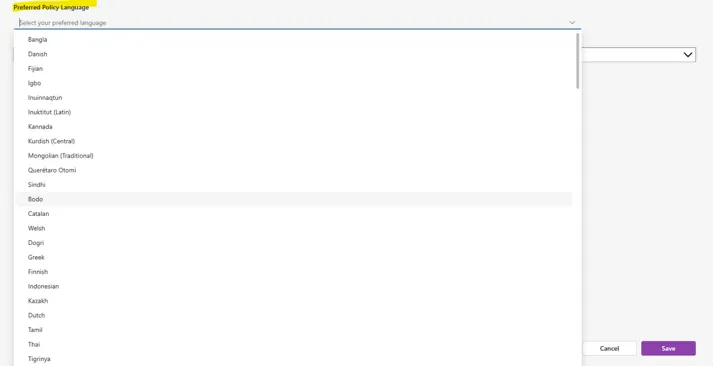
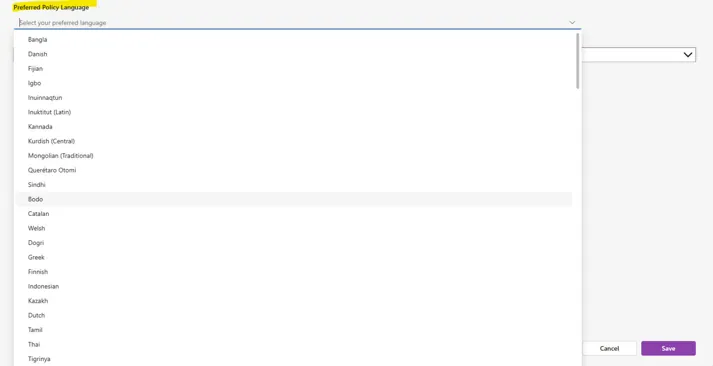
  • Select your preferred language for notifications.
  1. Save your changes.
9

End-User Guide (Employee)

End users view the policies assigned to them and sign to acknowledge that they have read and understood them.

Users can access the policy document by following these steps:

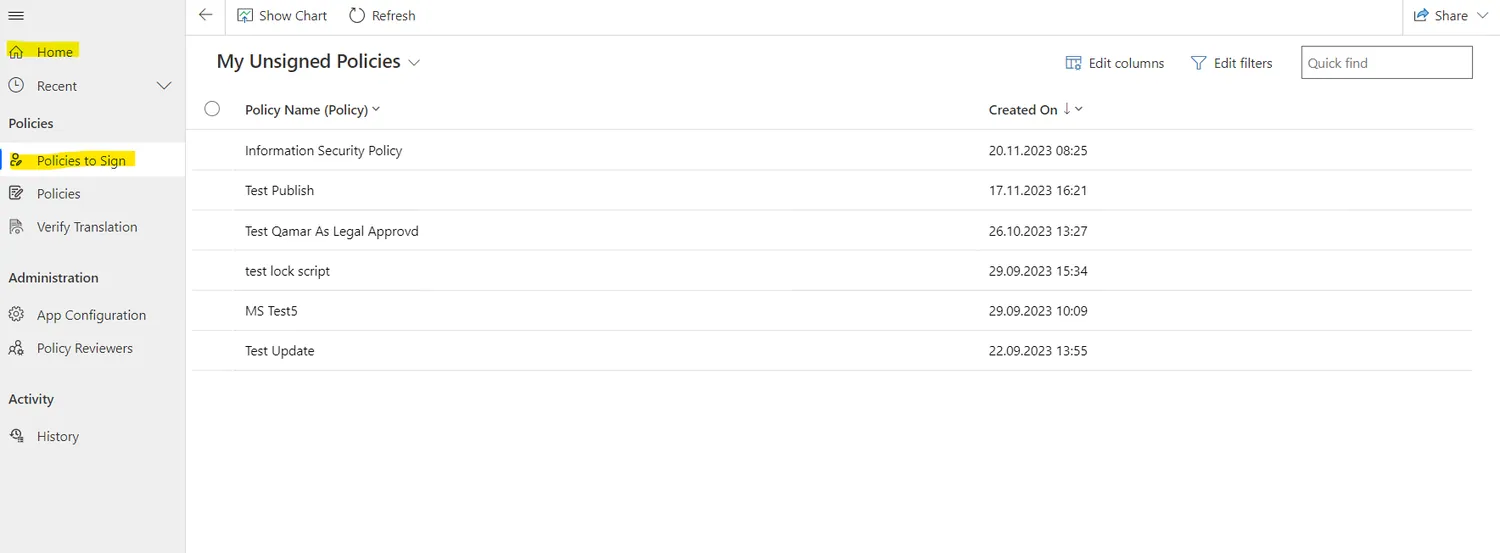
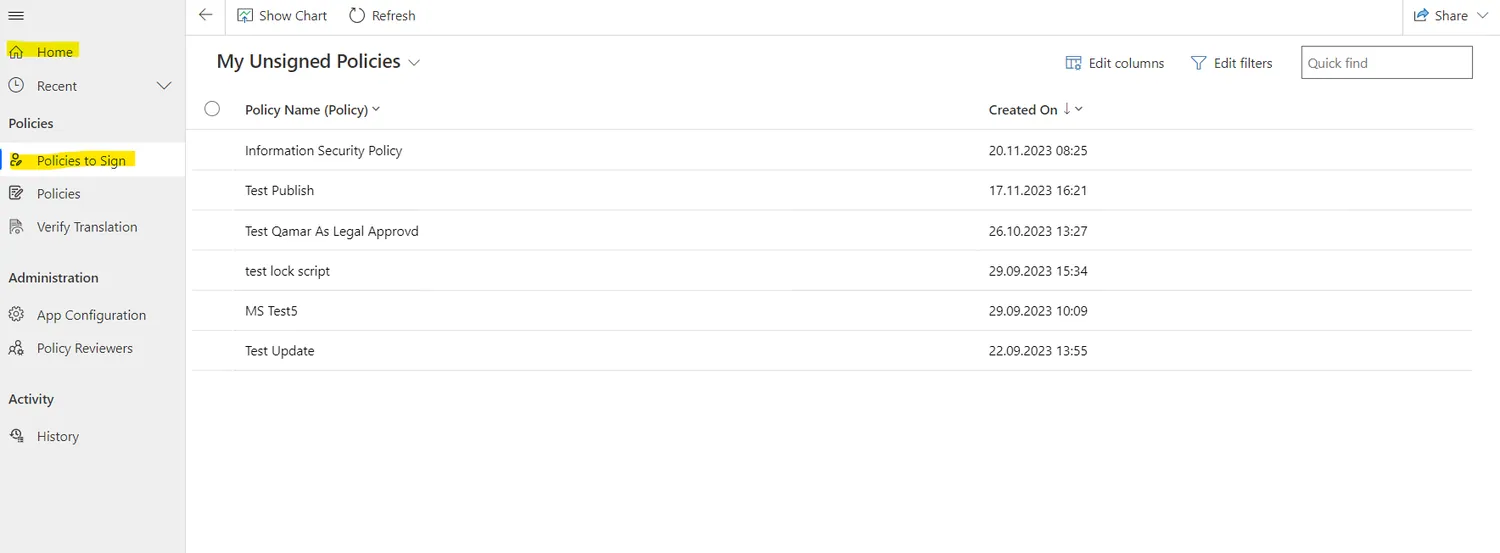
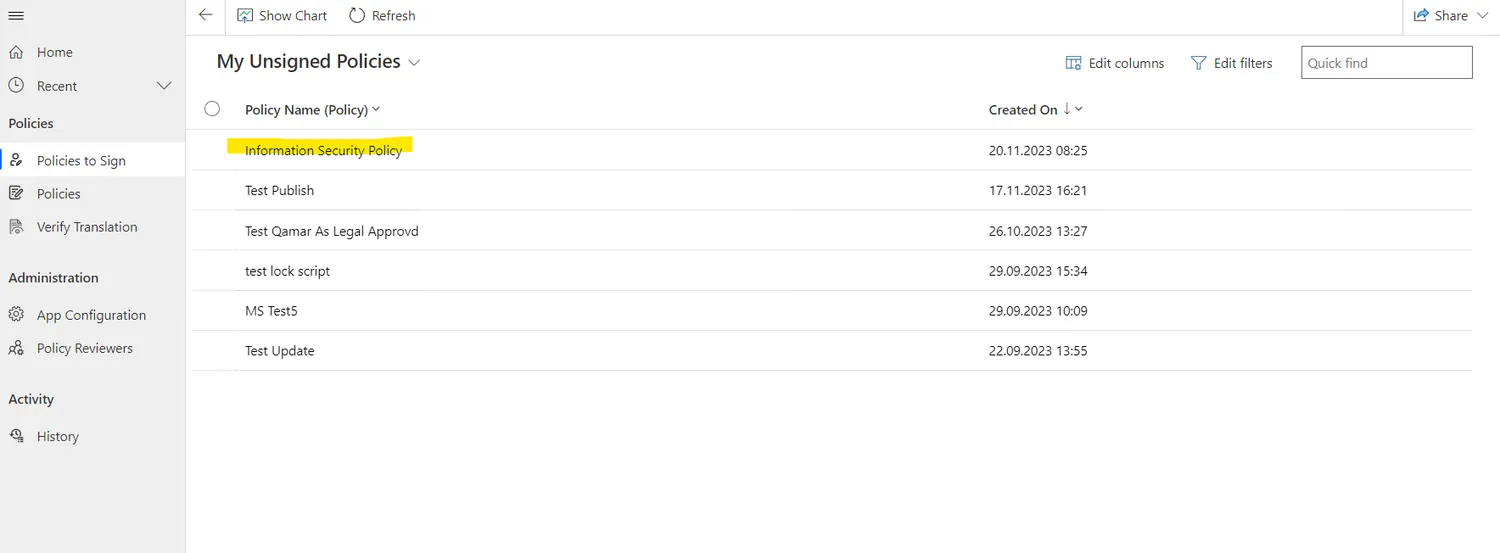
  1. Navigate to the "Home" or "Policies to Sign" tab in the menu:
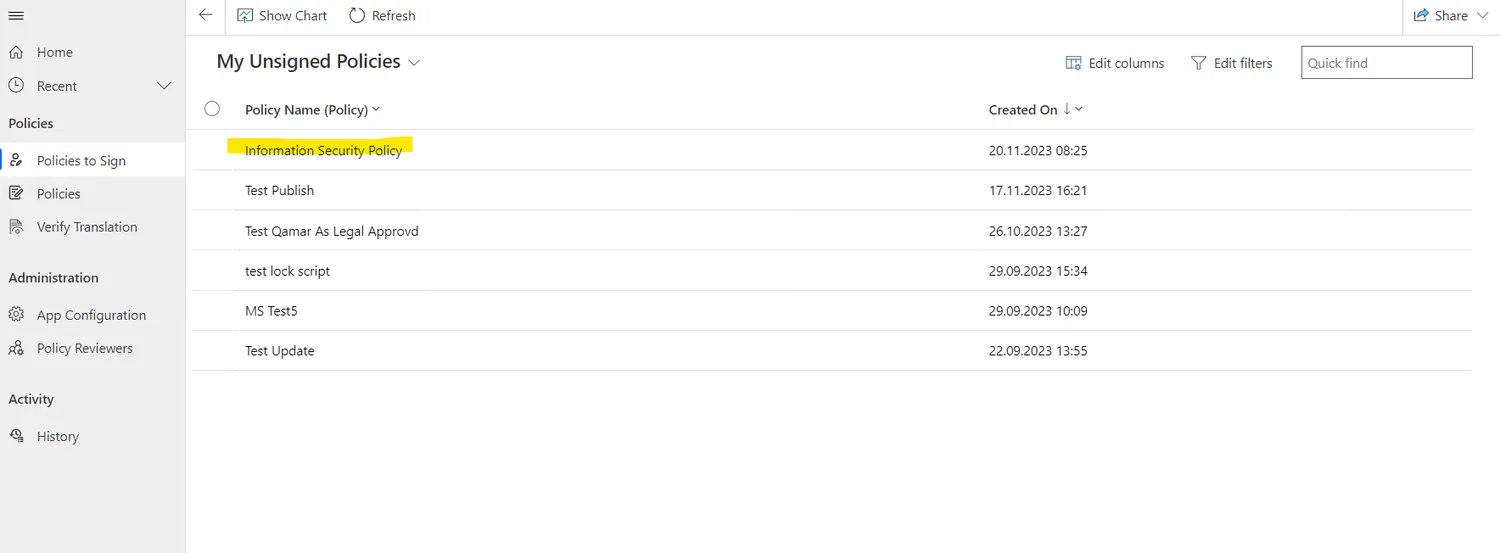
  1. Select the desired policy record:
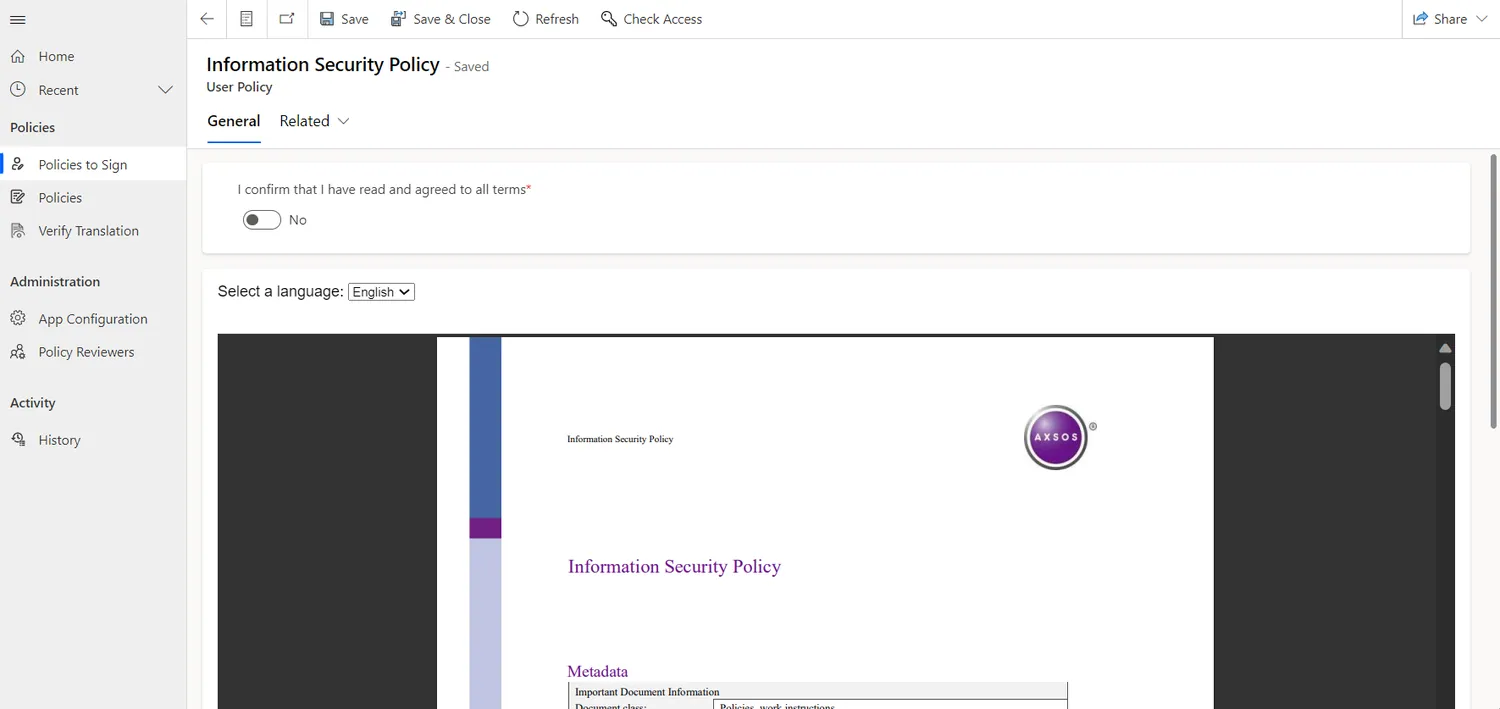
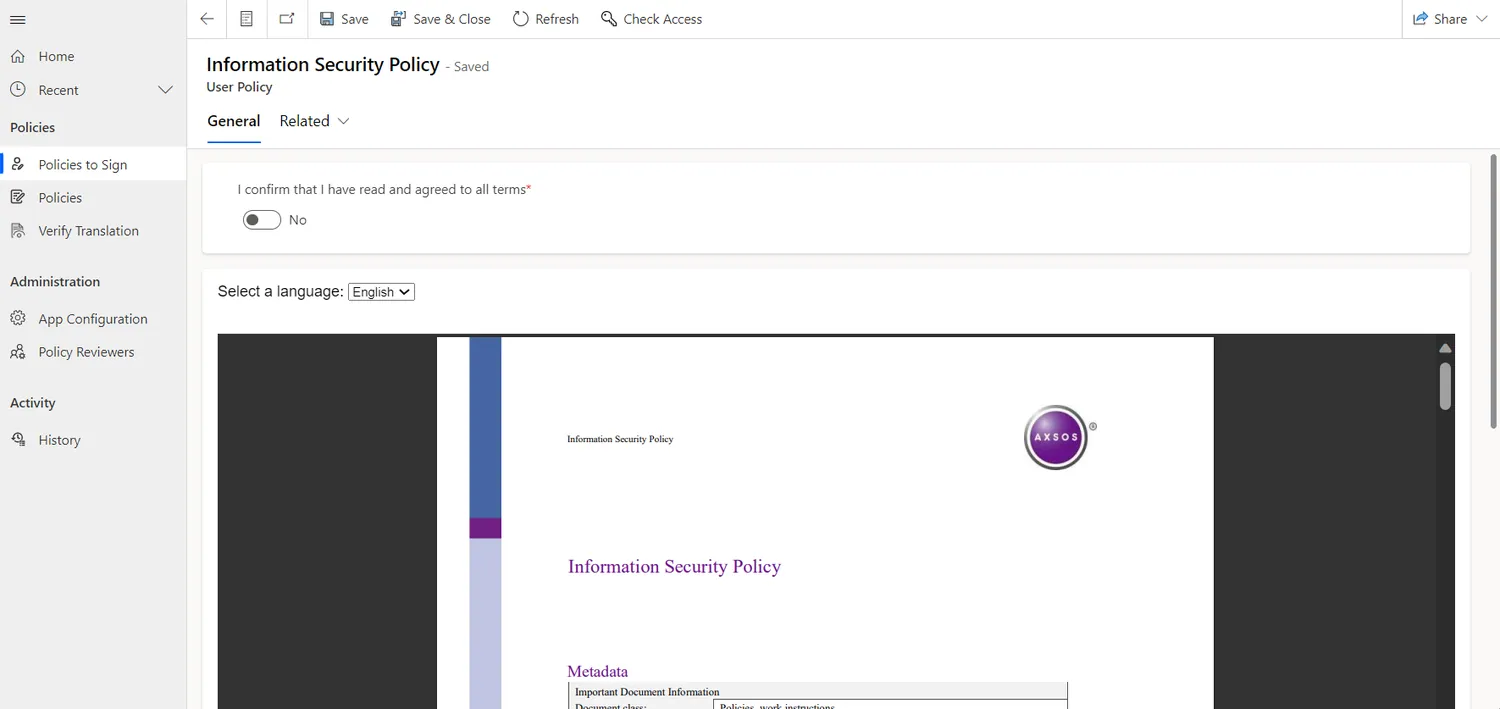
  1. View the policy document in its original language:
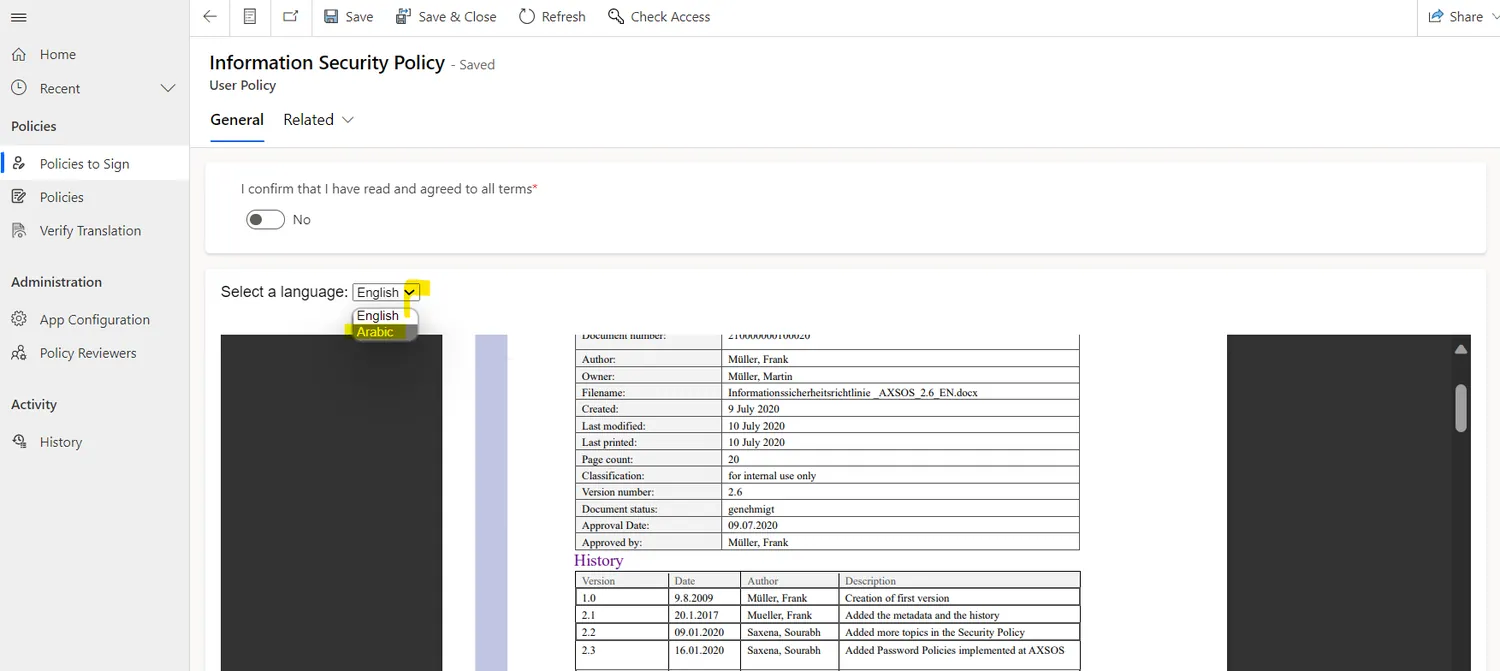
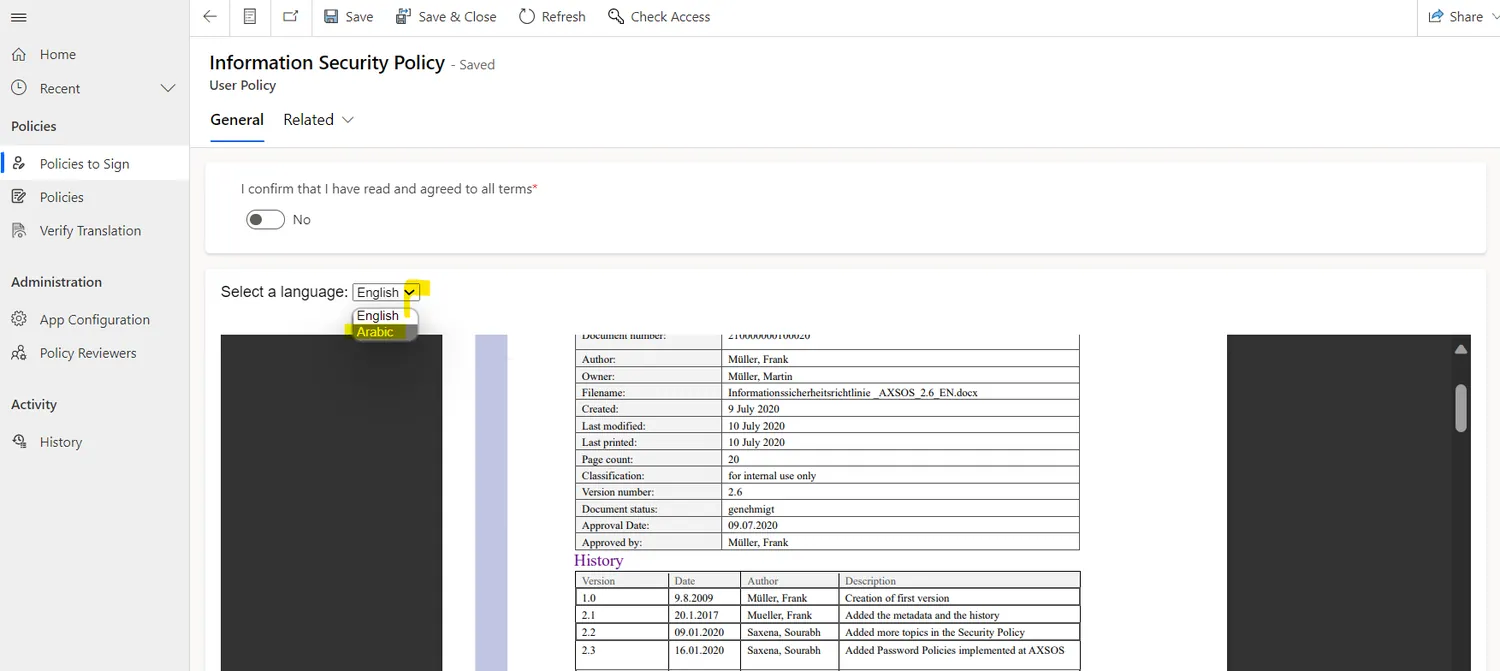
  1. View the policy document in other languages by selecting one of the available translations from the drop-down list:

Policy Document Viewing Options

The Policy app offers two ways to view policy documents in full-screen mode, providing users with a more flexible and enhanced reading experience.

  1. Open in a New Tab: Users can now open the policy document in a new browser tab, making it easier to navigate and access the document while using other application features. To use this option, click on “Having trouble viewing? Click here” as shown in the screenshot below.
  1. Open in a New Window: Alternatively, users can open the policy document in a separate window. This option is ideal for those who prefer to focus solely on the document without distractions. To use this option, click “Full Screen” as shown in the screenshot below.

Both options allow users to take advantage of standard PDF viewing features, such as zooming in and out, scrolling, and searching, ensuring a more comfortable and customizable experience when reading policies.

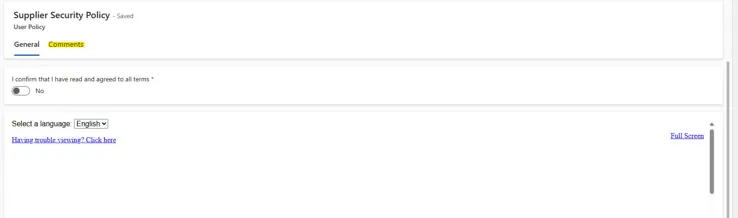
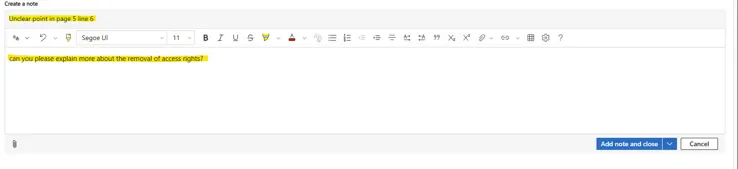
Users can now add notes, comments, or questions about specific points in a policy before signing it. This feature allows you to clarify doubts, provide feedback, or highlight areas of concern directly within the policy.

How to Add Notes or Comments:

  1. Open the policy document you need to review.
  1. Go to the "Comments" tab
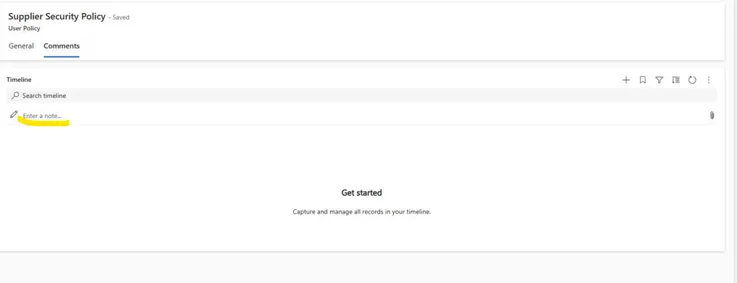
  1. Click "Enter Note"
  1. Type your note, comment, or question in the text box provided. To get the best response, include a title and a brief description of your question or feedback.
  1. Click on "Add note and close." It will be visible to policy creators for review,

Users can sign policies assigned to them by following these steps:

  1. Navigate to the "Home" or "Policies to Sign" tab in the menu:
  1. Select the desired policy record:
  1. View the policy document in its original language:
  1. View the policy document in other languages by selecting one of the available translations from the drop-down list:
  1. Read the policy carefully.
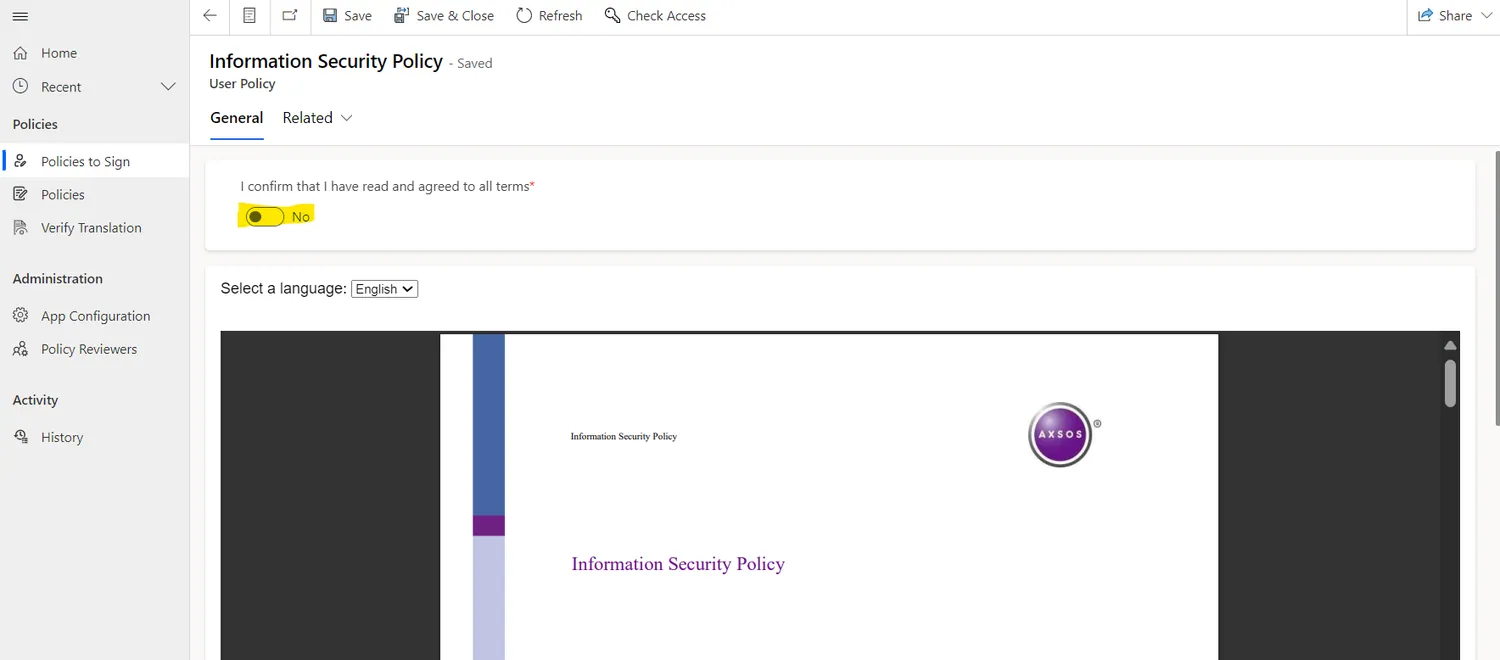
  1. Sign the policy by setting the toggle to "Yes."
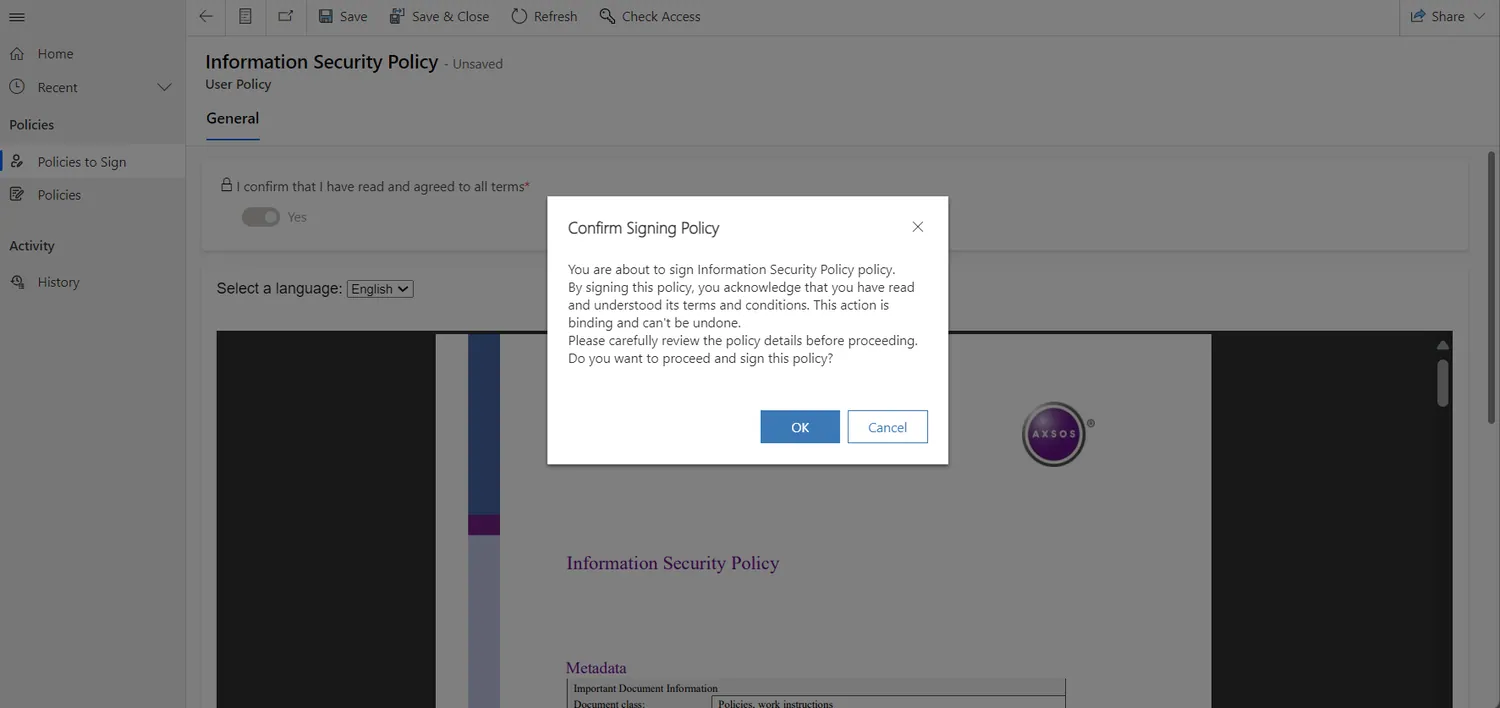
  1. Confirm the signing action by clicking the "OK" button in the confirmation pop-up:

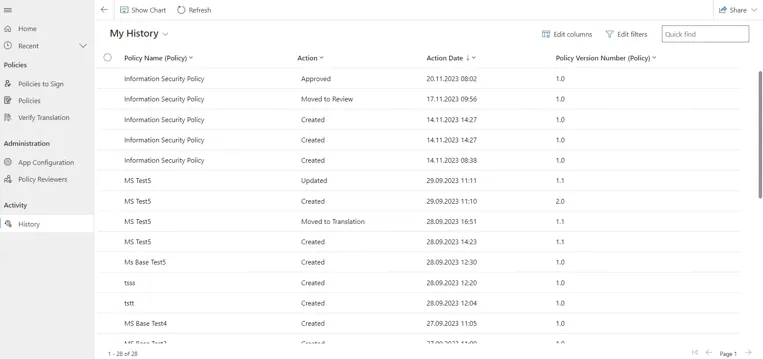
Users can view their activity history by following these steps:

  1. Go to the "History" tab in the menu:
  1. View the list of actions they took:

Users can customize their notification settings, while administrators can send critical reminders that override user preferences.

Customizing Notifications

  1. Open the Policy app and go to the User Settings tab (located in the main menu or profile dropdown).
  1. Select Notification Preferences.
  1. Save your changes.
10

Frequently Asked Questions

Administrator

In addition to their own configuration tasks, administrators can perform all tasks that Creators, Reviewers, and End Users can perform.

Creator

The app enforces this as a validation rule to ensure separation of duties. If the same person is assigned as both the legal reviewer and the content reviewer for a policy, the “Policy Validation” process will fail as soon as the creator submits the policy for review. In this case, assign two different people.

The policy creation form displays only the sections that your administrator has enabled on the App Configuration page. Legal Reviewer, Content Reviewer, Lifecycle Reviewer, and Translation can each be set to (Required, Not Needed, or Optional). If a parameter is set to Not Needed, the corresponding section is completely hidden.

Under “Recent Records,” the wrong reviewer type may be displayed for users with multiple roles (for example, content reviewer and language reviewer). Therefore, always select a reviewer from the complete list and make sure that the type displayed under the name corresponds to the role you want to assign.

Yes. A creator can assign multiple language reviewers to a guideline—one per language. This can be done both during creation and later on, for example, when editing a draft or updating to a new version. Be sure to select only language reviewers who have an arrow next to their names. The arrow confirms that a language has been assigned to them.

Yes, but only as long as the policy still has the "Pending" status. Open the policy, click the "Flow" dropdown menu, and select "Cancel Review." This will reset the policy to "Draft" status, allowing you to make changes and resubmit it.

Life Cycle Auditor

If the lifecycle validator does not respond within the validation period specified by the administrator, the validation period is simply extended by the same number of days and remains open until the validator responds. The policy remains published during this time.


If you select “Valid,” the current version of the policy will be incremented sequentially (for example, 1.2 → 1.3 → 1.4) without requiring any changes to the document. If you select “Not Valid,” the creator will be notified to update the policy manually. Once the creator has uploaded a new document, the version number will increase (for example, 1 → 2).

End user

No. By signing, you are bindingly confirming the policy. This cannot be undone. Therefore, please read each policy carefully and use the note feature if you have any questions before confirming your signature.

Open the policy, go to the "Comments" tab, and click "Enter a note." Then describe your question with a short title and a description. Your note will then be visible to the policy creator and the administrators, who can reply to you directly in the app.

Administrators can manually trigger reminders at any time via the Compliance Dashboard. Creators can send a reminder regarding a specific policy using the "Notify Users" workflow. In your user settings, you can specify your notification channel and language, or pause notifications for 14 days. However, administrators can still send you urgent reminders even if you have paused notifications.

General

Translated versions are not available until the policy has been assigned to language reviewers, approved, and published, and the responsible language reviewer has validated the translation. Until then, only the source-language version is available.

Once the expiration date has passed, the policy is automatically archived. The creator can then update it. This creates a new version with a higher version number.

Do you need further assistance?

If you have any questions or need further assistance with the Policy App, please contact our support team. We're happy to help you get the most out of the app.

Scroll up

Jamil Isayyed

Jamil is an experienced digital process professional, has a rich international background in the information technology and services industry spanning Germany, Greece and Palestine. He holds a Bachelor's degree in Computer Science and a Scrum Master certification from the Scrum Alliance with a focus on Computer Software Engineering. Jamil is passionate about leading and building high-performance teams that deliver exceptional experiences and create valuable opportunities for clients. In addition to his main role, he is the Director of Axsos Academy GmbH. In this role, he leads a dynamic German-Palestinian bootcamp designed to help young people enter the IT market and build a successful career.

Bernd Length

Bernd Länge has been working in the IT industry for over 20 years and advises clients and interested parties on cyber security issues as well as on the development and implementation of information security management and data protection. In this role, he acts as an external data protection and information security officer for clients. It is important to him to take a pragmatic approach and work closely with clients, partners and vendors to ensure that clients' enterprise security is up to date.

Martin Müller

As a technology enthusiast and committed leader, he has been helping companies in the IT sector to shape the future of work for over 20 years. Thanks to his quick thinking and ability to develop effective solutions, he is able to formulate a clear vision of what our future way of working will look like. Step by step, he overcomes challenges and drives us forward into the future. However, he does not accomplish these tasks alone. He has a competent team that he trusts completely and can rely on. Together they overcome every hurdle! Through positive, critical thinking, the second-best solution often leads to incremental success - after all, even an empire wasn't built in a day. This approach makes him unique in his role and he looks forward to working with you on the path to the future.

Rolf Stephan

His enthusiasm for information technology led Rolf to study computer science and graduate from the University of Karlsruhe, now the KIT / Karlsruhe Institute of Technology. Rolf has been working in the IT sector ever since and knows the industry inside out - both nationally and internationally. For more than 25 years, he has focused on international cooperation between experts across all cultures. He also pursued this approach in the first company he founded, AD Solutions AG, which quickly developed into a renowned international IT service provider with several branches in Germany, Switzerland, Austria and the USA. Rolf Stephan has been General Manager since 2010 and CEO of AXON IVY AG, headquartered in Switzerland, since 2021. He has been an investor, shareholder and Chairman of the Supervisory Board of Axsos AG since 2009.

Frank Müller

Frank is a passionate IT expert and visionary entrepreneur. He loves and believes in peace and freedom. For him, these values are more than just words. They are the result of great awareness, responsibility and a solid foundation. His foundation is his faith in Jesus and his unconditional love for people. Frank builds his great visions on this foundation, such as his commitment to peace in the Holy Land. He is not afraid to realize creative and unconventional ideas, such as founding a medium-sized company that spans four countries and cultures and offers its employees a great deal of freedom. Founding a bootcamp academy in the midst of the coronavirus pandemic is certainly one of these ventures. Through these efforts, Frank creates new innovations and added value for his customers and the people who travel with him. With more than 32 years of IT experience and 15 years as an entrepreneur, Frank helps other entrepreneurs focus on their core business and translate their needs into technology opportunities and implementations. His team and he can translate these requirements into a customized IT strategy, processes and technologies. Frank always has a heart for the people he supports and wants to encourage them to break new ground and develop their potential. Frank is open to exchanging ideas with people who see values not as CSR or marketing chatter, but as the basis of their actions. He seeks contact with people who want to change the world for the better. He also welcomes those who are looking for support from him or his team on their journey into the cloud, digitalization or the use of AI.